
Refrigerator Leaking Inside: How to Fix It
A blocked defrost drain was the leading identified cause among 699 refrigerator leak visits, with a $360 median repair cost in one independent appliance-water-damage dataset. When your refrigerator is leaking inside, start by locating where water first appears, then check the defrost drain before replacing parts.
You open the door expecting cold leftovers and find a puddle under the crisper drawers instead. The floor may still be dry, but that doesn't make the problem harmless. Water can remain hidden behind drawers, travel through insulation, damage cabinetry, or eventually escape beneath the appliance.
The financial difference between a contained appliance problem and widespread water damage can be substantial. One guide estimates that an ignored refrigerator leak can cause $500 to $2,500 in floor damage, while restoration costs may reach $6,000 to $15,000 when water spreads into an adjacent room and $15,000 to $30,000 or more when long-term moisture contributes to structural or mold complications (HomeFixx refrigerator leak guidance).
Table of Contents
- Diagnosing Why Water Is Pooling in Your Fridge
- The Defrost Drain System and How It Fails
- Step-by-Step Guide to Clearing a Clogged Drain
- Troubleshooting Other Internal Water Issues
- When to Call a Professional Plumber
- Preventive Maintenance and Final Checkpoints
Diagnosing Why Water Is Pooling in Your Fridge
The first response shouldn't be random part replacement. Remove the water, dry the shelves and drawers, and identify the point where fresh moisture returns. A puddle beneath the crisper drawers points you toward the drainage path, while droplets on shelves or walls suggest condensation, poor sealing, blocked airflow, or a different source.
A refrigerator creates water during normal automatic defrosting. Frost melts, enters a trough, travels through a drain tube, and collects in a pan beneath the cabinet. You normally never see that water. When the route is blocked, it backs up into the freezer or fresh-food compartment.
Practical rule: Diagnose the water's starting point, not the place where gravity finally leaves it.
Before touching components, unplug the refrigerator if you need to remove panels or reach the drain. Dry the surrounding floor and cabinetry, especially if water is near wiring or an outlet. For broader household leak-location methods, this guide to detecting water leaks provides useful context, but refrigerator diagnosis still depends on tracing the appliance's internal water path.
Separate condensation from a true supply leak
Condensation usually leaves scattered droplets, damp walls, or moisture on containers. A door that doesn't close fully, a dirty or damaged gasket, frequent opening, high room humidity, or food blocking an air vent can let warm air enter and create water inside. Clean the gasket, check for tears or gaps, and confirm that containers and drawers aren't holding the door open.
A concentrated trail near the ice maker, water filter, or rear wall deserves a different approach. Refrigerators with dispensers and ice makers contain valves, tubing, filter housings, and connections that can leak independently of the defrost system. Water appearing after an ice-making cycle is a particularly useful clue.
The Defrost Drain System and How It Fails
The defrost drain is the first component to investigate because it handles water the refrigerator deliberately produces. During a defrost cycle, melted frost should flow from the evaporator area into a trough, pass through the drain opening, and reach the pan below. Food debris, dust, or ice can obstruct that narrow passage.
When the drain blocks, water may pool at the back of the freezer, freeze into a sheet on the freezer floor, or run into the fresh-food compartment. The symptom can look like a plumbing leak even though the water began as normal defrost meltwater. The SERVPRO refrigerator leak resource recommends unplugging the appliance, clearing the drain, and flushing it with warm water rather than boiling water.
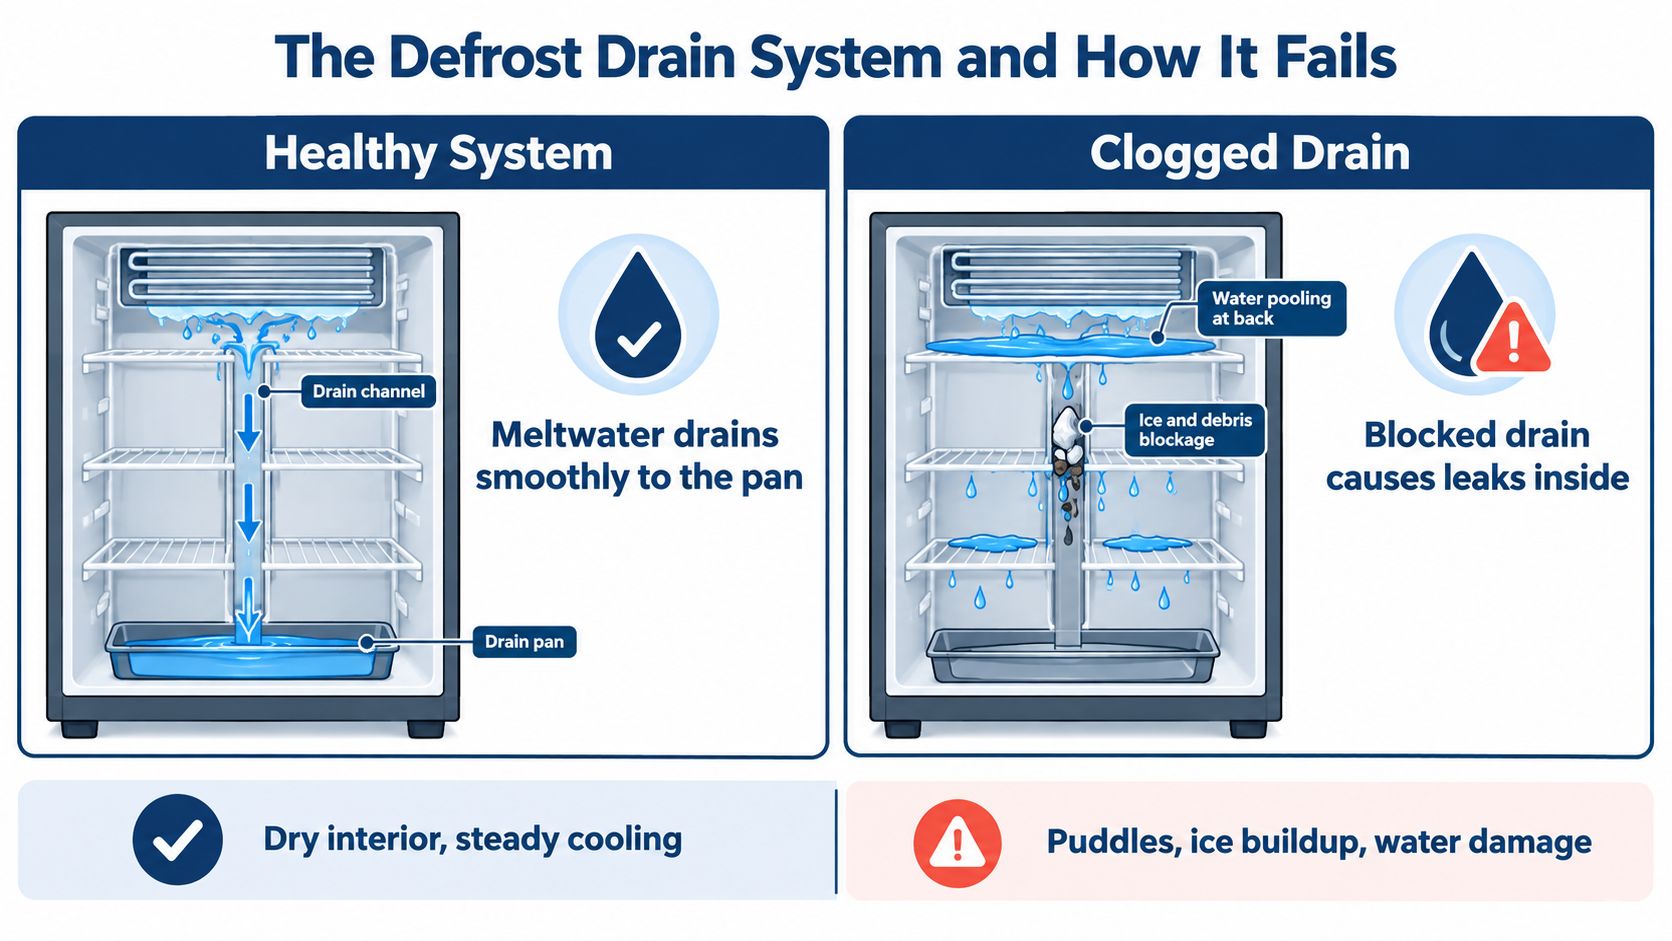
Use the location and timing of the water to narrow the source:
| Symptom | Likely Source |
|---|---|
| Water beneath crisper drawers | Clogged or frozen defrost drain |
| Ice or water on the freezer floor | Defrost drain obstruction or excessive frost |
| Droplets on walls and shelves | Condensation, poor gasket seal, humidity, or blocked airflow |
| Water near the filter | Poor seating, damaged seal, or filter housing problem |
| Water near the ice maker | Fill tube, inlet valve, tubing, or ice maker fault |
| Water after an ice-making cycle | Ice maker supply system or inlet valve |
A drain problem should produce a clear diagnostic result. After clearing and flushing, water should visibly move toward the drain pan underneath. If it doesn't, the passage may still be blocked, frozen farther down, or damaged. If it does flow freely but water continues pooling inside, investigate the pan, leveling, seals, and water-system components rather than repeating the same drain treatment.
Step-by-Step Guide to Clearing a Clogged Drain
Start safely. Unplug the refrigerator, remove food from the affected compartment, and take out drawers or shelves that obstruct access. Keep towels nearby because thawed ice and trapped water may release suddenly.
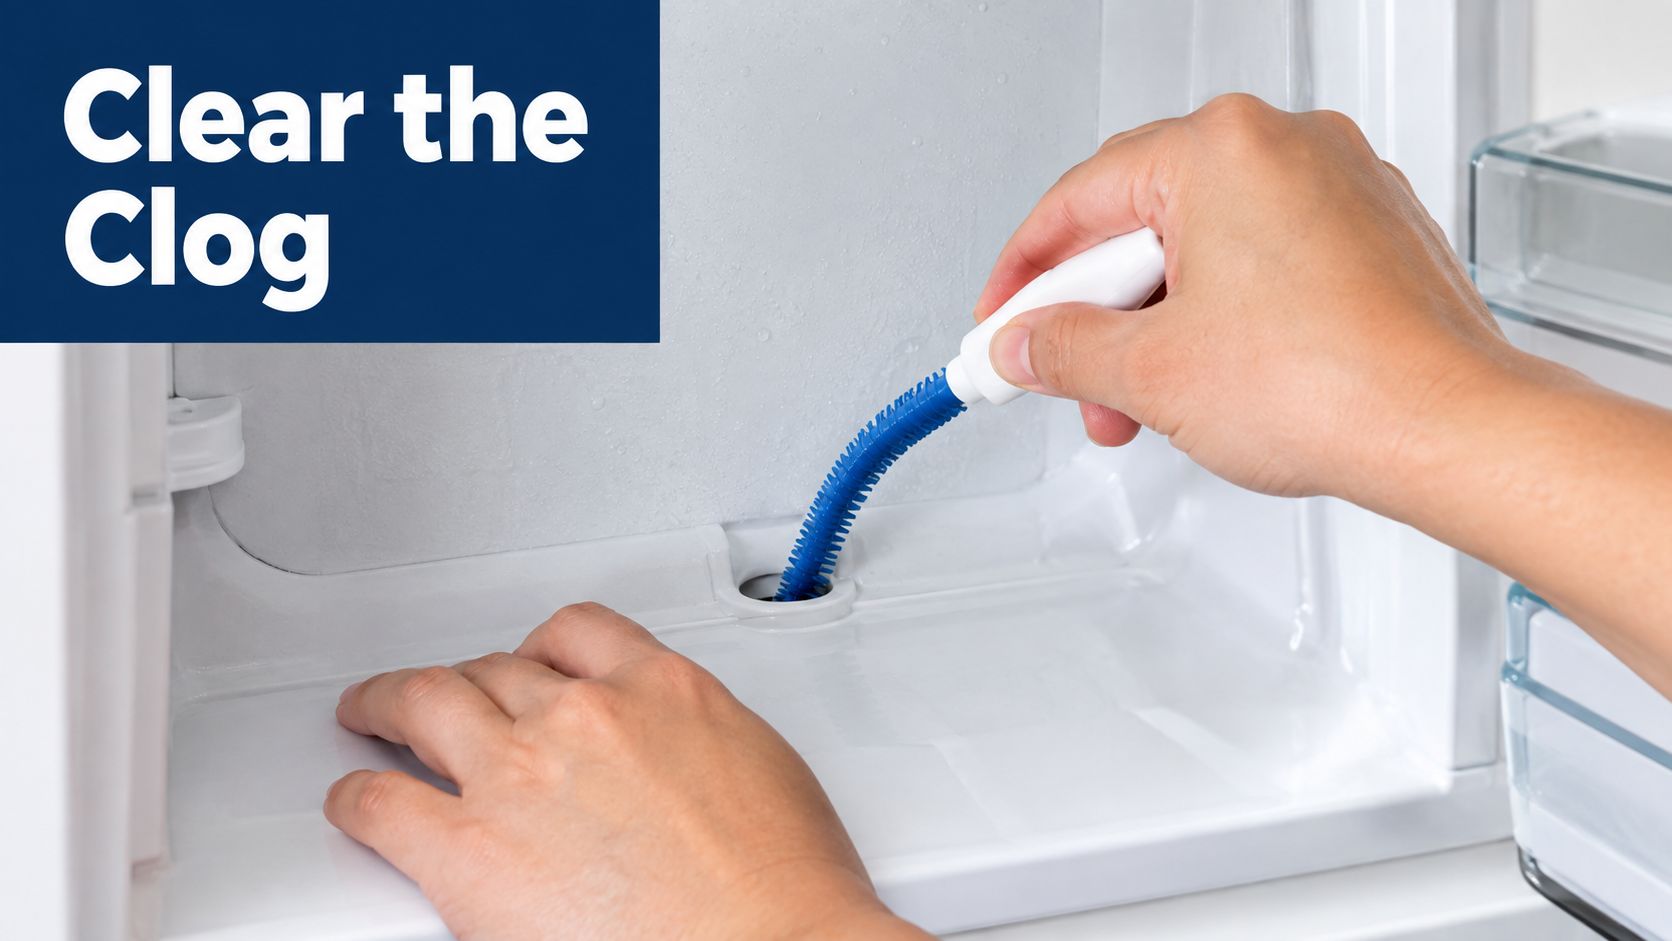
Clear the opening without damaging the cabinet
Locate the drain hole or trough according to the refrigerator's service instructions. Remove visible debris with a soft cloth or a small flexible brush. Don't use a knife, screwdriver, or other sharp object to chip ice. A punctured liner or damaged evaporator can turn a restricted drain into a major appliance repair.
Use a small flexible tool only far enough to loosen material at the opening. Then apply warm water with a turkey baster, syringe, or similar tool. Warm water helps dissolve ice and carry debris through the tube, while boiling water can warp plastic components or damage the liner.
Flush gradually until you see water reach the drain pan beneath the refrigerator. Immediate visible flow is the key test. If water rises back into the compartment, stop and reassess rather than forcing more pressure into the tube.
Confirm the repair
Dry the cabinet, restore power, and watch the original problem area. A successful clearing should stop the recurring puddle, but a drain that freezes again indicates a deeper issue such as a defrost fault, damaged drain component, or airflow problem.
For general non-chemical drain techniques, this resource on how to unclog a drain without chemicals explains the same preference for mechanical and warm-water methods. If water is spreading beyond the appliance or you can't isolate the source, a service focused on emergency drain cleaning Stultz offers a useful example of when professional response becomes more appropriate.
A visual walkthrough can help you compare access and flushing technique:
Troubleshooting Other Internal Water Issues
If the drain clears and water still appears, don't keep flushing it. The next step is to test the components that can imitate a drain blockage.
Start with the drain pan and trough. A cracked, warped, or displaced pan can let water escape before it reaches the intended collection point. A clear drain doesn't compensate for a pan that can't hold or direct meltwater. Access may require removing an interior panel, so follow the appliance manual and avoid forcing brittle plastic.
Check level and airflow
An out-of-level refrigerator can overflow a pan lip or alter the path of water through the trough. Place a level on a stable interior shelf or the cabinet surface, then inspect the appliance's adjustable feet. Don't make large adjustments without checking that both doors still close and seal correctly.
A refrigerator that runs too little may also fail to evaporate collected water efficiently, although this is less common than a blocked drain. Look for abnormal cooling, temperature changes, or heavy frost rather than replacing a compressor based solely on interior moisture.
Inspect the door and water system
Clean the gasket and examine its full perimeter for hard sections, tears, gaps, or areas that pull away from the cabinet. Make sure containers aren't preventing closure. If moisture appears across shelves and walls rather than collecting in one low point, condensation from humid air is more likely than a single drain failure.
If the water is near a filter, verify that the filter is fully seated and that its housing isn't cracked. Around an ice maker, inspect for frozen trails, loose tubing, or water that appears during the fill cycle. Water-line work can expose hidden damage, so this guide to ways leaks can damage drywall is a useful reminder to inspect nearby walls and cabinetry when moisture escapes the appliance.
When to Call a Professional Plumber
A homeowner can often dry the cabinet, inspect the gasket, clear an accessible drain, and verify visible connections. Professional help becomes the safer choice when the leak involves a pressurized water line, electrical components, concealed tubing, or repeated failure after a basic drain clearing.
Call an appliance technician when the refrigerator has heavy recurring frost, abnormal cooling, a suspected defrost-system failure, or an internal component that requires substantial panel removal. Call a licensed plumber when the supply line, shutoff, wall connection, or surrounding plumbing is leaking. These are different trades, and identifying the boundary prevents an appliance repair from turning into an unresolved plumbing leak.
Water near electrical connections changes the priority. Disconnect power only when you can do so safely, shut off the appliance water supply if appropriate, and stop using the refrigerator until the source is controlled.
For Los Angeles homes, an active leak can damage flooring, baseboards, cabinets, and drywall before the source becomes obvious. If water is running, spreading into multiple areas, or reaching an adjacent room, close the appliance stop or main shutoff when necessary and arrange emergency service. This 2026 water extraction guide explains why prompt removal matters once water has moved beyond the appliance.
Don't order a replacement inlet valve, drain pan, or gasket based only on appearance. Use the complete refrigerator model number and confirm the failed part first. A diagnosis costs less than installing the wrong component and leaving the original leak active.
Preventive Maintenance and Final Checkpoints
Once the refrigerator is dry, prevention comes down to keeping water moving, keeping humid air out, and catching changes early. Wipe spills and food residue from the interior, keep vents clear, and avoid pressing containers against the rear wall. Clean the door gasket so it can make continuous contact with the cabinet.
A major manufacturer recommends preventive drain flushing once or twice per year, according to the guidance summarized by Whirlpool's refrigerator leak resource. Use warm water and a suitable baster or syringe, never boiling water or sharp tools. The exact access point varies by model, so the owner's manual should control if it gives different instructions.
Use a simple inspection routine
- Check the cabinet floor: Look beneath the crisper drawers and along the rear wall for returning moisture.
- Test the door seal: Clean the gasket and confirm the door closes without obstruction.
- Watch the freezer: Ice buildup or water on the floor can signal a drainage or defrost issue.
- Inspect water connections: Look around the filter, ice maker, tubing, and rear supply connection.
- Protect airflow: Keep vents open and avoid overpacking shelves.
- Record changes: Note whether water appears after defrosting, door openings, filter replacement, or ice-maker operation.
The useful distinction is not “leak” versus “no leak.” It is where water starts, when it returns, and whether the drain carries it away. That logic keeps you from replacing a valve when the core problem is condensation, or repeatedly clearing a drain when a cracked pan or failed defrost system needs attention.
For broader household prevention, this drain maintenance guide offers practical habits for reducing avoidable water problems. If the refrigerator is still leaking after these checks, stop wiping and guessing. Isolate the water supply, protect the flooring, and get the correct technician involved.
EZ Plumbing provides licensed, insured plumbing service in Los Angeles, including emergency response, drain cleaning, water-line diagnostics, and same-day scheduling for planned repairs. If your refrigerator leak has spread beyond the appliance or you can't isolate the supply connection, visit EZ Plumbing to request service and protect your home from further water damage.