
Toilet Water Line Repair and Replacement Guide
You notice the wet spot after the toilet finishes filling. At first, it looks like condensation or a splash from the bowl. Then you touch the connector between the wall valve and the tank and find a slow drip working its way down the braided hose. In a Los Angeles bathroom, that small leak can soak the floor, stain the ceiling below, or keep returning after someone tightens the fitting.
A toilet water line, also called a toilet supply line, is the short connector carrying clean water from the shutoff valve to the toilet tank. It looks simple, but its performance depends on correct length, sound washers, proper alignment, a reliable angle stop, and reasonable water pressure. Replacing the hose without checking those conditions often treats the symptom rather than the cause.
Toilet fixtures also matter to household water demand. Older toilets installed before 1980 commonly used 5.0 to 7.0 gallons per flush, while modern low-flow toilets use 1.28 gallons per flush, and the average American flushes about 5 times per day. Toilets account for 24% of daily residential water use, according to Home Water Works' toilet water-use guidance. A reliable supply connection helps the fixture refill properly without creating an avoidable leak.
Table of Contents
- Introduction to Your Toilet Water Line and Why It Matters
- What a Toilet Supply Line Is and Where It Lives
- Choosing the Right Toilet Water Line Material
- How to Inspect Shut Off and Replace Your Toilet Water Line
- Why Your Toilet Water Line Keeps Leaking or Losing Flow
- Leak Prevention Tips and When to Call EZ Plumbing
Introduction to Your Toilet Water Line and Why It Matters
A toilet supply line usually goes unnoticed because it works in the background. You lift the handle, the tank empties, the fill valve opens, and water travels through that short connector until the tank reaches its set level. The line only gets your attention when the tank refills slowly, the hose starts dripping, or water appears behind the toilet.
Most of the calls I see fall into two groups. One is a single failed connection, often caused by a worn washer, a fitting that was overtightened, or a hose installed at an angle. The other is a repeat problem. Someone replaces the line, the toilet works briefly, and then the new connector leaks or the tank still fills poorly. That second situation needs diagnosis, not another blind replacement.
Los Angeles homes give plumbers plenty of examples of why these problems repeat. Older bathrooms may have stiff shutoff valves, corroded threaded connections, cramped clearances, or supply points that don't line up neatly with the tank inlet. In multifamily buildings and HOAs, several units can share pressure and piping conditions, so a recurring toilet line issue may point to a branch restriction or a building-wide pressure concern.
What the line can tell you
A wet connection at the tank doesn't automatically mean the hose itself is bad. The leak may come from the tank-side washer, the angle stop, a damaged valve body, or a line pulled sideways by poor routing. Low flow can also originate at a partially closed stop, sediment in an inlet screen, or a restricted branch.
A quick visual inspection is reasonable when the line is accessible, the valve turns normally, and the leak is clearly limited to one connection. Shut the water off, relieve pressure, inspect the parts, and test carefully. Plan for a professional visit when the valve is corroded, the leak returns after replacement, pressure is excessive, or water has reached cabinetry, flooring, or a ceiling below.
Field rule: A new hose fixes a failed hose. It doesn't fix a bad shutoff valve, blocked inlet, crooked installation, or excessive pressure.
The rest of the job is about separating those conditions. The right repair may be a connector replacement, a washer change, an angle-stop repair, a fill-valve cleaning, or a pressure investigation.
What a Toilet Supply Line Is and Where It Lives
Start at the wall or floor behind the toilet. The pipe coming through the finished surface is the stub-out. The angle stop threads or attaches to that supply point and controls water entering the fixture. From the angle stop, the flexible supply line runs upward to the threaded inlet on the bottom of the tank, where it connects to the fill valve.
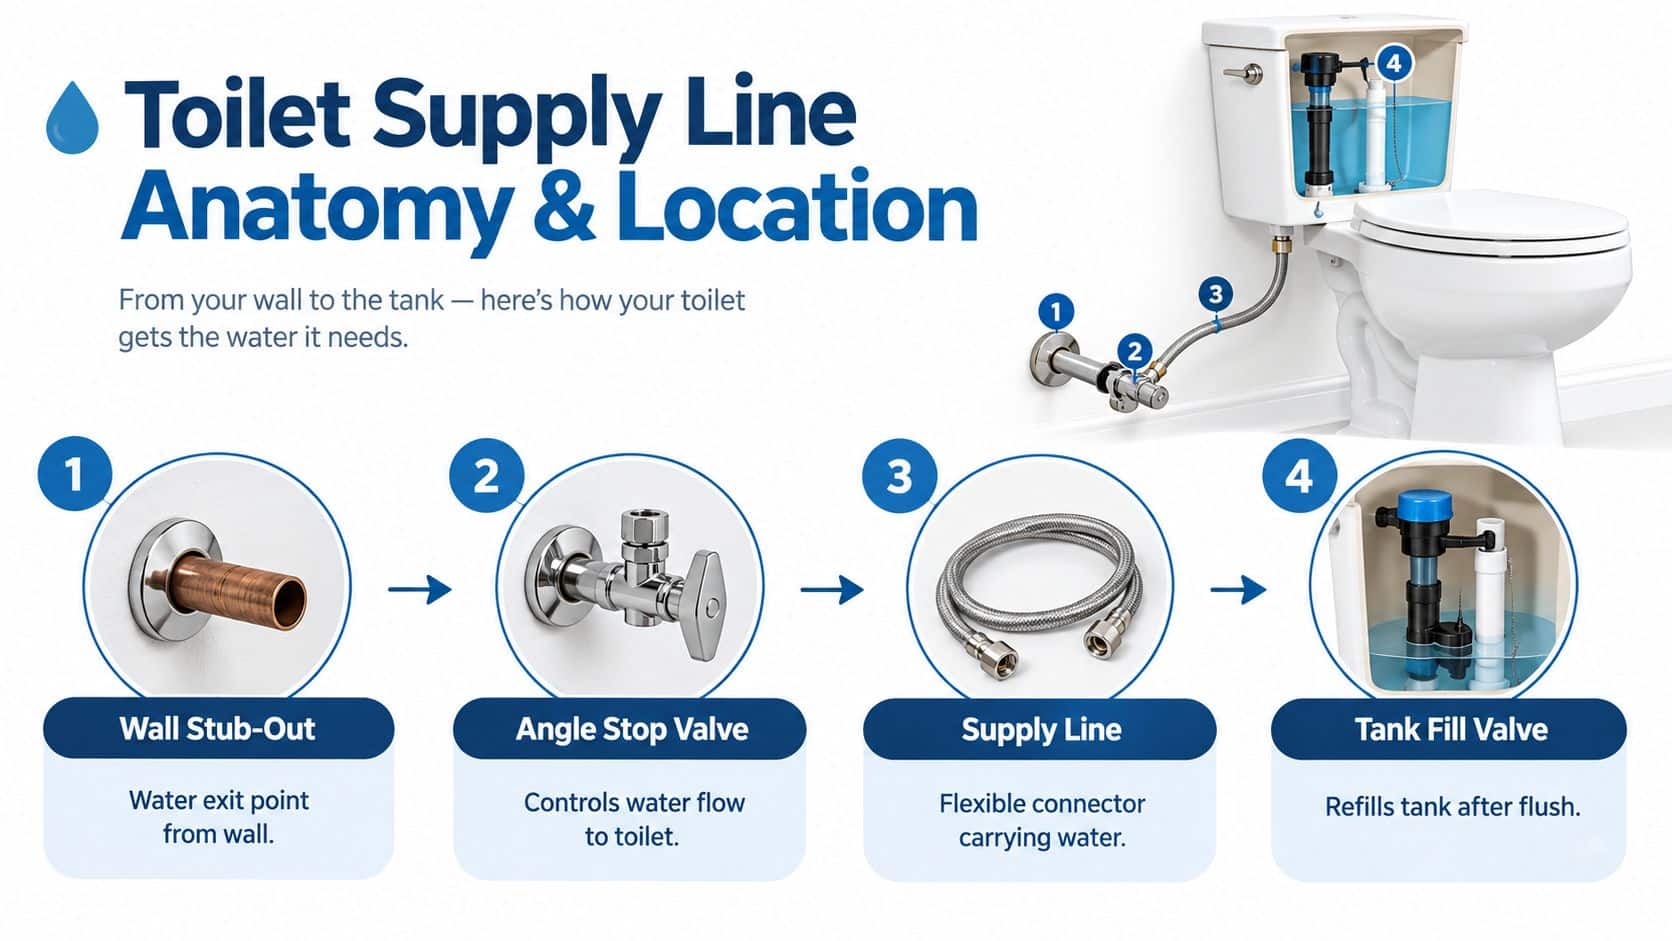
The line is normally visible behind the bowl, although modern toilets can conceal portions of the connection. Don't assume a hidden connection is safe because you can't see it. A small mirror, flashlight, and dry paper towel can reveal moisture around the valve, hose, or tank inlet.
Map the plumbing before buying parts
Measure from the outlet of the angle stop to the tank inlet, following the route the line will take. Don't measure in a straight diagonal if that path would pull the hose sideways or force a sharp bend. A line that's too short stays under tension. One that's too long may loop behind the bowl and rub against the wall or porcelain.
Standard rough-in guidance places the supply connection ideally about 8 1/4 inches above the finished floor, commonly within a 5 to 10 inch range, with the wall opening about 6 inches from the toilet centerline in common layouts. Replacement lines are commonly available in 12, 16, or 20 inches, dimensions discussed in The Spruce's plumbing rough-in guide. Those measurements aren't a substitute for measuring your actual bathroom. Remodeling, thick baseboards, tile, and unusual toilet shapes can change the usable route.
Look for these conditions before disconnecting anything:
- Kinks: A tight bend can reduce flow and place stress on the hose ends.
- Side pull: The connector should meet the tank inlet without forcing the fitting sideways.
- Rubbing: Contact with a sharp wall edge or porcelain can damage the outer jacket over time.
- Corrosion: Green, white, or crusty deposits can indicate a leaking washer or deteriorating valve.
- Restricted access: A cramped gap may require a basin wrench or compact adjustable wrench rather than force.
Identify the existing line
Braided stainless lines have a woven metal exterior over an inner tube. Reinforced polymer lines use a plastic or composite body and can be easier to route in tight spaces. Older vinyl connectors may look plain, yellowed, hardened, or discolored. The exterior appearance matters, but the condition of the nuts, washers, valve, and installation angle matters just as much.
Before choosing a replacement, check the connector ends and the tank inlet size. Match the existing configuration rather than assuming every toilet uses identical hardware. If the angle stop doesn't close fully or begins leaking around its stem when operated, replacing only the flexible line may leave you with a second repair immediately afterward.
Choosing the Right Toilet Water Line Material
The cheapest connector on the shelf isn't always the least expensive choice after labor, cleanup, and a second leak are included. Material selection should follow the installation environment. A homeowner with an open, dry bathroom has different priorities from an HOA maintaining concealed fixtures across multiple units.
Braided stainless is a common choice where durability and resistance to ordinary handling matter. It tolerates modest movement and is easy to inspect, but the braid doesn't make an incorrectly routed line safe. If the hose is sharply bent, pulled sideways, or rubbing against a hard edge, the metal exterior can hide stress on the inner tube.
Reinforced polymer can be useful in cramped spaces because it may bend more readily without the same visual bulk. It still needs a smooth route and properly seated washers. Don't choose it because it feels flexible. A soft connector that kinks behind the toilet can restrict tank refill and place strain on the ends.
Older vinyl-style lines deserve closer inspection. If the material has hardened, cracked, swollen, or become discolored, replacement is sensible even if the current leak is small. The washer may be the actual failure point, but an aged connector isn't a good foundation for a repair.
For additional context on how plumbing materials fit into a home's broader piping system, see this practical guide to residential plumbing pipe types.
Toilet Water Line Material Comparison
| Material | Durability and Best Use | Watch Outs |
|---|---|---|
| Braided stainless steel | A practical choice for exposed residential bathrooms, rentals, and installations where inspection is easy | The braid can conceal inner-tube damage, and a tight bend or side load can still cause failure |
| Reinforced polymer | Useful where the route is compact and a smoother bend helps avoid strain | Kinking, overtightening, and poorly seated washers can restrict flow or create leaks |
| Older vinyl | May remain serviceable in a clean, undisturbed installation when flexible and undamaged | Hardening, cracking, discoloration, and aged washers are reasons to replace rather than reuse |
Buy for the route, not just the fixture
Choose a length that reaches comfortably with a gentle curve. Don't use extra length to compensate for a poorly positioned valve, and don't stretch a short line to make it reach. The connector should be long enough to avoid tension but controlled enough that it won't form a loose loop.
Replace the angle stop at the same time when it won't shut off, leaks around the stem, feels seized, or shows substantial corrosion. A new supply line connected to a failing stop can create the false impression that the replacement hose didn't work. In a rental or multifamily setting, coordinated replacement of the stop and connector can prevent repeated service calls, especially where several bathrooms show similar age or installation conditions.
How to Inspect Shut Off and Replace Your Toilet Water Line
A clean replacement starts with pressure control, not with the wrench. Put a towel or shallow container under the connection, clear the area around the toilet, and protect the tank inlet from twisting while you work.
Follow the safe sequence
Close the angle stop. Turn the handle clockwise until it stops. If it spins without closing, leaks around the stem, or refuses to move, don't force it aggressively. The valve may need repair or replacement.
Flush and hold the handle down. This empties most of the tank and relieves pressure in the supply line. A small amount of residual water is normal, so keep the towel in place.
Inspect before disconnecting. Look at both nuts, the washers, the hose body, and the angle stop. White or green deposits, a flattened washer, a cracked nut, or moisture returning at the valve points toward more than a simple loose fitting.
Disconnect the tank-side fitting. Hold the fill-valve shank or the valve body steady so you don't twist the plastic hardware inside the tank. Loosen the connector nut with an adjustable wrench, then catch the remaining water.
Disconnect the wall-side fitting. Support the angle stop while loosening the supply-line nut. If the valve or stub-out moves in the wall, stop. Movement can damage the concealed connection.
Compare the old and new lines. Match the end fittings, washer arrangement, and usable length. A new connector shouldn't be forced onto incompatible threads or made to compensate for a misaligned valve.
Install the new line by hand. Seat the washer squarely and turn the nut by hand until it stops. The washer creates the seal in many toilet supply connections, so thread sealant or tape won't correct a washer that is missing, crooked, or damaged.
Tighten carefully. After hand-tightening, use a wrench for a modest additional turn, commonly about a quarter turn, while holding the mating valve or fill-valve hardware steady. Stop if the nut binds, the hose twists, or the tank fitting starts moving.
Route the line with a relaxed curve. Keep it clear of sharp edges, the wall, and the toilet base. Never leave it kinked just because the tank connection is reachable.
Open the valve slowly. Watch both ends as water returns. If the fitting immediately sprays or the valve won't control flow, close it and reassess rather than tightening harder.
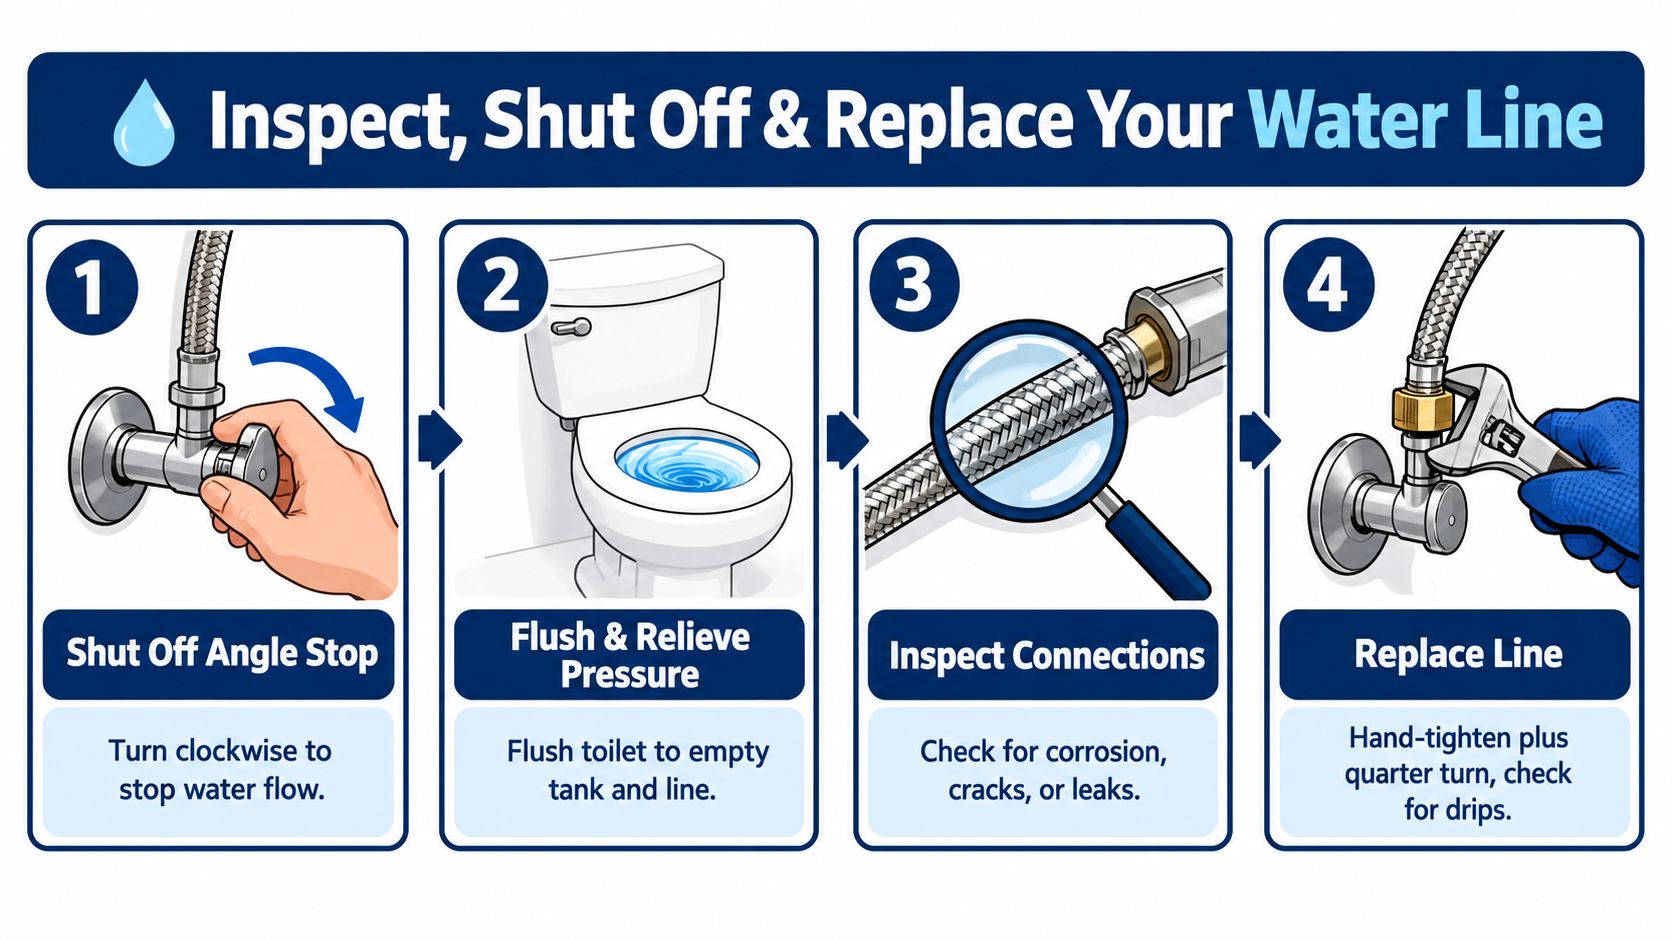
Dry the fittings with a clean paper towel and run your finger around each connection. A paper towel shows a slow seep more clearly than a quick glance. Let the tank refill, flush, and inspect again while the valve is under normal operating demand.
Don't replace parts blindly
If the toilet has been filling slowly or losing pressure, test before buying a new fill valve. The standard diagnostic sequence is to shut off the stop, flush to relieve pressure, disconnect the supply line, attach a gauge to the stub-out, and record static and flowing pressure. That process can separate a supply problem from a tank or fill-valve problem, as described in this toilet water pressure testing guide.
For a valve that leaks at the handle or won't close reliably, use this guide to a leaking shutoff valve as a reference point, but avoid turning a damaged valve repeatedly just to test it. A shutoff that fails during a leak can leave you searching for the building main while water continues to run.
You can also use the video below as a visual reference for the general replacement sequence.
Why Your Toilet Water Line Keeps Leaking or Losing Flow
Repeated failure usually has a pattern. A leak at one nut points toward a connection, washer, or mating surface. A hose that leaks in the middle suggests damage or aging. A fresh connector that still fills the tank slowly points farther upstream or downstream.
Use the symptom to choose the next test
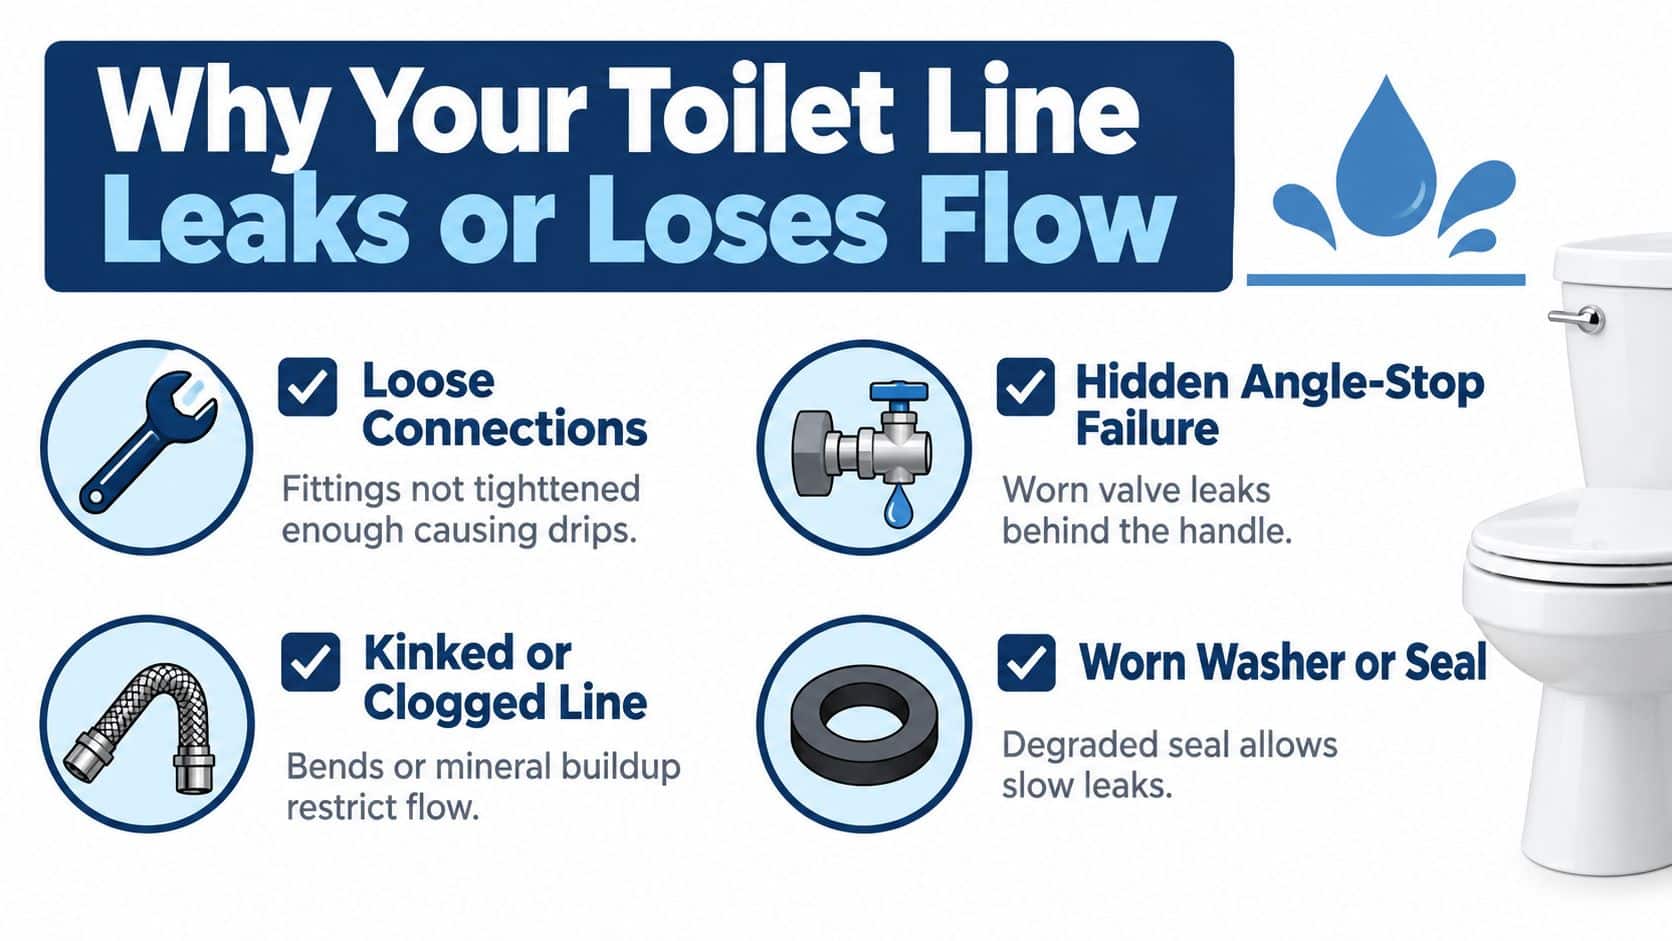
Connection leak: Dry the area completely, restore water slowly, and watch the exact first point of moisture. If the drip begins at the tank nut, inspect the washer and confirm that the fill-valve shank isn't turning. If it starts at the angle stop, the valve body, stem, or stop-side connection may be involved.
Hidden angle-stop failure: A valve can leak behind the handle or fail to open fully even when the supply line looks fine. Sediment and corrosion can also reduce the opening. Replacing the flexible connector won't restore flow through a restricted stop.
Sediment restriction: Debris can collect at the fill-valve inlet screen or inside the connector. If flow improves briefly after cleaning but declines again, look for upstream corrosion, disturbed pipe scale, or a deteriorating valve rather than treating the screen as the whole problem.
Pressure stress: Excessive pressure can stress the fill valve, washers, and flexible connector. Low pressure under flow can indicate a partially closed valve, blocked line, undersized branch, or heavy demand elsewhere in the building.
Measure static and flowing pressure
Attach a pressure gauge at the toilet shutoff or a nearby cold-water point. With all fixtures closed, record static pressure. Then open the toilet supply or another suitable fixture and record the flowing reading.
For standard toilet and fixture branches, guidance generally places minimum flowing pressure around 15 to 20 psig. Pressure-assisted or flushometer-style toilets typically need about 25 psig minimum. Static pressure shouldn't exceed 80 psig for those installations, and a home above 80 psi should use a pressure-reducing valve, according to bathroom plumbing code and pressure guidance.
A drop of more than about 20% from static to dynamic pressure is commonly treated as a warning sign for an undersized branch, partial obstruction, or high system demand. That doesn't identify the exact fault by itself, but it tells you that replacing the visible hose may not solve the problem.
Diagnostic shortcut: If a new line leaks again, stop asking which hose to buy. Ask which connection, valve, restriction, or pressure condition is making the hose fail.
In older housing and multifamily buildings, compare similar fixtures when possible. If several toilets refill slowly or show valve-related leaks, document the pattern for a plumber or property manager. A recurring issue across units deserves a system-level inspection.
Leak Prevention Tips and When to Call EZ Plumbing
Preventive work is less dramatic than emergency repair, but it protects the parts that are easy to overlook. Keep the supply line in a relaxed route, check the valve for smooth operation, and look behind the toilet during ordinary bathroom cleaning. A dry paper towel around the fittings can expose a slow seep before it reaches flooring or the room below.
Some current consumer and repair guidance recommends replacing flexible toilet supply lines at roughly 5 to 7 years, or when they're more than 5 years old, even without visible damage. The reasoning is practical. Corrosion, hardened rubber, and a damaged washer can develop unnoticed before the line produces an obvious puddle, as explained in this guidance on replacing toilet plumbing lines.
Match maintenance to the property
For an owner-occupied home, inspect the line whenever you clean behind the toilet or service the tank. For a rental, HOA, or commercial property, record the connector condition during unit turns and planned bathroom maintenance. Replace lines that are kinked, rubbing, visibly aged, or attached to corroded valves instead of waiting for a tenant or resident to report water.
Call a plumber when the angle stop won't close, the stub-out moves, the tank connection is cracked, pressure is outside the fixture's useful range, or the same toilet line fails again after replacement. Call promptly if water has reached a ceiling, wall cavity, cabinet, or finished flooring. In those cases, emergency water leak repair addresses the active damage while the plumber traces the source.
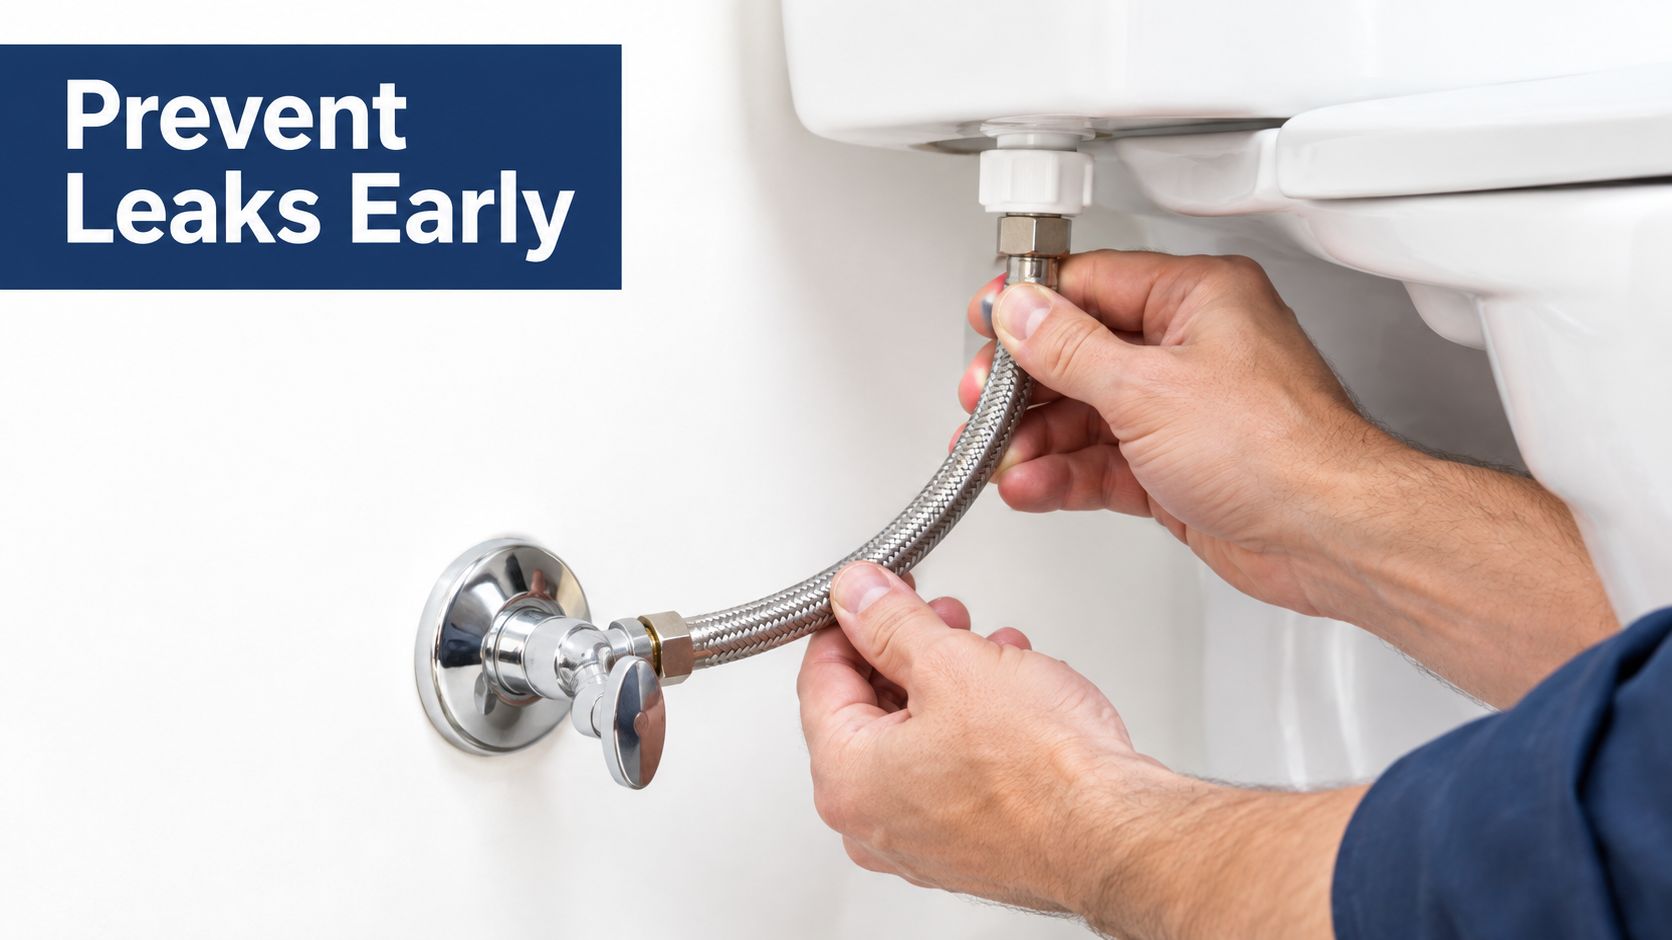
Modern low-flow toilets can reduce water demand, but they still need a clean, dependable refill path. A restricted line, failing stop, or pressure problem can leave an efficient fixture running poorly and can encourage unnecessary part swaps. A measured diagnosis is usually more useful than repeated tightening.
EZ Plumbing handles toilet water line inspection, repair, and replacement for Los Angeles homes, HOAs, property managers, and commercial properties, including urgent leaks and recurring supply problems. If your shutoff valve is failing, the line keeps leaking, or pressure and flow don't make sense, contact EZ Plumbing to schedule a same-day or 24/7 service response.