
How to Fix a Hot Water Heater: A DIY Troubleshooting Guide
You notice it at the worst time. The shower goes cold, the sink never gets warm, or you find water near the heater and start wondering if the whole unit just died.
Sometimes the water heater is the problem. Sometimes it isn't. That's where a lot of DIY advice goes off the rails. It jumps straight to parts replacement when the issue is a tripped breaker, a bad fixture, a mixing valve problem, or, in a multi-unit property, a circulation issue somewhere else in the system.
If you're trying to figure out how to fix a hot water heater, start like a plumber would. Rule out the dangerous stuff first. Then isolate whether the fault is in the heater, the controls, or the plumbing around it. That approach saves parts, saves time, and keeps you from making a small problem expensive.
Table of Contents
- Safety First Your Pre-Repair Checklist
- Diagnosing the Root Cause Is It Really the Water Heater
- Troubleshooting Common Tank Water Heater Problems
- How to Handle Tankless Water Heater Fixes
- Making the Call Repair or Replace Your Water Heater
- Preventive Maintenance and When to Call EZ Plumbing
Safety First Your Pre-Repair Checklist
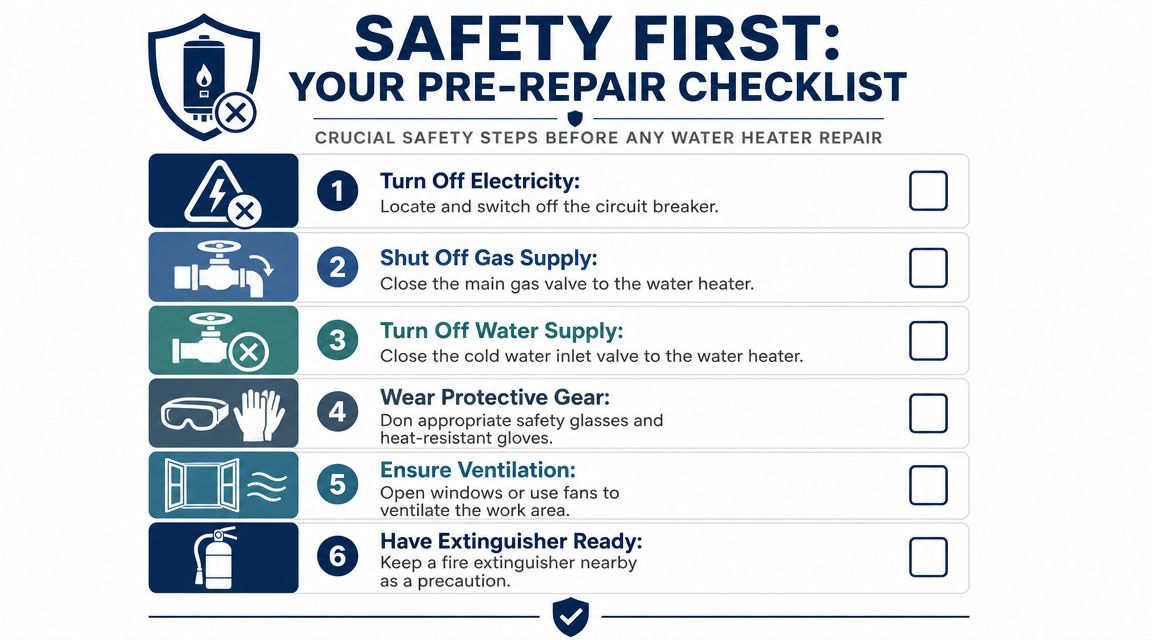
A water heater mixes electricity or gas, pressurized water, high temperatures, and metal parts in a tight space. That combination deserves respect. The safest repair is the one that starts with full isolation, not guesswork.
For an electric unit, the professional sequence is straightforward. Turn the breaker to OFF, verify zero voltage at the unit with a non-contact tester, then shut the cold-water supply and open a hot faucet to relieve pressure, as outlined in this electric water-heater isolation workflow. That order matters because powering an empty tank can destroy heating elements.
Shut everything down the right way
If you have a gas water heater, close the gas supply valve before touching anything else. If you smell gas at any point, stop troubleshooting. Leave the area, avoid switches or flames, and use a proper home gas leak warning guide to understand the next safe step.
If you need to drain the tank, attach a hose to the drain valve at the bottom and open hot taps elsewhere to help it flow. Before restoring power on an electric heater, refill the tank fully and confirm a nearby hot faucet runs steadily for about three minutes with no sputtering or air bubbles, according to this water-heater refill procedure. Then check for leaks before re-energizing the unit.
Practical rule: A thermostat dial is not a power disconnect. Always kill power at the breaker and prove the circuit is dead before removing an access panel.
What to have before you open a panel
You don't need a truck full of tools, but you do need the right ones:
- Non-contact voltage tester: Confirms the unit is de-energized.
- Multimeter: Needed for meaningful electrical diagnosis on electric heaters.
- Screwdrivers and nut drivers: For access panels, covers, and terminals.
- Adjustable wrench and channel-lock pliers: Useful for valves, fittings, and hose connections.
- Safety glasses and gloves: Hot water, rust flakes, and sharp sheet metal edges are common.
- A bucket, hose, and towels: Because even careful draining gets messy.
Good habits matter as much as tools. Anyone working around live panels or electrical equipment should understand basic worker electrical safety compliance, especially the idea that verifying de-energization is its own step, not an assumption.
Diagnosing the Root Cause Is It Really the Water Heater
“No hot water” sounds simple, but it isn't always a heater failure. One of the most common mistakes I see is replacing parts on a unit that's working fine while the actual issue sits in a fixture, a valve, or the distribution piping.
Authoritative guidance starts with the basic heater checks, but a big gap in most DIY articles is whole-home diagnosis. That's especially true in larger homes and multi-unit buildings, where a water heater problem can actually be a system problem.
Start at the fixtures, not the tank
Before you remove a panel or light a pilot, check where the problem happens.
Try this sequence:
- Test more than one fixture. Run hot water at the kitchen sink, a bathroom lavatory, and a shower.
- Compare symptoms. If one faucet has no hot water but the rest of the home does, the heater probably isn't your issue.
- Check the cold side too. Weak pressure on both hot and cold at one fixture points to a local plumbing problem, not the heater.
- Notice timing. If hot water starts fine and then turns lukewarm only at one shower, a mixing or anti-scald valve may be the culprit.
A single-fixture failure often means cartridge trouble, a blocked line, or a local valve issue. A whole-home failure points back toward the heater, its power source, or its fuel supply.
Clues that point away from the heater
These signs often mean you should stop blaming the tank:
| Symptom | More likely cause |
|---|---|
| Only one shower is affected | Shower cartridge or mixing valve |
| Hot water is fine in some units, not others | Building circulation, balancing, or distribution issue |
| Hot side pressure is weak at one sink only | Fixture stop, faucet issue, or local blockage |
| Water is warm but inconsistent at one location | Anti-scald valve or tempering issue |
In Los Angeles properties, that distinction matters. A condo resident may report no hot water when the actual fault is in a unit-specific valve. A property manager may hear complaints from one wing of a building when the water heater itself is still producing hot water.
If you want a broader look at common failure patterns before opening the heater, this water heater problem guide is a useful checkpoint.
If the problem affects one fixture, diagnose the fixture. If it affects the whole property, then suspect the heater.
Troubleshooting Common Tank Water Heater Problems
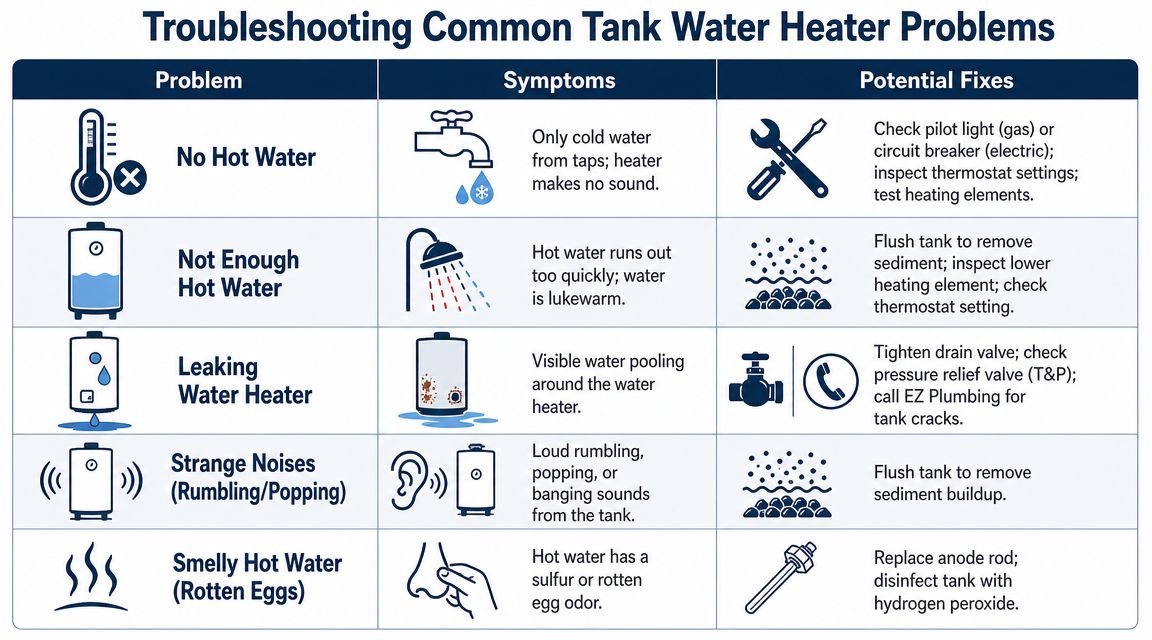
A tank heater can look dead when the underlying problem is smaller and repairable. It can also look repairable when it has crossed into unsafe territory. The goal here is to separate the common service calls from the jobs that should stop at diagnosis.
Tank-style units usually fail in predictable ways. Electric models lose power, trip a reset, or burn out an element. Gas models lose ignition, develop burner problems, or struggle with venting. Before replacing parts, confirm the issue affects the whole heater and not a tempering valve, recirculation problem, or another plumbing issue upstream or downstream. That distinction saves a lot of wasted effort, especially in larger homes and multifamily properties.
For homeowners comparing tank and on-demand systems, our guide to tankless water heater service and repair options covers the different failure patterns those units have.
No hot water
Start with the heat source.
For electric tank heaters, check the breaker first. If it has tripped once, reset it one time. If it trips again, stop there. A failed element, thermostat fault, or wiring problem may be pulling too much current. Remove access panels only after shutting off power and verifying it is off with a tester. These units carry enough voltage to seriously injure you.
Then check the thermostats and high-limit reset. If the reset trips again after you press it, there is an underlying fault. At that point, testing the upper and lower elements with a multimeter makes sense if you are comfortable working around electrical components. An open element often means that part can be replaced without replacing the whole heater.
For gas tank heaters, verify the gas supply is on and confirm whether the pilot or electronic ignition is working. If the pilot will not stay lit, the problem is usually in the thermocouple, gas control valve, or combustion air conditions. If the burner area is dirty or the vent is drafting poorly, the heater may fail to fire safely. Soot, scorch marks, or a gas smell are reasons to stop and call a licensed plumber or gas technician.
A good symptom-matching reference is this homeowner's guide to water heater fixes. Use it to narrow the likely fault, then keep the repair within your skill level.
Here's a visual walkthrough that helps if you want to compare symptoms and basic checks before you start replacing parts.
Not enough hot water
Partial hot water points to a different set of failures. The heater is working, but it is not keeping up, not heating fully, or not storing as much usable hot water as it should.
Common causes include:
- Sediment buildup in the tank: Mineral accumulation insulates the water from the burner or lower element and reduces recovery.
- A failed lower element on an electric heater: The unit may still produce some hot water, especially at first, but run out fast.
- Thermostat settings that are too low: Many homes do well around 120°F, but the right setting depends on scald risk, household needs, and whether a mixing valve is installed.
- A broken dip tube: Cold incoming water can mix near the top of the tank, so showers go lukewarm sooner than expected.
- An undersized heater for the household: This is common after renovations or when occupancy increases.
If recovery used to be better and has slowly gotten worse, sediment is high on the list. A careful tank flush can help, though old drain valves sometimes clog or start leaking after they are disturbed. I tell homeowners to be realistic here. If the heater is older, noisy, and already showing rust, a flush may not buy much time.
Leaks around the heater
Start by finding the highest wet point. Water travels, and the puddle on the floor is often not the true source.
Check these areas in order:
- Hot and cold connections at the top: Loose fittings can drip down the jacket and mimic a tank leak.
- The temperature and pressure relief valve and its discharge pipe: Active discharge means the heater is dealing with excess temperature, excess pressure, or both.
- The drain valve near the bottom: These can seep after age, impact, or an attempted flush.
- Condensation on a gas vent or cold piping: In some cases, what looks like a leak is moisture forming and dripping.
- The tank body, lower seam, or rusted jacket: Water coming from the tank itself usually means the glass-lined tank has failed internally.
Water at the base is not enough to condemn a heater. Water seeping from the tank shell or a rusted bottom seam usually is.
Never cap a relief valve discharge to stop dripping. That valve is a safety device, not a nuisance part.
Rumbling, popping, and other noises
Noise usually means sediment. On gas heaters, water gets trapped under mineral deposits at the bottom of the tank and flashes into steam as the burner heats that layer. On electric heaters, scale can build up around the lower element and make heating less efficient.
A light crackling sound on an older unit is common. Loud popping, banging, or repeated rumbling means maintenance is overdue and efficiency has already dropped. Flushing may reduce the noise. It will not reverse heavy scale or fix a tank that is near the end of its life.
Smelly hot water
If the odor shows up only on the hot side, the heater is a likely suspect. In many homes, that smell comes from a reaction involving bacteria and the anode rod inside the tank.
Start by checking whether the smell is present at every hot fixture or only one. If it is only one faucet, return to the fixture before blaming the tank. If the smell is system-wide on hot water only, sanitizing the heater or replacing the anode rod may solve it. If the unit also has rust-colored water, leakage, or visible corrosion, skip the experiment and get a professional diagnosis. At EZ Plumbing, this is the point where we usually see homeowners spend money on parts when the tank itself is already telling them it is done.
How to Handle Tankless Water Heater Fixes
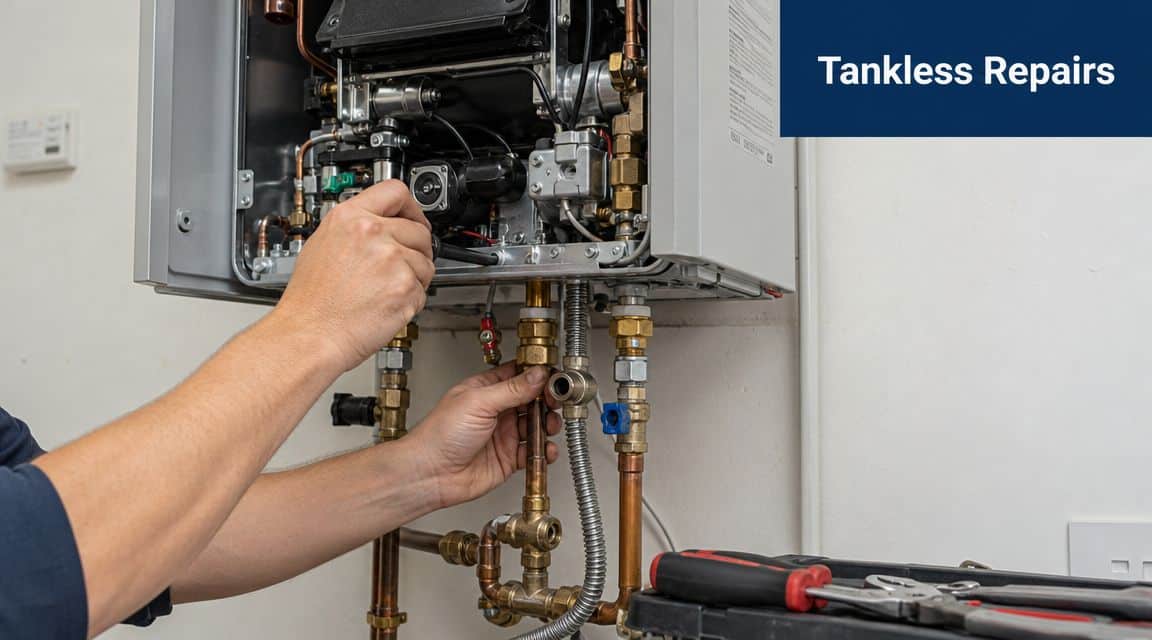
Tankless units changed the repair game. They don't store hot water in a tank and then reheat it. They heat water on demand, which means the failure points move away from classic tank issues and toward flow, ignition, scaling, sensors, and electronics, as explained in the Department of Energy overview of demand-type systems.
What makes tankless troubleshooting different
Tankless diagnosis starts with a different question: is the unit failing to fire, or is water flow failing to trigger it?
Common tankless trouble spots include:
- Ignition and flame-sensor faults
- Scale buildup inside the heat exchanger
- Recurring electronic or venting-related errors
- Restricted flow through the unit
Independent repair guidance also notes that tankless systems often involve ignition or flame-sensor issues and need annual descaling, especially in hard-water areas, in this tankless maintenance and diagnostic video. In Southern California, hard water turns skipped maintenance into repeat callbacks.
If your unit is short-cycling, throwing repeated error codes, or producing inconsistent temperature, don't treat it like a tank heater. The parts, sequence, and likely causes are different. For model-specific support and service options, this tankless water heater service page is one way to compare what your system may need.
Safe maintenance you may be able to do yourself
Some tankless maintenance is reasonable for a careful homeowner. Some isn't.
What may be DIY-friendly:
- Cleaning the inlet screen or filter: If your model provides safe access and the manual allows it.
- Descaling the unit: Many tankless systems need periodic flushing to remove mineral buildup.
- Visual inspection of vent and intake terminations: Only for obvious blockage or damage you can safely see.
What usually crosses the line into pro work:
- Repeated ignition failures
- Anything involving gas components
- Persistent venting faults
- Flame-sensor replacement or burner work unless you know the model well
A tankless heater that keeps throwing the same fault after cleaning usually has a deeper cause. Don't keep resetting it and hope for a different outcome.
The biggest mistake with tankless systems is treating maintenance as optional. It isn't. Descaling and sensor cleanliness aren't “nice to have” tasks on these units. They're basic operating requirements.
Making the Call Repair or Replace Your Water Heater
You get one lukewarm shower, reset the heater, and start pricing parts. Before spending money, determine what failed. I've seen homeowners replace a thermostat, heating element, or even a full heater when the problem was a bad mixing valve or another whole-home issue that kept blending cold water into the hot line.
The repair-or-replace call comes down to three things. The condition of the unit, the type of failure, and whether the fix solves the root problem or just buys a little time.
When repair still makes sense
Repair is usually the right call when the heater has one clear fault and the rest of the system is in decent shape.
| Situation | Repair outlook |
|---|---|
| One failed electric element | Often worth repairing |
| Single thermostat issue | Usually a reasonable fix |
| Minor valve issue with no tank corrosion | Often repairable |
| Performance issue tied to overdue maintenance | Usually worth correcting |
For tank heaters, a targeted repair makes sense when the tank body is sound, there's no water at the base, and the burner or elements have been otherwise reliable. A bad heating element, thermostat, gas control issue, or relief valve can often be fixed without throwing good money after bad.
Tankless units need a different standard. If the heat exchanger is sound and the problem tracks back to scale buildup, a dirty inlet screen, a flow sensor issue, or a venting or combustion code that has a specific cause, repair is often justified. The key is making sure the diagnosis is specific. Repeated error codes with no clear cause usually mean the problem is larger than one simple part swap.
When replacement is the smarter move
Some failures settle the question fast.
Replace the unit if the tank itself is leaking. A tank-body leak is not a repair item. The same goes for severe corrosion at the shell, heavy rust at connections that have been leaking for a while, or multiple major failures stacking up on an older unit.
Replacement also makes sense when you keep fixing symptoms instead of one root cause. That pattern shows up as inconsistent hot water after recent repairs, frequent shutdowns, or a heater that still struggles after proper maintenance and confirmed correct gas, power, and water conditions.
A practical rule I use is simple. If the next repair is expensive and the heater already has age, corrosion, or a history of callbacks, replacement is often the less costly decision over the next few years. For homeowners comparing emergency options during a no-heat or no-hot-water situation, the Precision Air Solutions experts offer a good example of how urgent heating problems are evaluated by service pros.
One mistake that gets expensive
Don't approve a replacement until you know the heater is the failed component.
If hot water is weak at every fixture, the heater is a likely suspect. If one shower goes cold while sinks stay hot, or if temperature swings happen after someone uses another fixture, look beyond the heater first. A failing shower cartridge, tempering valve, recirculation crossover, or whole-house mixing valve can mimic water heater trouble and lead to a completely unnecessary replacement.
That distinction matters even more with tankless systems. Many older DIY articles treat every hot-water problem like a storage tank issue. Modern tankless units shut down for airflow, ignition, flame-sensing, condensate, scale, and sensor faults that do not mean the unit is worn out. Replace a tankless heater only after those causes have been tested and ruled out.
If the diagnosis is clean and the repair is limited, fix it. If the tank is leaking, the unit has multiple age-related problems, or the actual cost is a string of repeat service calls, replacement is the smarter call.
Preventive Maintenance and When to Call EZ Plumbing
A lot of emergency calls start the same way. The water was getting noisier, showers were less consistent, or the tankless unit had been throwing the same fault on and off for weeks. Then one morning there was no hot water at all.
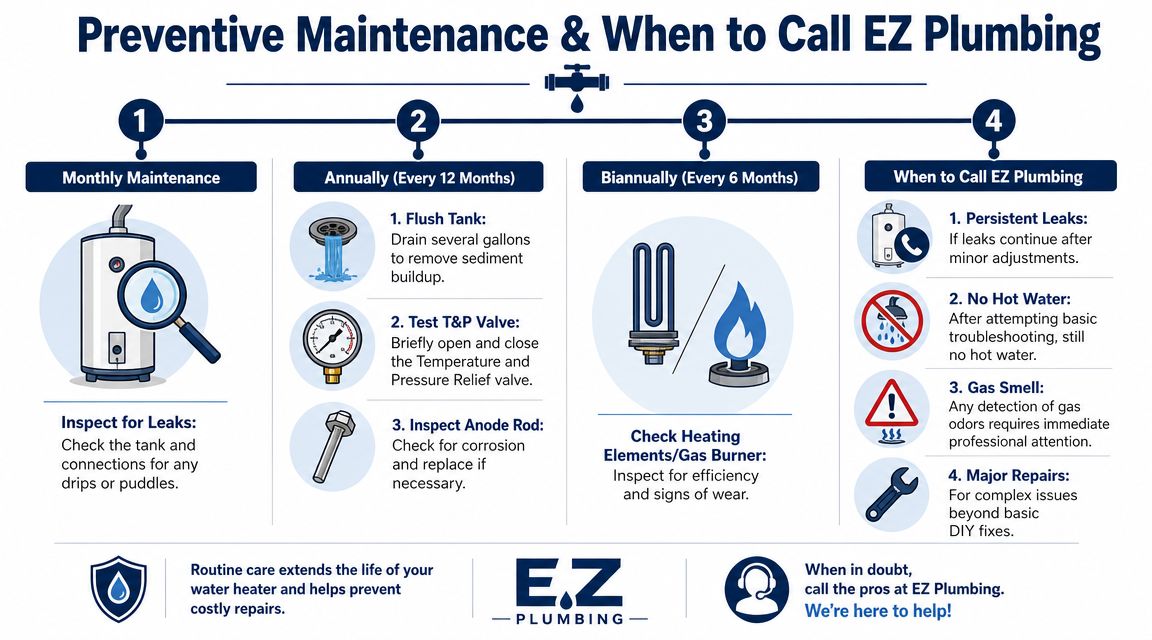
Good maintenance is less about doing a big annual chore list and more about catching small changes early. A heater that starts popping, short-cycling, dripping at a fitting, or taking longer to recover is usually giving you a warning. The same goes for tankless units that work fine at one faucet but struggle during higher flow. That pattern can point to scale, a dirty inlet screen, venting trouble, or a plumbing-side issue outside the heater itself.
Simple upkeep that prevents bigger failures
For tank heaters, routine flushing helps limit sediment that causes rumbling, uneven heating, and extra wear on the burner or elements. For tankless units, the equivalent job is periodic descaling where water quality and manufacturer guidance call for it. Skip that on a tankless heater and you can end up chasing error codes that look electrical or mechanical but are really flow and heat-exchanger problems.
Use this short checklist:
- Check for leaks: Look at the floor, drain valve, shutoff connections, and flex lines.
- Watch the hot water pattern: If every fixture is affected, the heater is a stronger suspect. If one shower is the problem, check the cartridge, mixing valve, or crossover first.
- Set a sane temperature: Around 120°F is a practical baseline for many homes, as noted earlier.
- Listen for changes: Popping, sizzling, or new fan and ignition noises matter.
- Inspect venting and air intake on gas units: Loose vent sections, blockage, or corrosion need prompt attention.
- Clean inlet screens and service filters on tankless systems if the manufacturer calls for it: Restricted flow creates misleading symptoms.
Gas work deserves extra caution. If you disconnect gas piping, reconnecting it safely is the job, not just getting the burner lit again. Any smell of gas, any doubt about the vent, or any sign of rollout, scorching, or improper draft means stop and bring in a licensed plumber.
Some homeowners like seeing how other trades handle urgent combustion equipment problems. The Precision Air Solutions experts make the same point heating technicians and plumbers learn fast. Once safety is in question, fast diagnosis beats trial-and-error.
Stop and call for help when these show up
Call a pro if you see any of the following:
- Gas odor
- Water leaking from the tank body
- Burn marks, melted wiring, or breakers that keep tripping
- Repeated tankless ignition, flame, condensate, or venting faults
- Pressure relief valve discharge that continues after proper testing
- Hot water problems that do not match the heater itself, such as one bad shower, a suspected mixing valve issue, or a recirculation crossover
- Any repair that has you guessing about gas, combustion, or electrical safety
There is also a practical line between maintenance and repair. Draining a tank, cleaning a screen, or confirming which fixtures are affected is reasonable DIY territory for many homeowners. Gas leaks, vent corrections, live electrical testing, combustion faults, and persistent tankless error codes are not.
For homeowners, landlords, and property managers, downtime matters. If you need a licensed and insured plumbing contractor for water heater repair, tankless service, gas leak work, or emergency plumbing response in Los Angeles, EZ Plumbing handles those calls. You can call (818) 908-2710 or schedule online.
If your shower just went cold, your tank is leaking, or your tankless unit keeps faulting, don't keep swapping parts blindly. EZ Plumbing provides water heater repair, tankless diagnostics, emergency plumbing service, and licensed gas-related plumbing support across Los Angeles. Call (818) 908-2710 or schedule online to get the problem diagnosed safely and correctly.