
Gas Water Heater Issues: A Pro’s Troubleshooting Guide
You step into the shower half awake, turn the handle, and get hit with cold water. Then the questions start fast. Is the pilot out? Is the tank leaking? Is this a simple fix, or are you looking at a full replacement?
That's how most gas water heater issues show up. They interrupt a normal morning and turn into a stress problem immediately. In the field, the right approach is never to guess. Start with safety, match the symptom to the likely cause, and know where homeowner troubleshooting ends. If water has already reached flooring or baseboards, a fast cleanup matters too, and this emergency water extraction guide is useful for limiting secondary damage while the plumbing issue gets handled.
Some problems are straightforward. A pilot light may need to be relit. A thermocouple may be dirty or out of position. Others are not straightforward at all, especially when the heater keeps shutting down and every online guide says the same thing: replace the thermocouple. Sometimes that works. Sometimes it wastes time, and the actual problem is the gas control valve.
If your unit has already stopped heating completely, this overview of what to do when a water heater is broken can help you think through the immediate next step without making the situation worse.
Table of Contents
- That Shock of Cold Water What Happens Now
- Safety First Your Non-Negotiable Pre-Checks
- Diagnosing Common Gas Water Heater Problems
- Actionable DIY Troubleshooting Steps You Can Take
- When to Stop and Call a Professional Plumber
- Understanding Repair vs Replacement Costs
- Preventative Maintenance to Extend Your Heater's Life
That Shock of Cold Water What Happens Now
A failed gas water heater rarely gives you the courtesy of timing. It quits before work, before school, before guests arrive, or right when you need to clean up after dinner. Most homeowners do what anyone would do. They try the faucet again, wait a minute, then go stare at the heater hoping something obvious will jump out.
Sometimes something obvious does jump out. A pilot is off. Water is pooling under the tank. The burner won't stay lit. Other times the heater looks normal from the outside, but it still won't produce hot water. That's where people lose time. They start replacing parts in the dark.
The better approach is to slow down and read the heater by symptoms.
Start with the symptom, not the part
A gas water heater that makes no hot water at all points you toward one set of causes. Lukewarm water, rumbling sounds, or a pilot that won't stay lit point you somewhere else. The mistake I see most often is homeowners jumping straight to one popular fix they saw online, usually the thermocouple, without confirming that the symptom fits.
A calm diagnosis saves more money than a fast guess.
Keep your first checks simple
Before you touch anything, answer these practical questions:
- Has the pilot gone out: Look through the sight area and confirm whether there's a flame.
- Is there water on the floor: Even a small puddle changes the priority from comfort to damage control.
- Do you smell gas: If you do, stop there and move to the safety section below.
- Is the burner flame blue or yellow: A healthy burner should burn blue, not yellow or orange.
That last point matters more than many homeowners realize. Burner color tells you whether combustion is clean or compromised, and that affects both performance and safety.
Don't assume age is the only answer
Older units do fail more often, but age alone doesn't tell you whether you're dealing with a simple service item, sediment buildup, or a failed control component. A heater can be old and still worth one repair. It can also be young and have a problem that needs licensed diagnosis because gas controls are involved.
That's the mindset to carry through the rest of this guide. Start safe. Match symptom to cause. Fix only what you can verify.
Safety First Your Non-Negotiable Pre-Checks
Before you remove a panel, strike a lighter, or touch a control knob, handle the safety basics.
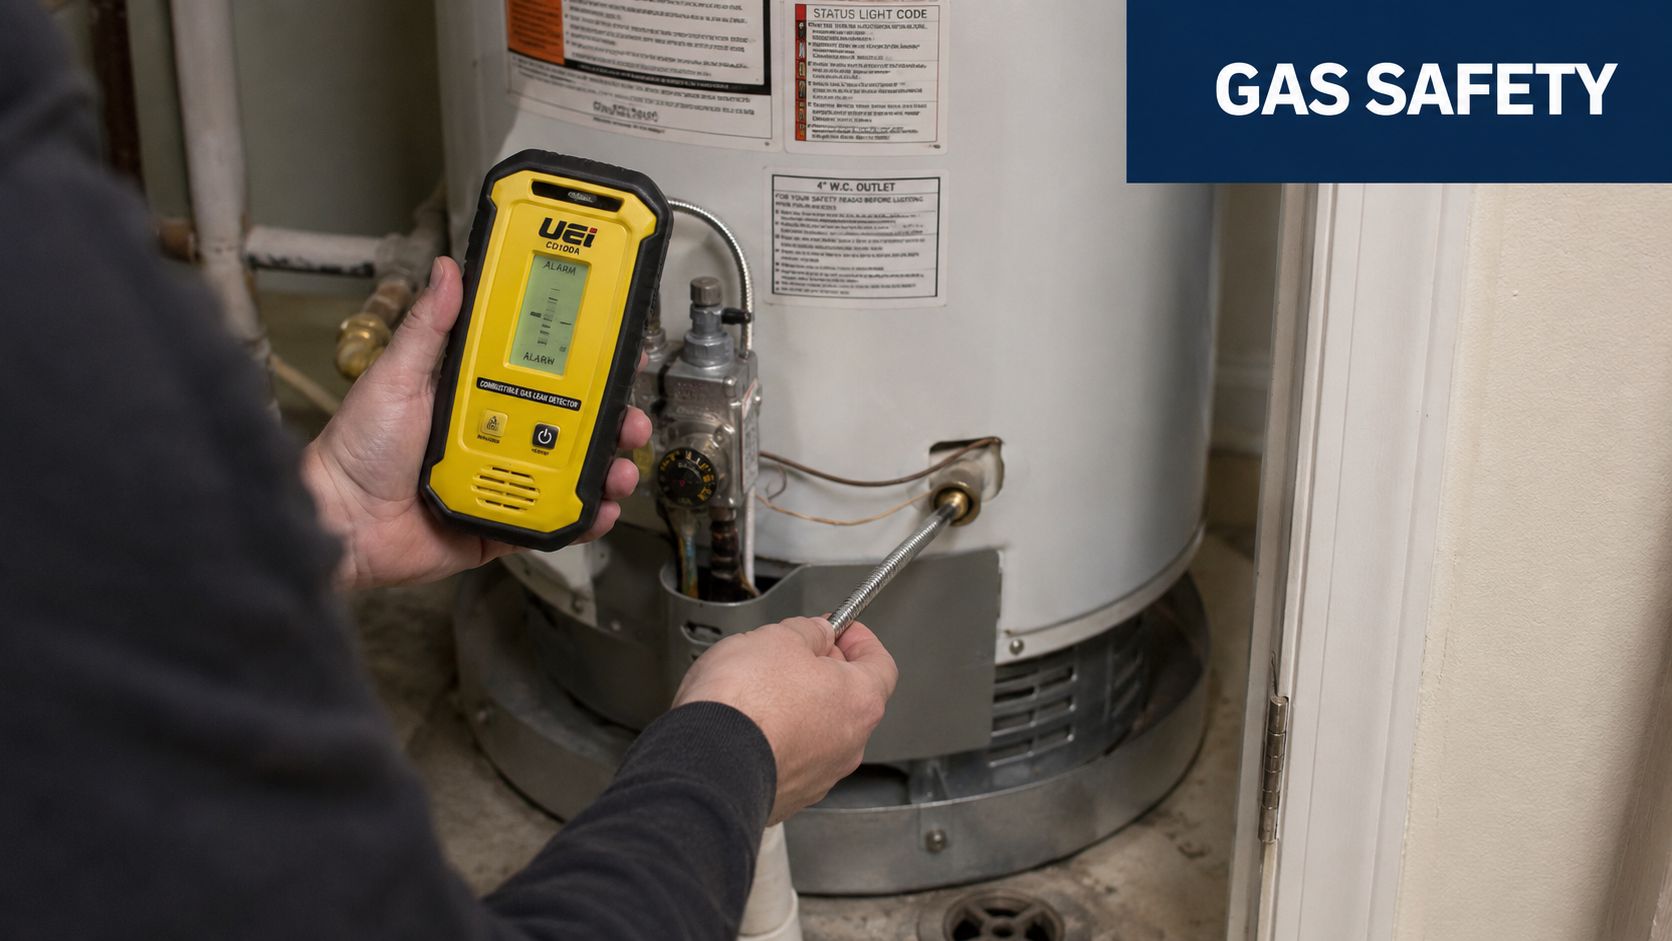
Treat a gas smell as an emergency
If you smell rotten eggs or suspect gas:
- Do not flip switches. Don't touch light switches, appliances, plugs, or thermostats.
- Do not try to relight the pilot. Keep flame and spark away from the area.
- Leave the house immediately. Get everyone out, including pets.
- Call the gas company from a safe distance. Then arrange for licensed plumbing or gas service as needed.
If you want a clear homeowner reference for warning signs, this guide on how to detect a gas leak in your home is worth reviewing before you do anything else.
Practical rule: If gas odor is present, troubleshooting stops. Evacuate first.
Shut down the heater if water or combustion looks wrong
If there's no gas smell, but the heater is acting up, do these checks in order:
- Turn the gas control to off: This prevents repeated ignition attempts while you inspect.
- Close the cold water shutoff above the heater if the tank is leaking: That limits additional water release.
- Look for active dripping at fittings: Water at the top may come from piping or vent-related condensation. Water at the tank body is more serious.
- Check the vent area visually: If the vent connector looks loose, corroded, or displaced, don't run the heater.
Know what not to do
Homeowners get into trouble when they push past the safe limit.
- Don't disassemble the gas valve assembly.
- Don't force seized controls with pliers.
- Don't keep relighting a unit with an unstable flame.
- Don't ignore soot, scorch marks, or a stuffy combustion area.
Those signs mean the heater needs more than a reset. Gas appliances are forgiving right up until they aren't.
Diagnosing Common Gas Water Heater Problems
Cold water usually traces back to a small set of failures. The job is to match the symptom to the right suspect without guessing, especially around the pilot circuit, burner, and gas control.
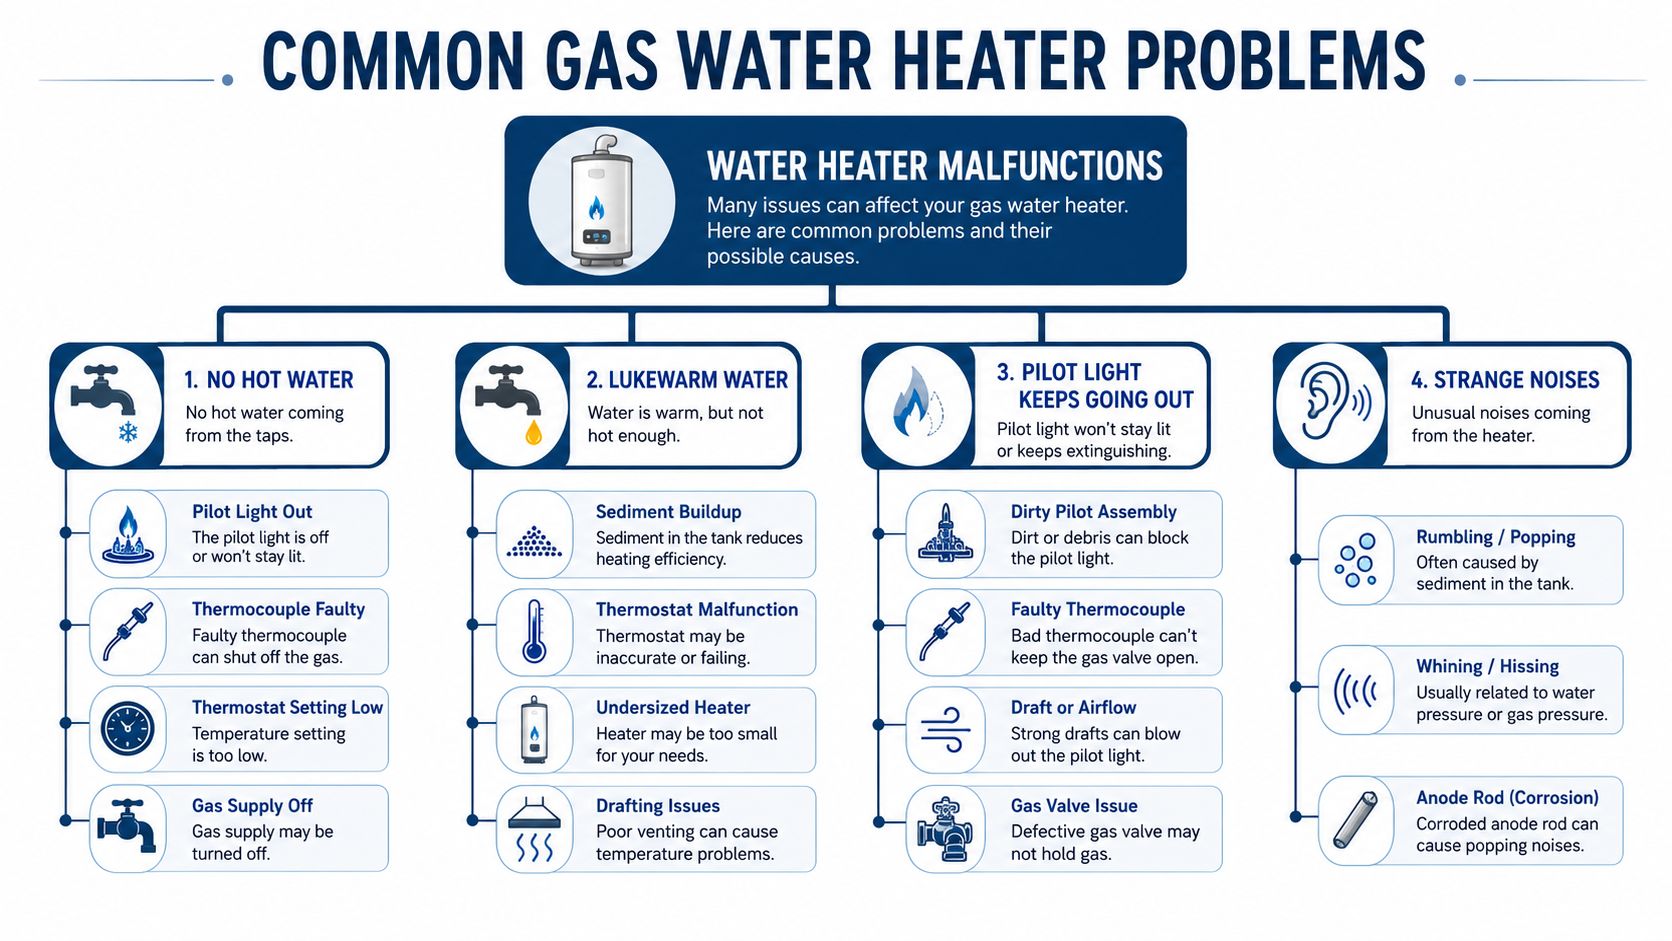
No Hot Water
No hot water at any fixture points to a heater that is not firing at all, or one that never gets the burner on long enough to heat the tank. Start by separating a pilot problem from a control problem.
If the pilot is out, the burner cannot light. If the pilot lights but will not stay lit, homeowners often jump straight to the thermocouple. Sometimes that is correct. Sometimes it is an expensive wrong turn.
A weak thermocouple, poor pilot flame contact, or a dirty pilot assembly can all shut the unit down. A failing gas control valve can produce almost the same complaint. From the outside, those two faults can look identical. That is why I do not treat "pilot won't stay lit" as automatic proof that the thermocouple is bad. A licensed plumber can run a millivolt test and tell whether the sensor is weak or the gas valve is failing to hold. That test saves a lot of wasted parts swapping.
Lukewarm Water
Lukewarm water means the heater still works, but not well enough to keep up. The usual causes are a low temperature setting, sediment at the bottom of the tank, a burner that is not transferring heat properly, or a heater that is undersized for the household's demand.
Sediment is common, especially in hard water areas. It creates a barrier between the burner flame and the water in the tank, so recovery slows down and available hot water drops. Homeowners describe it as "the shower gets warm, then fades fast." That pattern matters.
A partially restricted burner or weak combustion can cause the same complaint. So can a cross-connection somewhere in the plumbing system, where cold water mixes into the hot side. If several fixtures go lukewarm quickly, look at the heater first. If the problem shows up in one bathroom or at one shower, the fixture or mixing valve deserves suspicion too.
Pilot Light Keeps Going Out
This is the problem that gets misdiagnosed more than any other.
A pilot that will not stay lit can come from a dirty pilot orifice, a bent or poorly positioned thermocouple, a weak thermocouple, combustion air issues, venting trouble, or a bad gas control valve. Those are not interchangeable problems, and they do not all call for the same repair.
Flame quality gives you a useful clue. The pilot and main burner should burn steady and blue. Yellow tipping, lazy flame movement, soot, or a burner that sounds rough points to combustion or airflow trouble, not just a bad sensor. The U.S. Department of Energy notes that proper venting and combustion air matter for safe operation of fuel-fired water heaters, and visible flame problems should be taken seriously: Energy Saver guidance on water heater safety and maintenance.
The key trade-off is simple. Cleaning an accessible pilot area or replacing a worn thermocouple may be reasonable DIY work on some models. Diagnosing a gas valve is not.
Strange Noises Popping or Rumbling
Popping and rumbling usually mean sediment has baked onto the tank bottom. Water gets trapped under that mineral layer, overheats, then breaks loose during a firing cycle.
That noise is more than an annoyance. It tells you the burner is working harder to push heat through scale, which raises fuel use and stresses the tank. A noisy older heater can keep running for a while, but it is warning you that efficiency and tank life are heading the wrong way.
Water Leaking from the Unit
Where the water shows up matters more than how much you see at first glance.
Water at the top of the heater often comes from pipe joints, shutoff valves, the vent connection area, or condensation that has run down from above. Water from the drain valve may be a loose cap, debris in the valve, or a valve that no longer seals well. Water coming from the tank body, the lower jacket seam, or the base pan usually means the tank itself has failed.
That last one is the hard answer homeowners hope not to hear. Internal tank leaks are replacement problems, not dependable repair problems.
Discolored or Smelly Water
If the hot water looks rusty, cloudy, or smells foul while the cold water looks normal, the heater is a likely source. Sediment, corrosion inside the tank, and an aging anode rod can all change water quality.
A rotten egg smell in hot water often points to a reaction inside the tank rather than a gas issue. Rust-colored hot water can mean the tank lining or internal components are wearing down. These symptoms do not always mean the heater is at the end today, but they do mean it needs attention before you are dealing with a leak or a full loss of hot water.
Actionable DIY Troubleshooting Steps You Can Take
Start with the jobs that let you confirm what the heater is doing without opening gas connections or guessing at controls. A homeowner can usually handle inspection, light cleaning, and a basic thermocouple replacement on some models. Once the problem points toward the gas valve or combustion, stop there.
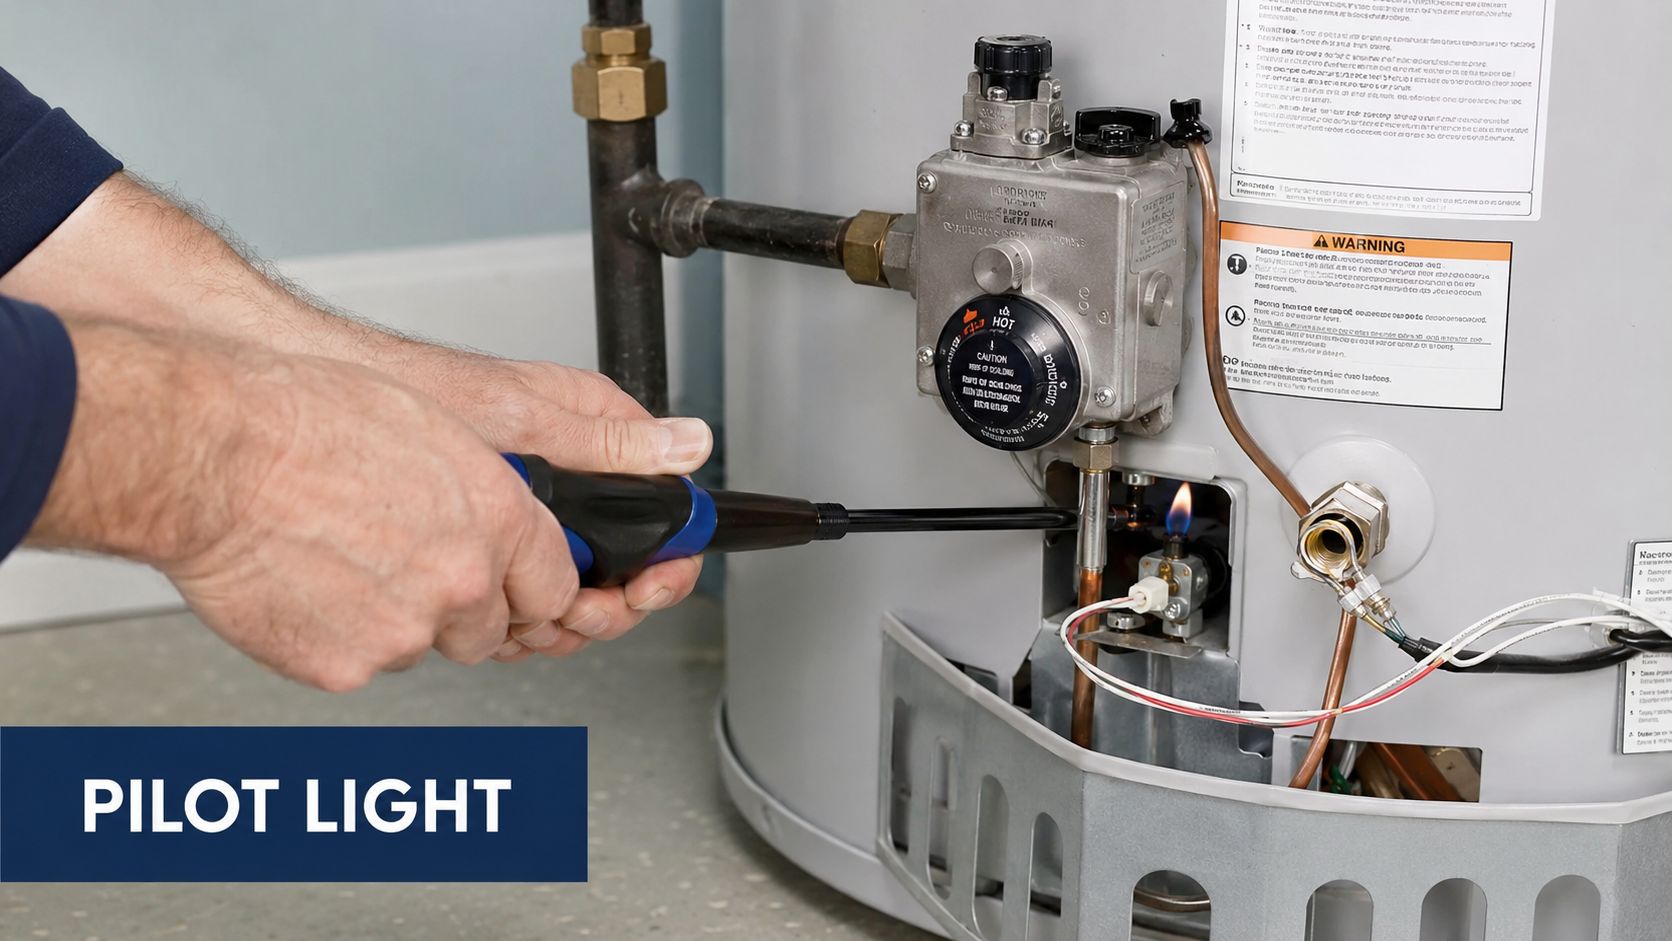
Relight the Pilot the Right Way
If your heater has a standing pilot and the relighting steps are printed on the tank, use those instructions exactly. The label on the unit is the authority for that model.
- Turn the control to off and wait. Let any unburned gas clear before you try again.
- Remove the access cover if your model has one.
- Set the control to pilot.
- Press and hold the pilot button or knob.
- Use a long lighter or built-in igniter if the label calls for it.
- Keep holding the control long enough for the safety sensor to heat up.
- Release slowly and watch the pilot flame.
If the pilot stays lit, reinstall the cover and return the control to the normal setting. If it lights and drops out right away, repeated relight attempts usually do not solve the actual problem.
Check the Thermocouple Before You Replace It
The thermocouple is a safety sensor that proves the pilot flame is present. If it does not send a strong enough signal, the gas valve shuts the pilot back off.
Before you buy parts, inspect the basics.
- Look at the tip position. It should sit directly in the pilot flame.
- Check for soot, lint, or corrosion. A dirty pilot assembly can act like a failed sensor.
- Inspect the connection at the gas control. It should be snug, not cross-threaded or obviously damaged.
- Watch the pilot flame itself. A weak or lazy flame cannot heat the thermocouple properly.
If the thermocouple is bent, heavily corroded, or clearly out of the flame path, replacement can be a reasonable DIY step. Do it once, carefully, with the correct part for the heater.
That last point matters. I have seen plenty of homeowners replace a thermocouple because the symptom fit, only to find out the actual fault was elsewhere.
Clean the burner area if it is dirty and accessible
A healthy burner flame is usually steady and blue. If you see heavy yellowing, soot, or obvious debris around the burner compartment opening, shut the heater down and inspect the area you can safely reach.
Look for lint, dust, rust flakes, and blocked air openings. Clean only what is accessible without disturbing gas tubing, burner alignment, or sealed components. If the chamber is sealed and your model does not provide simple homeowner access, leave it alone and schedule service.
For a visual refresher on pilot service, this walkthrough is useful:
Know the limit between a thermocouple problem and a gas valve problem
Homeowners consequently lose time and money.
A pilot that will not stay lit can point to a bad thermocouple, but it can also point to a failing gas control valve. The symptoms overlap. From the outside, both can look like the same simple pilot problem.
A homeowner can inspect the flame, confirm the thermocouple is in the flame, clean accessible dirt, and replace the thermocouple once if there is good reason to suspect it. What you cannot do by sight is confirm whether the gas valve is properly receiving and responding to the thermocouple signal. That takes meter-based testing, often a millivolt test, and that is the dividing line between sensible DIY and part swapping.
If the pilot is clean, the thermocouple is properly positioned or newly replaced, and the heater still will not hold pilot, stop buying parts. At that point, the smarter move is professional diagnosis. A bad gas valve is often misread as a bad thermocouple, and that misdiagnosis gets expensive fast.
Good DIY steps, in order
Use this sequence to keep the troubleshooting focused and safe:
- Read the label on the heater. Follow the manufacturer relight procedure.
- Confirm the gas supply valve is on.
- Check whether the pilot lights, then note exactly what happens when you release the control.
- Inspect the pilot flame and thermocouple position.
- Clean accessible dust and lint from around the burner opening and air intake areas.
- Replace the thermocouple once, if the evidence supports it and your model allows straightforward replacement.
- Stop if the pilot still will not stay lit.
That order helps you rule out simple problems first without drifting into unsafe gas control work.
When to Stop and Call a Professional Plumber
You relight the pilot, hold the control, wait, and it still drops out the moment you let go. That is usually the point where homeowners start buying parts in frustration. It is also where mistakes get expensive.
A gas water heater crosses out of DIY territory when the problem involves gas flow, combustion, venting, or control testing. You can inspect, clean, and make a reasonable first thermocouple replacement. You cannot confirm by sight whether the gas control valve is receiving the thermocouple signal and responding correctly. That requires meter-based testing by someone who knows the sequence and the risks.
Call a licensed plumber right away if you smell gas, see soot, notice scorching, or have any concern about venting. Those are safety problems first, repair problems second. The same goes for water leaking from the tank body or base. A leaking tank is not a parts problem.
The common cutoff point homeowners miss
The expensive misdiagnosis I see over and over is a bad gas control valve mistaken for a bad thermocouple. The symptoms can look similar at first. The pilot will not stay lit, or the burner will not fire reliably, and the heater gets treated like a simple pilot issue.
If the pilot assembly is clean, the thermocouple is properly positioned or already replaced once, and the unit still will not hold pilot, stop there. At that stage, a professional should test the control side of the system instead of guessing. As noted earlier, gas control problems are common enough that repeated part swapping is a poor bet.
Call when the heater is failing as a whole
Age matters, but condition matters more.
An older heater with rust, corrosion, damp insulation, burner issues, and control trouble is often near the end of its useful life. If the tank shows active leaking, replacement is the answer. If the heater is older and now needs a gas valve, the repair may not make financial sense once labor, testing, and code-related updates are considered.
Homeowners run into the same judgment call with other hidden house systems. These California homeowners' foundation coverage insights are a good reminder that some problems are repairable, while others point to larger system failure and bigger cost decisions.
Stop and make the service call if you notice any of these
- Gas odor near the heater
- Soot, scorch marks, or signs of poor combustion
- Draft or venting concerns
- Water leaking from the tank body or pooling at the base
- Repeated pilot failure after basic cleaning and one justified thermocouple replacement
- Burner operation that is unstable, delayed, or abnormal
- Visible rust, deformation, or heavy corrosion on the tank or connections
Knowing when to stop is part of doing the job safely. A good plumber is not just there to replace parts. Their value is confirming whether the heater has a repairable component problem or a failing gas control system that needs proper testing and a clear repair-versus-replace recommendation.
Understanding Repair vs Replacement Costs
The money question is simple. Is this heater worth fixing, or are you paying to delay replacement for a short time?
The answer depends on which part failed, how old the unit is, and whether the tank itself is still sound. Small items can be worth doing. Major control repairs on an older tank often are not.
Gas Water Heater Repair vs. Replacement Cost Estimates (2026)
| Service | Typical DIY Cost | Typical Professional Cost (EZ Plumbing) |
|---|---|---|
| Thermocouple replacement | $10 to $20 | Qualitatively higher due to labor and diagnosis |
| Gas control valve replacement | $150 to $200 for the part if correctly identified | Qualitatively higher due to licensed gas work and testing |
| Tank flush for sediment | Qualitatively low if done by homeowner with proper procedure | Qualitatively higher due to service labor |
| Full gas water heater replacement | Not typically a DIY job | Varies by unit, code needs, venting, and installation conditions |
That table is intentionally conservative because precise installed pricing changes by access, venting, permit requirements, and whether other code items need updating. A heater in a garage with easy access is one conversation. A heater in a tight closet with aging gas piping and drainage issues is another.
The practical decision test
Use these questions:
- Is the tank leaking: If yes, replacement is the answer.
- Is the unit already in its later years: Older units deserve a stricter repair threshold.
- Is the failed part minor or major: A thermocouple is very different from a gas valve.
- Has performance been declining for a while: Repeated symptoms usually mean more than one problem is brewing.
There's a homeowner mindset issue here too. People often ask whether insurance might help whenever hidden damage is involved. Water and structural claims can get complicated fast, so resources like these California homeowners' foundation coverage insights are useful for understanding where policy language often becomes the main issue.
Spend money on a repair when it restores reliability. Don't spend it just to postpone an obvious replacement.
Preventative Maintenance to Extend Your Heater's Life
Most gas water heater issues don't begin as emergencies. They begin as neglected maintenance.
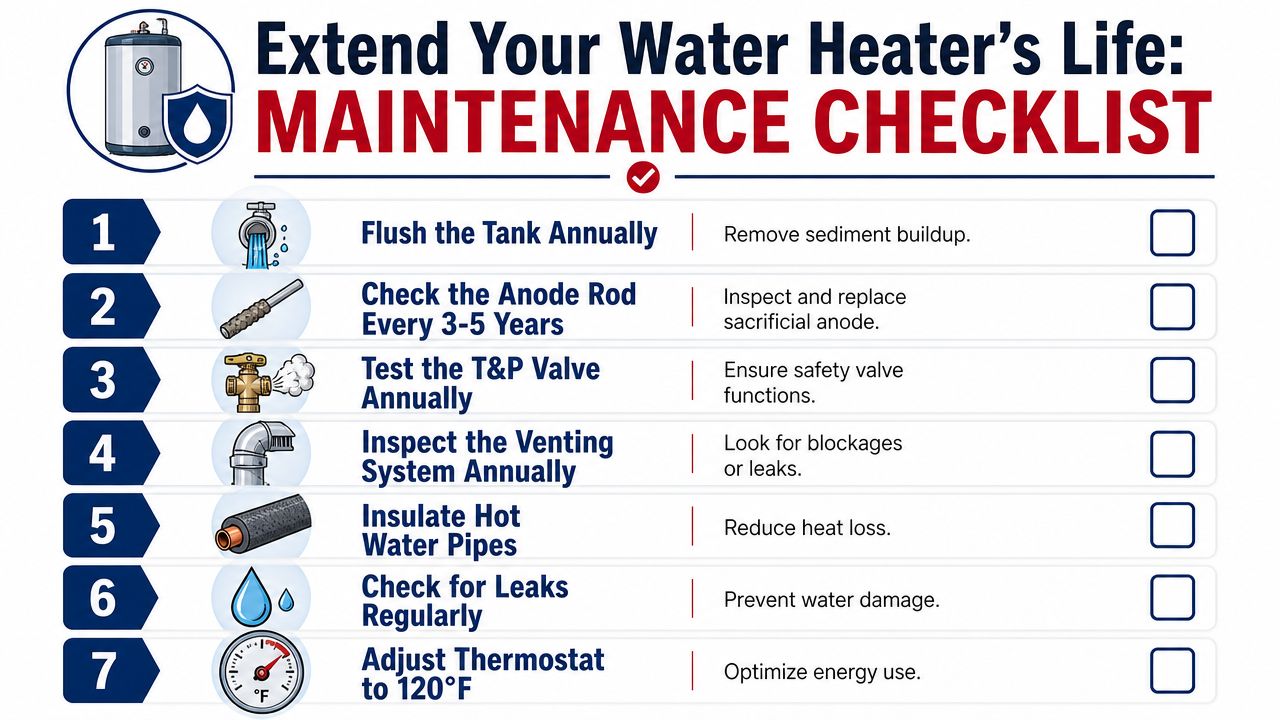
Sediment buildup is a leading cause of premature failure. In hard water areas, it can shorten tank life by 3 to 5 years, and annual flushing is recommended because sediment-related failures account for nearly 40% of gas water heater replacements in major U.S. markets, according to 24HR Supply's troubleshooting overview.
A maintenance routine that actually helps
- Flush the tank on schedule: This removes the mineral layer that insulates water from the burner and makes the heater overwork.
- Watch the burner flame during routine checks: Blue is what you want. Unusual color or soot means it's time for service.
- Inspect for small leaks early: A damp fitting is easier to fix than damaged flooring and cabinetry.
- Keep the area around the heater clean: Dust, lint, and clutter don't belong near combustion equipment.
- Pay attention to your water quality: If your house deals with hard water, broader water filtration guidance can help you reduce the mineral load that shortens heater life.
Don't skip the simple annual check
The best maintenance plan is the one that gets done every year. If you want a homeowner-friendly checklist, this guide on how to maintain a water heater is a good place to keep your routine organized.
Small preventive work beats emergency replacement every time. A flush, a visual burner check, and early attention to odd sounds usually cost less stress than waking up to cold water and a dead tank.
If your gas water heater has stopped heating, won't keep the pilot lit, or is showing signs that go beyond safe DIY work, EZ Plumbing can help. They've served Los Angeles since 1989 with licensed, insured plumbing service, same-day scheduling for many repairs, and 24/7 emergency response when the problem can't wait. For homeowners, property managers, and commercial properties that need clear answers and dependable work, call (818) 908-2710 or schedule service through their website.