
How to Fix Burst Pipes Before They Flood Your Home
You hear the water before you see it. It may be a sharp hiss behind the drywall, a steady drip from a ceiling bulge, or water spreading across the kitchen tile while a hot spot develops in the hardwood. In a Los Angeles home, the failure may have nothing to do with freezing. A slab-embedded copper line, an aging galvanized riser, excessive pressure, or a split connection can release enough water to turn a plumbing repair into a flooring, drywall, and mold problem.
The right way to think about how to fix burst pipes is damage control first, pipe repair second. State Farm reported more than $806 million paid for over 32,000 frozen-pipe and water-damage claims from August 2022 through August 2023, with claims averaging about $25,000 (State Farm's frozen-pipe reporting). The pipe itself may be a small component of the final loss. Your first job is to stop the flow, make the area safe, relieve pressure, and preserve evidence.
Table of Contents
- The First Ten Minutes When a Pipe Bursts
- Shutting Off Water and Power Safely
- Temporary Repairs You Can Actually Do
- Repair the Section or Replace the Line
- Stopping the Damage You Cannot See
- What a Professional Burst Pipe Visit Looks Like
- Preventing the Next Burst in a Los Angeles Home
The First Ten Minutes When a Pipe Bursts
A homeowner often finds the problem at the worst possible moment. You step into a hallway and feel water under your socks. A ceiling seam has swollen. The cabinet beneath a sink is full of spray, and the shutoff valve is nowhere in sight. In another room, a hot-water line may be hissing inside the wall while the floor grows warm around it.
The instinct is to grab towels or start moving furniture. Those actions can wait. Mopping while water is still entering the room only gives you a cleaner version of an active flood.
Stop the source before chasing the leak
Use this order:
- Close the nearest fixture valve. If the failure is clearly at a toilet, sink, washing machine, or water heater connection, turn that local valve clockwise.
- Go to the main shutoff if water continues to flow, the break is hidden, or you can't identify the fixture.
- Keep people away from wet electrical areas. Don't step through standing water to reach an outlet or appliance.
- Open faucets after the main is closed to release pressure and drain water trapped in the system.
- Move dry valuables only after the water is isolated.
The first ten minutes influence how much water reaches drywall, insulation, flooring, and cabinets. They also shape the insurance record. Photograph the source and surrounding damage once you can do so safely, and don't throw away failed pipe sections or damaged materials before documenting them.
A practical, homeowner-focused checklist for the immediate response is stop pipe burst damage fast. The key principle is simple: containment beats cleanup. If water is still pressurized, every minute spent searching for a mop instead of the shutoff can enlarge the repair.
Practical rule: Don't cut into a wall or thaw a suspected frozen line until the water supply is isolated and the electrical risk has been addressed.
Shutting Off Water and Power Safely
Start with the smallest valve that can stop the leak. A toilet stop valve, sink stop valve, washing-machine valve, or water-heater isolation valve may protect the rest of the house while you assess the failure. If the valve is seized, damaged, or the leak is on a line without a local isolation point, close the whole-house main immediately.
In many Los Angeles homes, the main valve is near the water meter or where the service line enters the property. A ball valve usually closes with a quarter-turn, while an older gate valve may require several clockwise turns. Don't force a corroded valve with a long wrench. You can break the stem or create a second leak. Some properties have a buried curb stop that requires a meter key, and the local water utility may need to handle it.
Follow the shutoff sequence
- Close the fixture stop valve when the burst is localized.
- Close the whole-house main if the leak continues or its location is uncertain.
- Switch off the boiler or immersion heater where applicable, and don't restart hot-water equipment until the system has been refilled.
- Open cold taps, starting with the lowest practical fixture, to drain residual water and reduce pressure.
- Protect nearby electrical equipment before beginning any containment or repair.
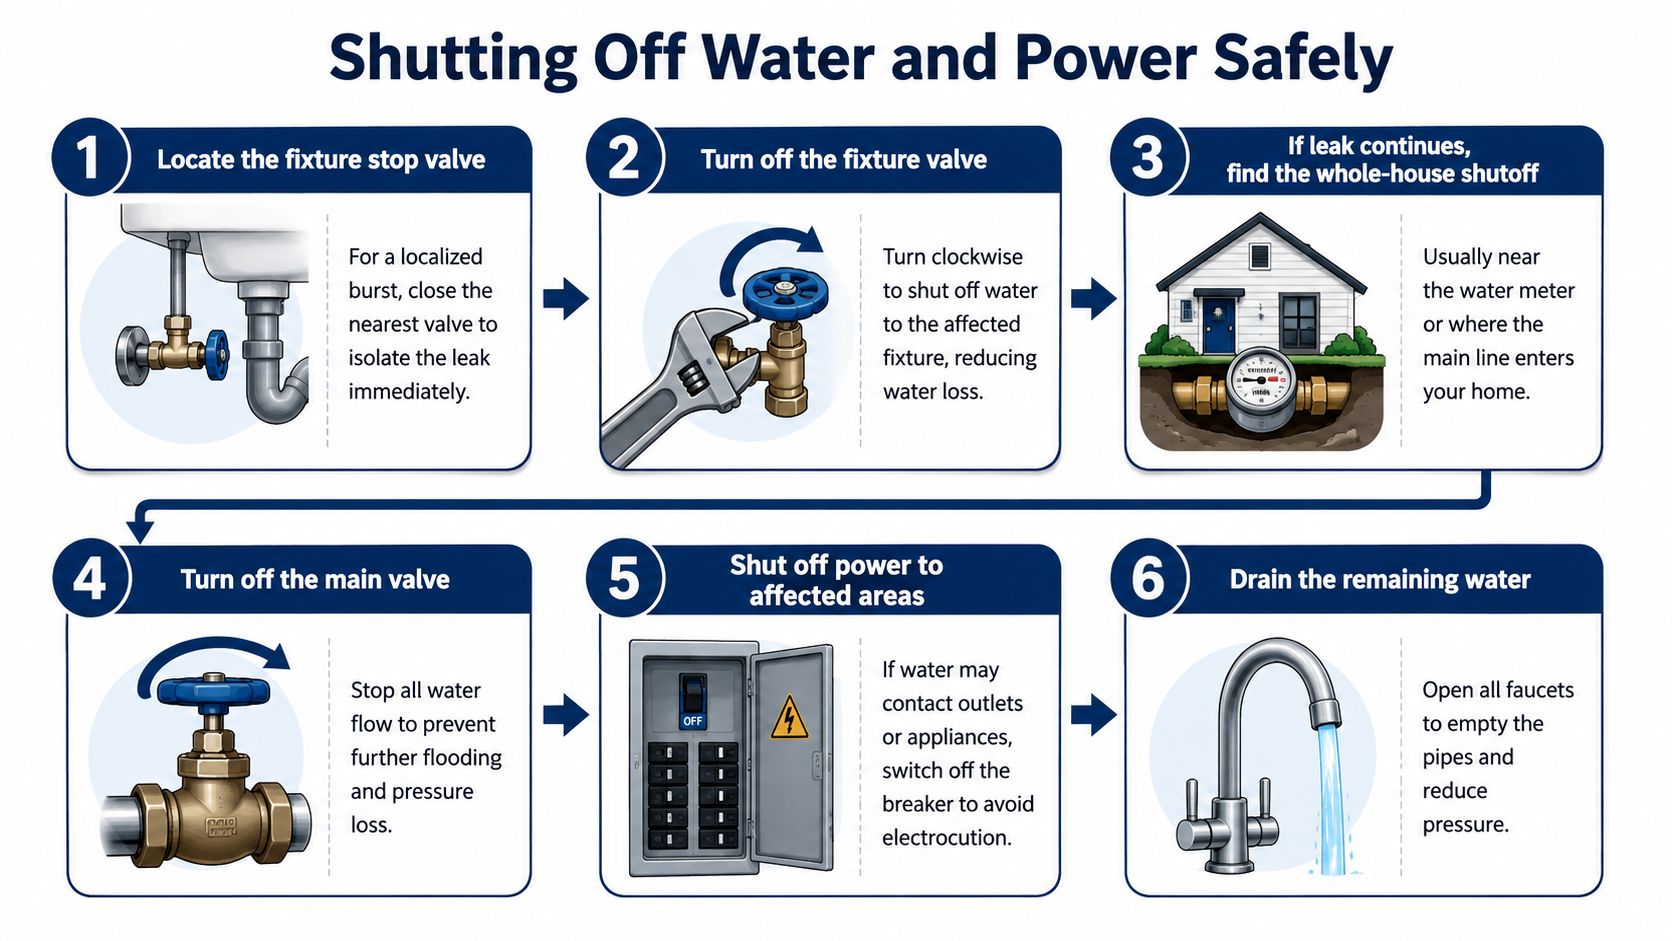
Water near outlets, appliances, extension cords, or floor-level wiring changes the situation. If you can reach the electrical panel without standing in water, switch off the affected circuit, or the main breaker if necessary. GFCI protection may trip, but it isn't permission to touch wet equipment. Never touch a wet panel, and don't cross standing water to reach it. Call the utility or an electrician if the panel itself is wet or inaccessible.
For a clear visual walkthrough of the main-valve process, use this guide to shut off the main water supply. Renters should also document the event and notify the landlord promptly. A resource on Mai & Associates renters insurance can help clarify the difference between coverage for personal belongings and responsibility for the building itself.
This is also the point to record the time, take photographs, and keep receipts for emergency materials. A burst-pipe claim can involve plumbing, flooring, drywall, contents, and temporary accommodation, so a clean timeline matters.
Temporary Repairs You Can Actually Do
Temporary repair is useful when the water has been isolated, the pipe is accessible, and a plumber can't arrive immediately. It isn't a substitute for replacing the ruptured section. Official burst-pipe guidance treats clamps, tape, and wraps as short-term measures, and the damaged line still needs a permanent repair by a qualified plumber (prepared burst-pipe guidance).
A pipe repair clamp with a rubber sleeve is usually the most dependable emergency option for a small split on straight copper, galvanized steel, or rigid plastic pipe. Center the sleeve over the damaged area, fit the clamp around it, and tighten evenly. It won't work well over a jagged break, a fitting, a badly corroded section, or a pipe that can't be reached all the way around.
Self-fusing silicone tape can contain a small seep on clean, dry pipe under low pressure. Stretch it firmly as you wrap, overlapping each turn. It doesn't bond reliably to wet, dirty, oily, or heavily oxidized surfaces, and it shouldn't be trusted on a large split or a line that remains under full pressure.
Push-to-connect couplings, plugs, and test caps can provide a clean temporary isolation point on compatible copper, PEX, or CPVC. They require a fully closed supply, a square cut, and a smooth pipe surface with no burrs. A fitting pushed onto a crooked or damaged end can look secure while leaking as soon as pressure returns.
| Method | Best For | Skill Level | Hold Time | Cost |
|---|---|---|---|---|
| Repair clamp and rubber sleeve | Small split on accessible straight pipe | Basic | Short term, until permanent repair | Usually moderate |
| Self-fusing silicone tape | Minor seep on clean, dry low-pressure pipe | Basic | Very short term | Low |
| Push-to-connect fitting or plug | Cleanly cut compatible copper, PEX, or CPVC | Basic to intermediate | Short term, until permanent repair | Moderate |
| Plumber's tape | Threaded joint seep after proper disassembly | Basic | Depends on joint condition | Low |
Epoxy putty often fails when applied to wet, pressurized, moving, or badly corroded pipe. Ordinary plumber's tape isn't a repair for a split pipe, it only helps seal suitable threaded connections. For more detail on materials and preparation, see this guide to sealing a leaky pipe.
Don't reopen the main supply just to test a temporary patch while people are standing near wet electrical equipment.
Expect these methods to last hours to days, not weeks. Mark the repaired spot, keep the area accessible, and arrange permanent replacement.
Repair the Section or Replace the Line
A burst pipe doesn't automatically mean the whole plumbing system needs replacement. The decision depends on what failed, what surrounds it, and whether the remaining line is likely to fail soon.
Pipe material comes first. A single split in accessible PEX may justify a sectional repair. Copper with one isolated impact or connection failure can also be repaired cleanly. Repeated copper pinholes, brittle CPVC, and deteriorated galvanized pipe deserve a wider assessment. Polybutylene piping should generally be evaluated for replacement rather than patched repeatedly because the problem can extend throughout the system.
Use four decision questions
- Is the failure isolated? One clean break is different from multiple weak spots along the same run.
- How old is the line? A leak in a long, aging galvanized run is a warning about the rest of that run.
- How expensive is access? An exposed garage line is easier to repair than copper buried beneath a slab or tile.
- What symptoms existed before the burst? Low pressure, discolored water, green oxidation, white mineral buildup, or earlier repairs point toward broader deterioration.
| Criterion | Repair the Section | Replace the Line |
|---|---|---|
| Material | Sound PEX or copper with one isolated failure | CPVC, polybutylene, or heavily corroded galvanized |
| Condition | No nearby corrosion or weak spots | Multiple repairs, pinholes, or damaged fittings |
| Access | Exposed, reachable pipe | Slab, finished wall, or difficult concealed route |
| Performance | Normal pressure and clear water | Low pressure, recurring leaks, or water-quality symptoms |
| Financial logic | Lower immediate disruption | Higher initial work, potentially lower repeat-failure risk |
Los Angeles soil movement can stress slab-embedded copper, while mineral deposits and internal corrosion can weaken older systems. The useful comparison isn't only today's invoice. Consider access work, drying, patching, repeated service calls, and disruption over the next several years before choosing a narrow repair.
A sectional repair makes sense when the surrounding line tests sound. Replacement or rerouting becomes more rational when the plumber finds repeated weak points, corrosion within a short distance of the break, or a route that can be replaced with less destructive access than another emergency opening.
Stopping the Damage You Cannot See
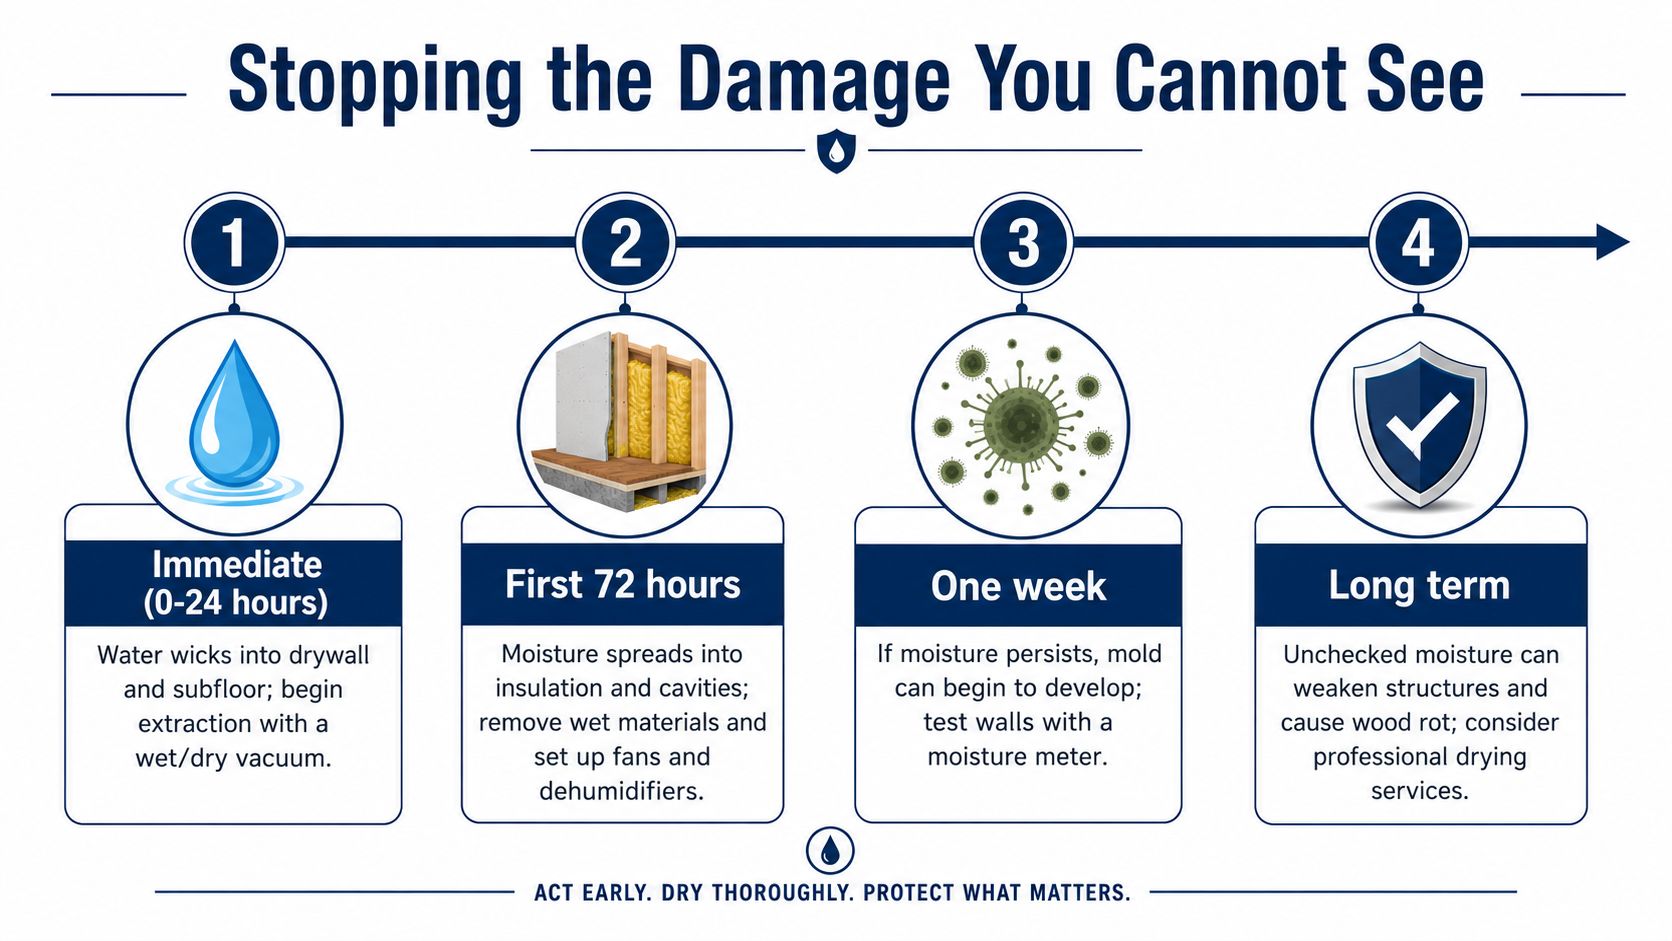
The water you can mop is the easy part. Moisture under baseboards, inside drywall, beneath flooring, and in insulation can remain after the visible surface looks dry. That hidden moisture is why drying and documentation deserve the same attention as the pipe itself.
Start extraction as soon as the water is isolated. Use a wet/dry vacuum where safe, remove wet rugs and movable contents, and pull baseboards if they block airflow. Small weep holes near the bottom of affected drywall can release trapped water, but don't drill blindly around wiring or plumbing.
Work through the drying window
- First hours: Remove standing water and separate wet contents from dry materials.
- First day: Run air movers and a dehumidifier, and set the HVAC fan to circulate air if the system is safe to operate.
- Following days: Check walls, flooring, cabinets, and subfloor with a pin or pinless moisture meter.
- Before closing surfaces: Confirm that concealed cavities and insulation have dried, not just the painted face of the wall.
The practical repair benchmark is that a standard 230-litre tank can take roughly 15 to 20 minutes to drain when taps and toilets are opened, according to West Lothian Council's burst-pipe guidance. That gives you a rough sense of how long residual water may continue after the main valve closes, though a house's actual drainage depends on its layout and remaining pressure.
Document before discarding
Photograph the failed pipe, valve position, affected rooms, soaked materials, furniture, appliances, and contents. Record moisture-meter readings by location, save invoices, and write a timeline from discovery through shutoff, plumber arrival, extraction, and repairs.
Standard homeowners coverage typically responds to sudden and accidental water damage, but the failed pipe itself may not be covered. Gradual leaks, deferred maintenance, and conditions the owner should have corrected can create denial risk, as explained in neutral insurance coverage reporting. Ask the adjuster about mitigation, access, resulting damage, and pipe replacement separately. Don't assume that approval for drywall or flooring means approval for the plumbing line.
For extensive saturation, use a qualified water and mold remediation service rather than sealing damp materials behind new finishes.
What a Professional Burst Pipe Visit Looks Like
A competent emergency visit begins with confirmation, not a guess. The plumber verifies that the water is isolated, checks whether electrical hazards remain, and identifies whether the failure is visible, concealed, or beneath the slab.
For an accessible break, the diagnostic work may involve visual inspection, pipe-material identification, and pressure testing. A hidden Los Angeles leak may require acoustic equipment, thermal imaging, or carefully planned access through drywall or flooring. The technician should explain why a particular access point is necessary before opening it.
What the estimate should account for
Pricing logic usually reflects more than the replacement fitting. Ask whether the quote includes:
- Emergency dispatch and after-hours service, if applicable.
- Leak location and pressure testing before the repair.
- Pipe material and repair method, including sectional repair or rerouting.
- Drywall, tile, cabinet, or slab access, plus separate patching.
- Permit requirements for work that requires permitted replacement.
- Testing after repair, including pressure verification before the wall or floor is closed.
An accessible repair may be completed during one service visit. A hidden-wall or slab repair takes longer because the plumber must expose the line, protect the property, replace or reroute the damaged section, test it, and leave the area safe for restoration. The exact timeline depends on access and the extent of secondary damage.
A quote issued before anyone pressure-tests the system or investigates the leak location is an estimate based on hope, not diagnosis.
Be cautious if a technician refuses to investigate a concealed leak, won't explain the difference between a temporary patch and a code-compliant repair, or leaves the system pressurized without verifying that the repair holds. For a property manager, the written scope should state what was repaired, what remains wet, and which restoration tasks still need another contractor.
Preventing the Next Burst in a Los Angeles Home
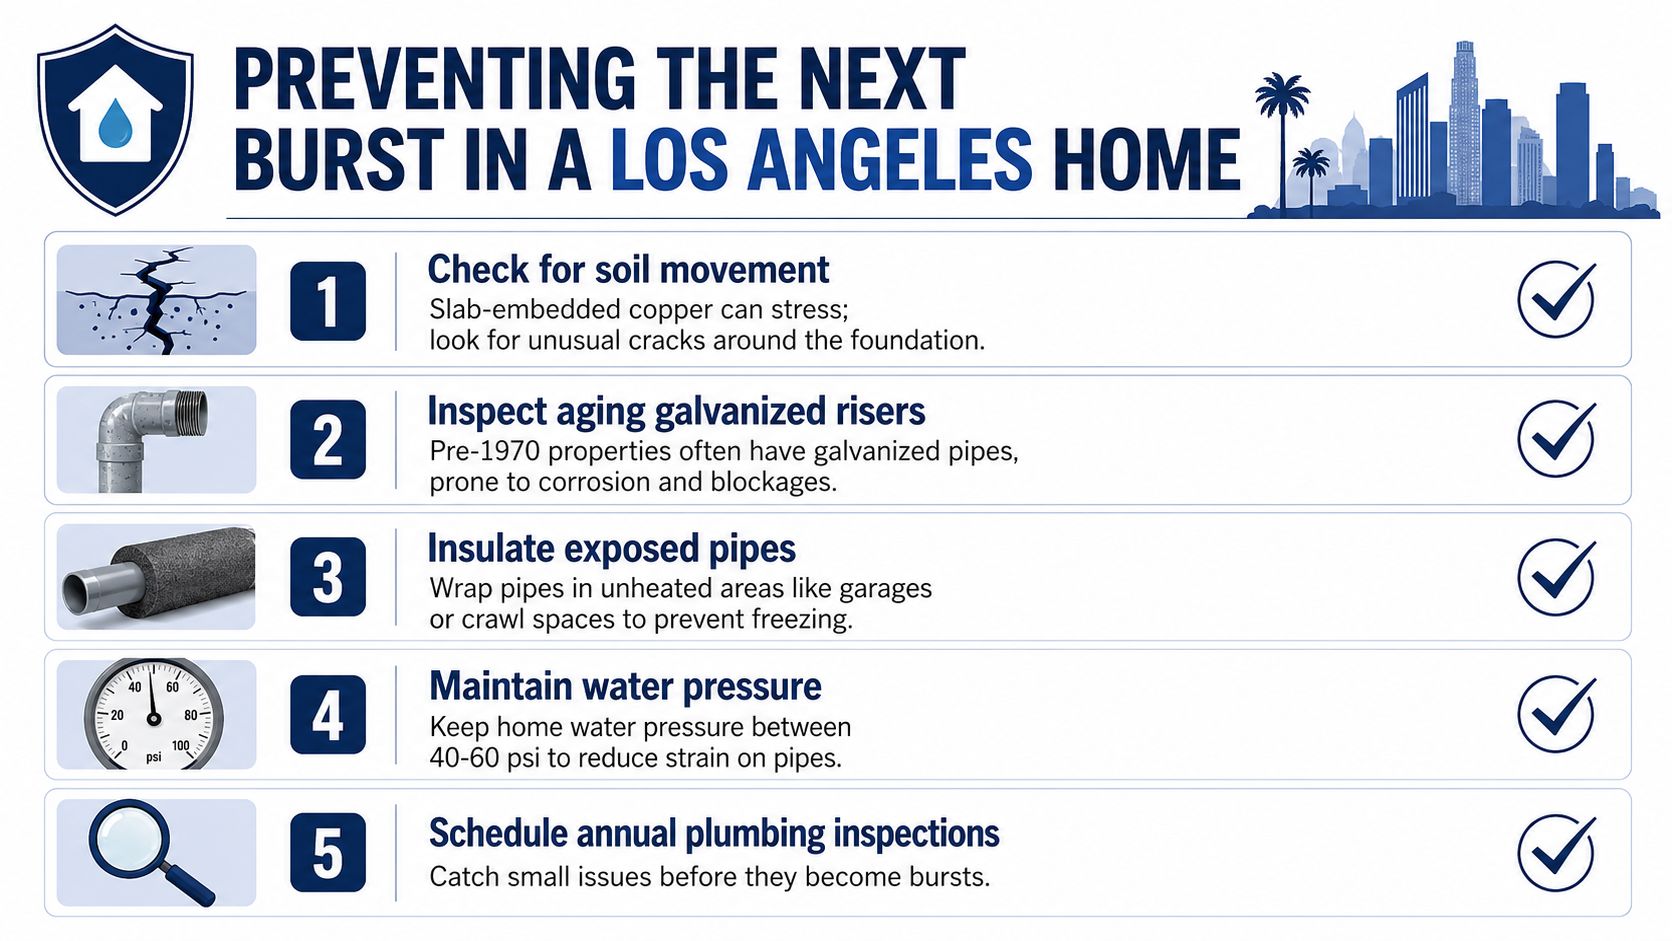
Los Angeles homes fail in ways that don't fit the classic winter-freeze story. Soil movement can stress copper embedded in a slab. Older properties may have galvanized risers narrowed by corrosion. High static pressure can punish valves and fittings, while tree roots can invade clay sewer laterals. These problems still demand the same response as a cold-weather burst, isolate the source before the damage spreads.
Build the inspection around local failure modes
- Find and label the main shutoff. Everyone in the household, and every property manager on call, should know whether it uses a ball valve, gate valve, or curb stop.
- Check pressure and the pressure-reducing valve. A static reading above 80 psi warrants evaluation for a pressure-reducing valve before another joint fails.
- Inspect visible copper. Green oxidation, pinholes, damp insulation, or repeated staining deserves investigation rather than paint or caulk.
- Exercise isolation valves carefully. A valve that never moves may seize when you need it.
- Inspect hose-bib vacuum breakers and exposed connections. Damaged anti-siphon parts can leak and leave exterior lines vulnerable.
- Watch the slab and hot-water behavior. An unexplained warm spot, sudden hot-water pressure loss, or persistent sound of running water calls for slab-leak detection.
Insulate exposed pipe in garages, crawl spaces, and other unheated areas, even though freezing isn't the primary Los Angeles risk. Protecting vulnerable lines also reduces temperature swings and makes small defects easier to spot.
For older homes, one repair should trigger a broader condition check. A property manager who documents pipe material, shutoff locations, pressure readings, prior repairs, and slab-leak symptoms can make a planned replacement decision instead of waiting for the next occupied-unit emergency.
EZ Plumbing provides emergency burst-pipe response, leak location, water shutoff, and repair or replacement recommendations for Los Angeles homes, HOAs, and commercial properties. Visit EZ Plumbing to arrange emergency service or a planned inspection before a small warning becomes a flooded room.