
Mobile Home Plumbing Systems and Repair Guide
A leak under a manufactured home rarely announces itself politely. You may notice a soft spot in the floor, hear water running after every fixture is shut off, or crawl beneath the home and find wet insulation hanging from the underbelly. By then, the visible drip may be only one part of the problem.
Mobile home plumbing needs a different repair mindset from site-built residential plumbing. Pipes often run through a shallow underbelly, beneath floors and between chassis components, where cold air, movement, limited access, and previous repairs all affect performance. A fitting that would be protected inside a conventional wall may be exposed underneath a manufactured home. A small leak can soak insulation, damage flooring, and remain hidden until the structure begins to move or smell.
Table of Contents
- Understanding Manufactured Home Plumbing Basics
- System Layouts and Common Pipe Materials
- Identifying Failure Points and DIY Troubleshooting
- Winterizing and Year-Round Maintenance Routines
- Navigating Permits, Codes, and Hookup Rules
- Cost Ranges and When to Call a Licensed Plumber
- How EZ Plumbing Supports Los Angeles Property Owners
Understanding Manufactured Home Plumbing Basics
A repair can look finished at the fixture and still leave risk underneath the home. For example, replacing a leaking connector without checking the belly material, insulation, and pipe support can leave the plumbing exposed to cold air or movement. Mobile home plumbing requires repair decisions that account for the home's floor system and chassis, not just the visible fixture.
In a site-built house, supply and drain lines commonly run through framed walls, finished ceilings, or a basement. Manufactured homes often route them through the floor assembly and the enclosed space below it. That space provides access, but it also places plumbing near temperature changes, pests, moisture, shifting supports, and damage caused by careless entry.
Why the underbelly changes repairs
The underbelly includes insulation and protective belly material that help reduce heat loss and limit air movement around the pipes. Cutting through that material creates a direct path for cold air. Loose or saturated insulation provides less protection, and an open tear can allow pests and moisture to reach the plumbing.
Drainage has different limitations. Waste lines must maintain a dependable route to the exterior sewer connection within a shallow floor assembly. A low section can retain wastewater, contribute to recurring clogs, and make a drain seem blocked even after it has been cleaned. Check support and alignment before assuming the fixture or trap is the only problem.
Practical rule: Repair the leak, then restore the insulation and belly protection around the pipe. A replacement fitting by itself does not complete the repair.
Federal requirements also shape how these homes are evaluated. The U.S. Manufactured Home Construction and Safety Standards took effect on June 15, 1976, placing newer manufactured homes under a federal construction code instead of relying only on local residential rules. The standards established more consistent expectations for water supply, drainage, and plumbing safety. The manufactured-housing industry's standards history provides that regulatory context.
The code does not make every home identical, and older repairs may not match current expectations. Before selecting materials or a repair method, identify the home's construction era, existing pipe material, original installation, and local hookup requirements. Those details often determine whether a conventional residential fix will hold up.
System Layouts and Common Pipe Materials
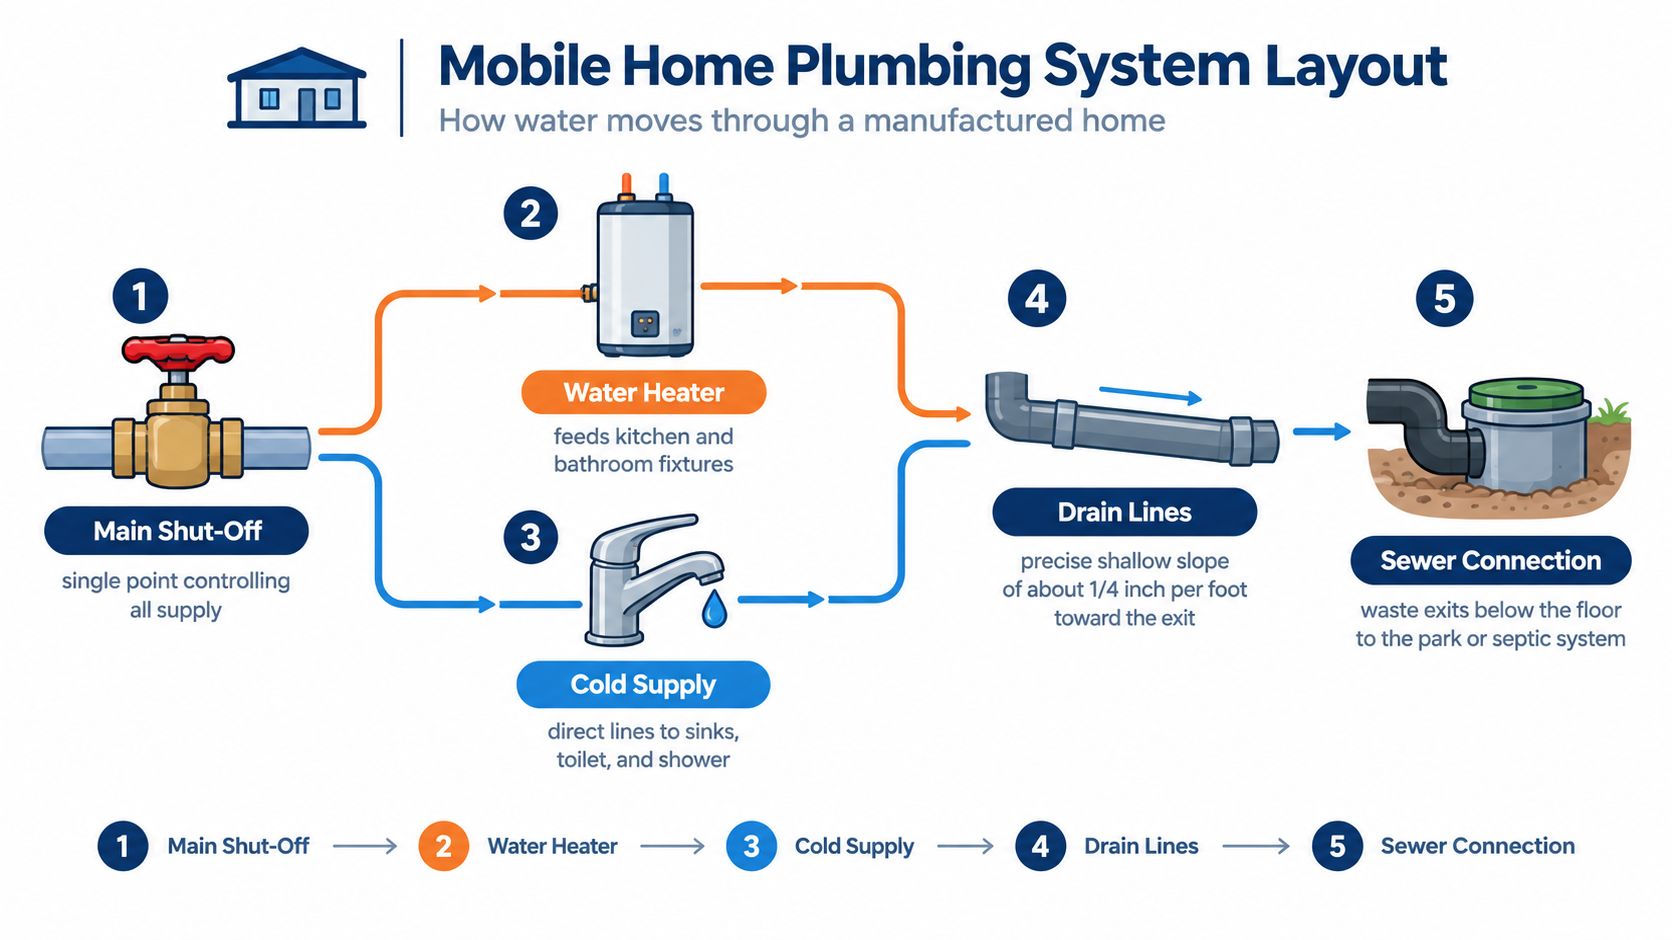
Start by locating the main shut-off valve. Depending on the home and site connection, it may be near the water-service entry, beneath the home, or at an exterior connection point. Once closed, it should stop the supply to the entire home, giving you a safe starting point for leak isolation.
From that point, cold water branches toward fixtures such as the toilet, shower, sinks, and exterior hose connections. Another branch supplies the water heater, which then sends hot water to the kitchen, bathroom, laundry area, and other fixtures. Think of the system as a tree. The main service is the trunk, fixture branches are limbs, and individual flexible connectors are the smaller twigs most likely to be disturbed during repairs.
The drain system works in the opposite direction. Fixture drains join larger branch lines, then move wastewater beneath the floor toward the exterior sewer connection. Because the available space is limited, support straps, alignment, and slope matter. A drain that dips between supports can retain water and solids, while a poorly aligned connection can stress fittings.
Match the repair to the pipe
Copper is rigid, durable, and familiar to many plumbers, but it needs careful support and clean soldered or approved mechanical connections. Movement underneath a manufactured home can place stress on rigid sections, especially where copper transitions to flexible tubing.
Older homes may contain polybutylene, often recognized by gray plastic tubing. It can become brittle with age, and repairs may be complicated by the condition of nearby fittings. Replacing one failed section can work when the surrounding material remains sound, but repeated failures suggest that spot repair may no longer be the sensible strategy.
PEX is flexible and usually easier to route through tight floor spaces. It tolerates some movement better than rigid pipe, but it still needs proper supports, compatible fittings, protection from abrasion, and suitable installation away from damaging heat sources. Don't mix fittings casually. A connector that fits physically may not be approved for the pipe or the location.
The federal standard addresses pressure and material selection. Manufactured homes are designed for an inlet water pressure of 80 psi, and a pressure-reducing valve is required when site pressure exceeds that level. The standard also specifies a 3/4-inch threaded inlet connection and requires approved materials and sizing that can supply fixtures without backflow or siphonage. HUD's water distribution requirements are useful when a repair involves the main inlet or a repipe.
For a broader comparison of copper, PEX, and other options, use this practical guide to plumbing pipe types. If the system includes an RV-style water heater or a related compact installation, the Class A RV Repairs Pipe Creek shop can also provide relevant equipment-specific background, though manufactured-home components still need to match the home's own code and layout.
Identifying Failure Points and DIY Troubleshooting
The first task during a plumbing emergency isn't finding the exact fitting. It's stopping the water before it reaches flooring, insulation, electrical components, or the home's support structure.
Isolate the problem safely
Use this sequence:
- Shut off the main supply. Open a cold faucet briefly to release pressure, then close it again once the flow stops.
- Identify the source. Check whether water is coming from a supply line, drain connection, water heater, toilet base, or exterior hookup.
- Protect the floor. Remove standing water, place a container beneath the leak, and avoid walking repeatedly over a softened area.
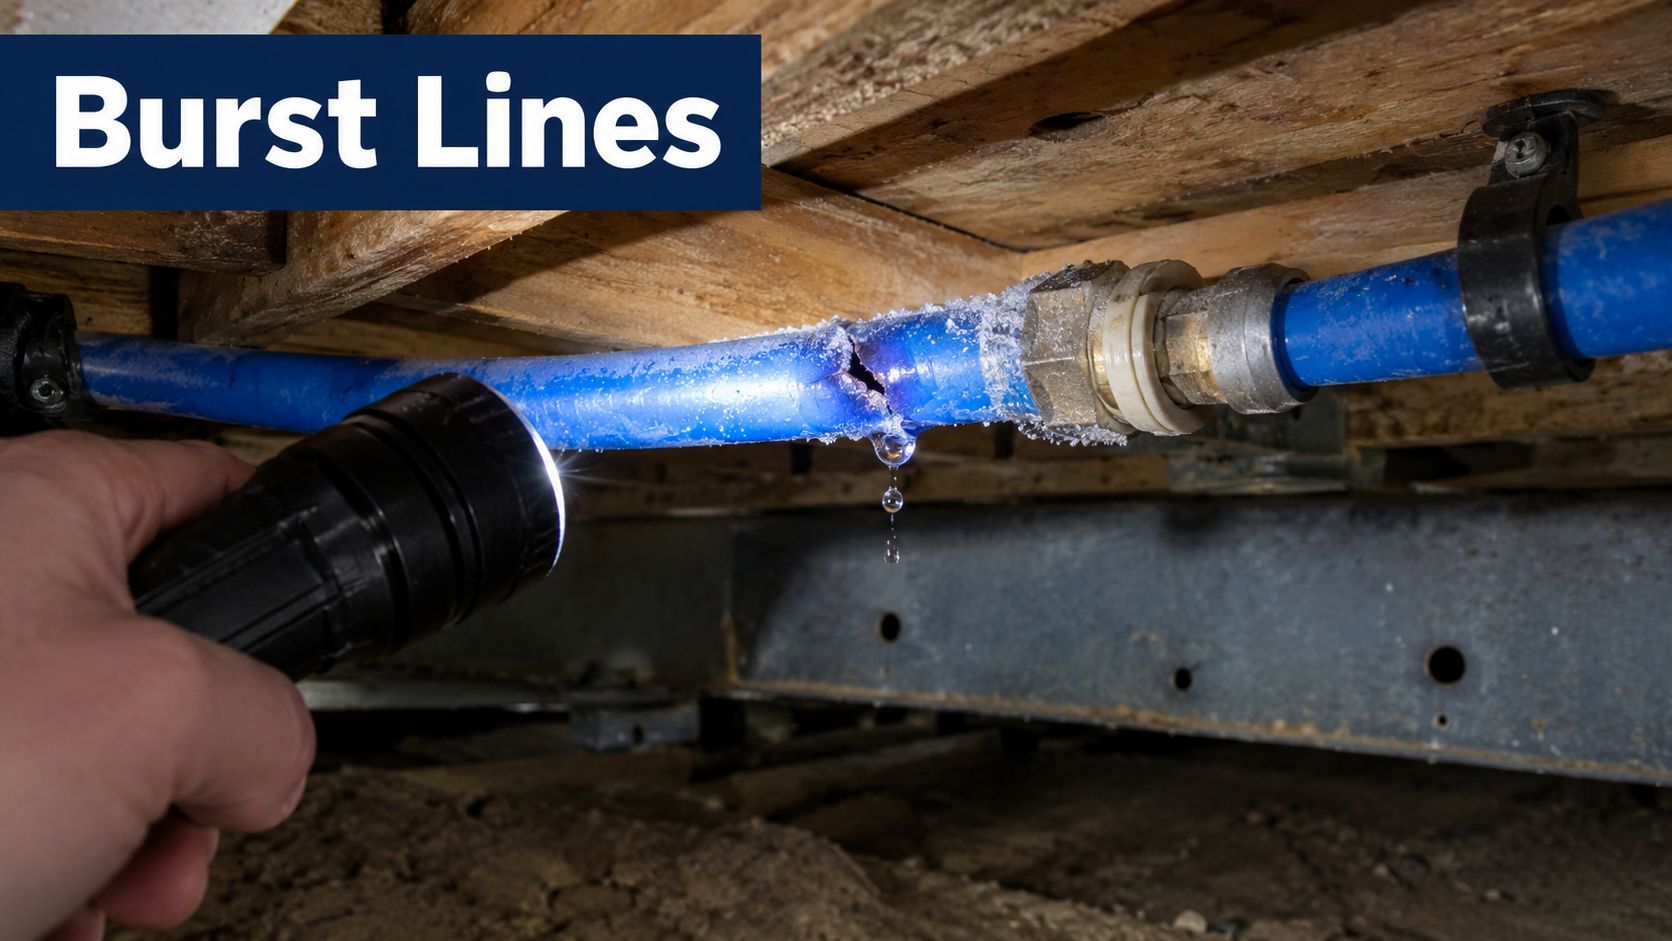
- Inspect the underbelly carefully. Use a flashlight and keep clear of exposed wiring, sharp metal, and contaminated wastewater.
- Restore only after testing. A repair should be checked under pressure before the underbelly is closed.
Frozen supply lines are a common concern because plumbing beneath the home can be exposed to cold air. Insulation that has fallen away, a torn belly barrier, or an unprotected section near the perimeter creates a weak point. When water freezes, the pipe may split, then release water after temperatures rise and pressure returns.
A failed plastic shut-off valve can produce a slow leak that looks like condensation. Place a dry towel beneath the valve, turn the supply on briefly if safe, and watch the connection. Don't force a brittle handle. If the valve body cracks, the repair may require cutting and replacing an entire section rather than tightening a nut.
Problems that need closer inspection
Toilet leaks deserve attention even when the floor around the toilet appears dry. Floor movement can compromise the seal at the toilet base, and wastewater may travel beneath flooring before becoming visible. A toilet that rocks, smells, or leaves a recurring damp mark should be isolated until the flange and floor condition are assessed.
A confident DIYer can usually replace a compatible faucet supply line, clean a trap, or tighten a loose slip connection when the area is accessible and the water is fully isolated. Cutting pipe, replacing a main inlet, opening a water heater connection, or working on a concealed drain line demands more caution.
Water that disappears into the underbelly hasn't disappeared from the building. It has moved to a place you can't easily see.
For a visual walkthrough of a typical burst-pipe situation, review the following video before attempting work beneath the home:
Stop the DIY repair if the leak returns after pressurizing, several fixtures lose pressure at once, sewage is involved, or the floor feels soft. Those signs point beyond a simple connector replacement.
Winterizing and Year-Round Maintenance Routines
Winter preparation should begin above the ground, not with a frantic search for a frozen pipe. Walk around the home and look for torn belly material, missing insulation, open skirting, and pipes that sit close to outside air. Correcting those conditions protects more plumbing than wrapping one visible fitting.
A practical seasonal sequence
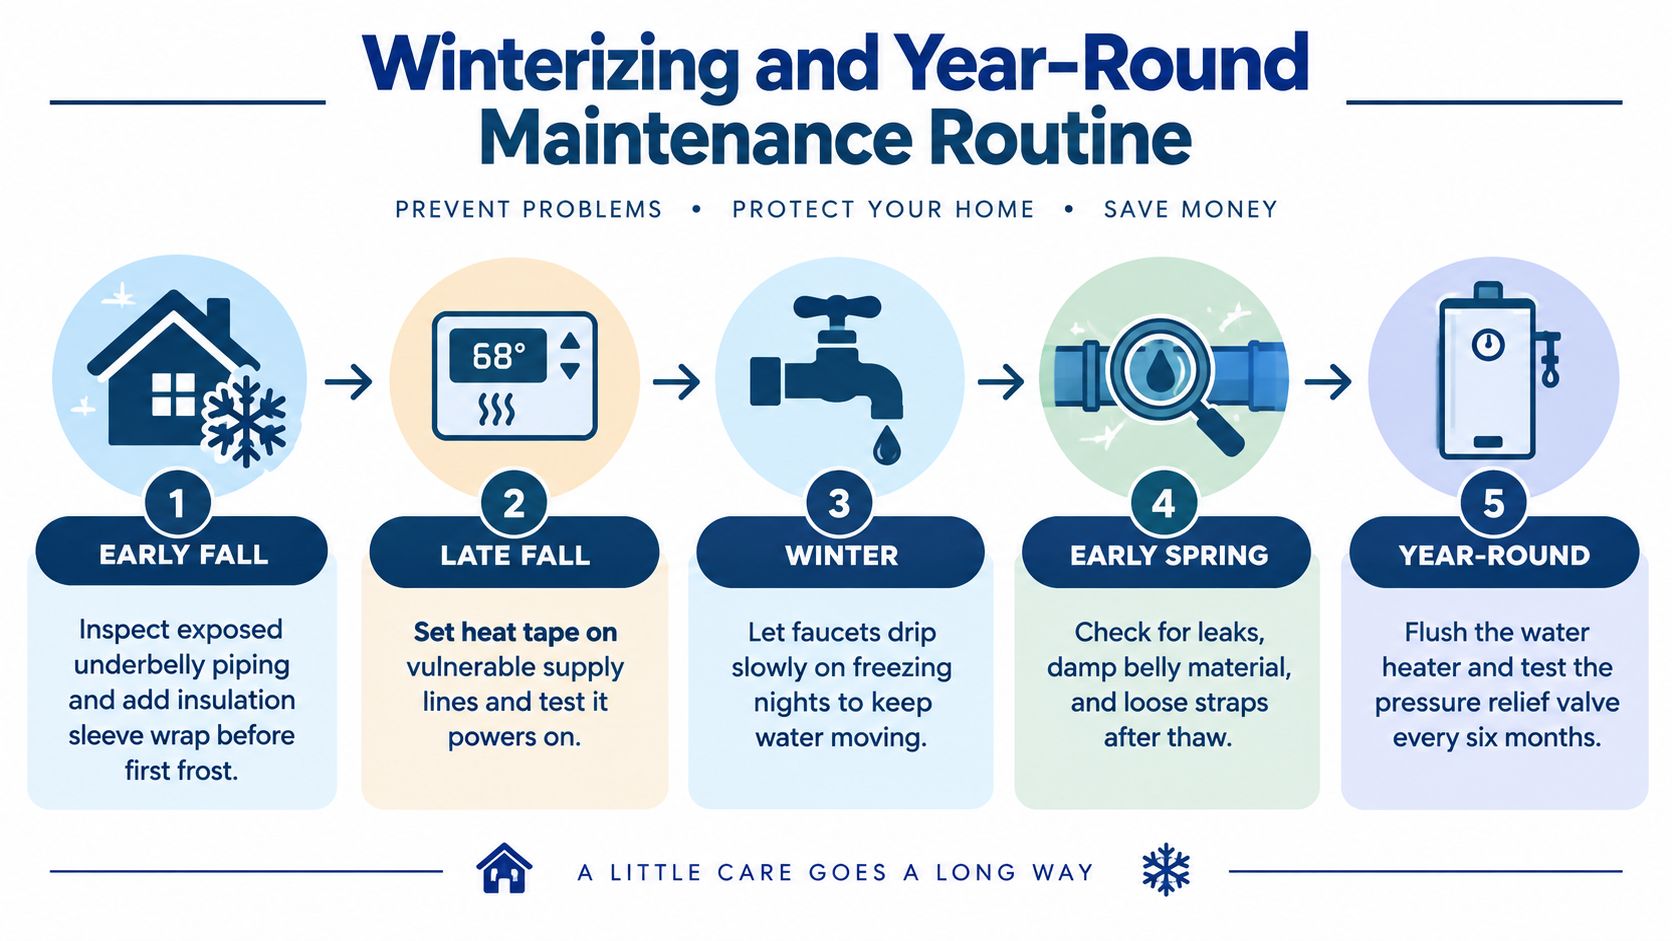
In early fall, inspect the entire accessible underbelly. Replace damaged insulation, secure loose sections, and seal openings with materials intended for the application. Don't compress insulation tightly around a pipe if doing so prevents proper coverage or creates a moisture trap.
Before freezing weather arrives, check heat tape installed on vulnerable supply lines. Use only products approved for plumbing applications, follow the manufacturer's installation instructions, and inspect the cord and thermostat for damage. Never overlap heat tape unless the product specifically permits it, and don't cover damaged equipment with insulation.
During a freezing night, modest water movement may help reduce the risk of a stagnant line freezing. That approach isn't a substitute for insulation, skirting, or correctly installed heat protection. If the home will be vacant, shut off the water and use a proper winterization procedure rather than leaving a leak to develop unnoticed.
Keep a simple maintenance record
A written record helps distinguish an isolated defect from a pattern:
- After a freeze: Look for damp insulation, split tubing, loose supports, and leaks that appear only when the water is running.
- Around the water heater: Check for corrosion, dripping connections, unusual noise, and a discharge pipe that isn't safely routed.
- At the sewer cleanout: Keep the cap accessible and investigate recurring backups or odors rather than repeatedly using chemical drain products.
- At fixtures: Watch for slow toilets, unstable bases, dripping shut-offs, and supply hoses that rub against framing.
- During routine service: Ask the technician to document pipe material and any areas that need protection.
Insulation must be installed thoughtfully. It reduces heat transfer, but it won't correct a broken belly barrier, a leaking pipe, or a failed pressure regulator. This explanation of plumbing insulation and its purpose can help you evaluate whether a proposed repair addresses the cause or only covers the symptom.
Navigating Permits, Codes, and Hookup Rules
A leak under a manufactured home can involve more than a broken pipe. The home is built under a federal construction standard, while its water, sewer, drainage, and utility connections are usually controlled by local authorities, utilities, or the park owner. Treating the entire system like conventional site-built plumbing can lead to an inaccessible repair or a failed inspection.
That distinction becomes important during a repipe. Replacing a faucet or an exposed trap may stay within the home. Altering the main water connection, sewer lateral, meter connection, or site drainage can require approval from the park, utility, health department, building department, or other authority having jurisdiction.
The federal framework took effect on June 15, 1976, when the Manufactured Home Construction and Safety Standards began governing core construction and plumbing requirements for newer manufactured homes. As noted earlier, those requirements address the home itself. They do not replace local rules for the property connection.
Where local rules take over
Local requirements control what happens outside the home, including service capacity, pressure, burial depth, sanitation, cleanouts, and protection of shared lines. One municipal health standard, for example, requires a mobile-home lot water service capable of delivering 6 to 8 gallons per minute at a minimum pressure of 25 psi. Another cited requirement specifies 150 gallons of water per day per mobile home and distribution piping at least 4.5 feet below the surface. These figures are local examples, not universal requirements. Southern Nevada's mobile-home park plan-review requirements illustrate why the site connection needs its own review.
Inside the home, HUD requirements cover approved materials, workmanship, fixture performance, and construction details. The crawlspace and underbelly create added inspection concerns. A repair may be technically sound yet still fail if the belly barrier, supports, access, or connection method is left in poor condition.
Before work begins, confirm:
- Which agency or park authority approves the connection?
- Does the project change the home's main water or sewer connection?
- Is an inspection required before a trench or underbelly is closed?
- Are the replacement materials approved for manufactured-home use?
- Could the work affect a shared line or neighboring lot?
Los Angeles owners can start with this guide to plumbing permits, then verify the requirements with the responsible local authority. Resolving the permit question before cutting pipe is less costly than reopening an inaccessible connection after inspection.
Cost Ranges and When to Call a Licensed Plumber
A reliable plumbing price for a manufactured home can't be determined from the fixture alone. The technician needs to know whether the leak is inside the home, beneath the floor, at the main connection, or in the site sewer line. Access, damaged insulation, pipe material, previous repairs, and the condition of the floor can change the scope substantially.
For that reason, a responsible contractor should inspect first and provide a written, site-specific estimate rather than promise a universal price range. The table below gives a more honest planning framework without inventing dollar amounts that could mislead a homeowner.
| Service Type | Estimated Cost Range | Complexity Level |
|---|---|---|
| Replace a faucet supply line or accessible shut-off | Site-specific quote after inspection | Low |
| Repair a leaking trap or exposed drain connection | Site-specific quote after inspection | Low to moderate |
| Replace a section of underbelly supply piping | Site-specific quote after inspection | Moderate |
| Repipe extensive aging or failed supply lines | Site-specific quote after inspection | High |
| Diagnose a concealed leak | Site-specific quote after inspection | Moderate to high |
| Repair or replace a main sewer connection | Site-specific quote after inspection | High |
| Clear a persistent sewer obstruction or damaged line | Site-specific quote after inspection | High |
The repair decision isn't only about price
Spot repair makes sense when one accessible fitting has failed and the surrounding pipe is flexible, supported, and in good condition. A repipe becomes more defensible when leaks recur in different areas, older tubing has become brittle, or previous repairs have created a chain of incompatible connections.
Call a licensed plumber when water pressure drops throughout the home, a sewer odor persists, wastewater backs up, or a leak continues after the main valve is closed. Electronic leak detection, drain camera inspection, hydro jetting, and sewer excavation require equipment and judgment that a basic fixture repair doesn't.
A professional should also verify that replacement materials and workmanship meet the applicable standard. HUD requires manufactured-home plumbing to be durable, free from defective workmanship, and capable of satisfactory service over a reasonable life expectancy. The standard also limits toilet flush demand to 1.6 gallons per flush and requires plumbing materials to meet referenced standards or be listed by a nationally recognized testing laboratory. The federal plumbing performance requirements provide the relevant code reference.
Don't choose a contractor solely because the first verbal quote sounds low. Ask what access work is included, whether damaged underbelly material will be restored, how the repair will be pressure-tested, and whether the estimate covers disposal and cleanup. The cheapest visible fix can be expensive if it leaves the actual failure point untouched.
How EZ Plumbing Supports Los Angeles Property Owners
Los Angeles manufactured-home owners often need more than a standard fixture technician. A useful service call may involve a tight underbelly, aging pipe materials, a shared property connection, an HOA requirement, or a sewer problem that begins beneath the home and extends into the site line. The contractor must diagnose the whole path, not just replace the first wet fitting.
EZ Plumbing serves Los Angeles homeowners, property managers, HOAs, landlords, and commercial property owners. Its service model includes 24/7 emergency response, same-day scheduling for planned repairs, clear communication, and upfront recommendations before work proceeds. Those details matter when a burst line is releasing water below a home or when a recurring drain problem threatens multiple units.
Matching tools to the failure
A qualified plumbing contractor should select the diagnostic method based on the evidence:
- A pressure check can help identify a supply-side problem.
- A camera inspection can show whether a sewer line is obstructed, separated, or damaged.
- Hydro jetting can remove accumulated grease and debris when the pipe condition supports that method.
- Leak detection can help locate concealed water loss without opening large areas unnecessarily.
- Water-heater service can distinguish a tank performance issue from a broader hot-water distribution problem.
EZ Plumbing is a licensed and insured contractor with a C-36 license, and it works across communities including Beverly Hills, Santa Monica, West Hollywood, Pasadena, Glendale, Burbank, and the San Fernando Valley. Its broader services include emergency plumbing, drain cleaning, sewer diagnostics and repair, water-heater repair for tank and tankless systems, and licensed gas leak detection and remediation.
The practical benefit is accountability. A contractor familiar with Los Angeles properties can coordinate with an HOA or property manager, identify whether a connection is part of a shared system, and recommend a repair that accounts for access and code requirements. That approach reduces the risk of closing the underbelly before the system has been properly tested.
If you're dealing with a leak, weak pressure, recurring sewer odor, or a repipe decision, collect photos of the affected area and note when the problem occurs. Give that information to the plumber before the visit so the technician can bring the right diagnostic equipment and explain whether repair or replacement is the safer path.
EZ Plumbing provides 24/7 emergency plumbing, leak detection, drain cleaning, hydro jetting, water-heater service, and sewer diagnostics for Los Angeles manufactured homes and other properties. Visit EZ Plumbing to schedule service or call (818) 908-2710 when a mobile home plumbing problem needs a licensed professional.