
What Is a Water Shut Off Valve and How Does It Work
You're standing in the kitchen when you hear it, a sharp hiss behind the wall or a steady rush under the sink. A cabinet floor is filling with water, a bathroom supply line has split, or a washing-machine hose has let go. You know there's a small handle somewhere that can stop the flow, but you're not sure which one controls the whole house, which one serves only the leaking fixture, or whether turning the handle will make things worse.
That small control is a water shut off valve. It isolates the water supply so you can stop a leak, work on a fixture, or protect the property while help is on the way. Once you understand the difference between the main valve and local valves, the emergency becomes much more manageable. You don't need special training. You need a clear mental map, a flashlight, and the confidence to recognize a quarter-turn handle.
Table of Contents
- The Panic Moment Every Homeowner Eventually Faces
- How a Water Shut Off Valve Actually Stops the Flow
- The Main Types of Valves in a Typical Home
- Where to Find Every Valve in Your House
- Warning Signs a Valve Is About to Fail
- How to Turn the Water Off and Back On Safely
- Smart Valves, Lead-Free Rules, and When Upgrading Makes Sense
- When the Right Move Is Calling a Licensed Plumber
The Panic Moment Every Homeowner Eventually Faces
Water moves faster than expected. A broken angle stop under a bathroom sink can send a hard stream into the cabinet, across the floor, and underneath baseboards before you've found a towel. In Los Angeles homes, the main valve may be in a garage, a utility closet, a planter box, or near the point where the service line enters the building. If nobody has identified it beforehand, the search becomes part of the emergency.
The valve itself is simple, but its job is important. A main shutoff valve controls water entering the property. Smaller isolation valves control individual fixtures, such as a toilet, sink, water heater, or washing machine. Building codes treat these controls as core plumbing features. Code excerpts collected by the water-supply control requirements describe main shutoffs near the curb or service-entry point and accessible shutoffs on supply lines serving many fixtures.
The first move during an unknown leak: Shut off the main, then investigate. Stopping the supply gives you time to think.
Suppose water is spreading from a wall and you can't see the failed pipe. Don't waste time looking for a local handle that may not exist. Go to the main valve, turn it off, and open a faucet to confirm that pressure is falling. If the leak is clearly coming from a toilet supply or sink connection, the local valve may stop that fixture without interrupting water elsewhere.
The useful picture is a short brass valve with a lever. When the lever runs in the same direction as the pipe, the valve is open. Turn it a quarter-turn so the lever crosses the pipe, and the flow stops. A calm hush replaces the rushing water. Finding that handle on a dry afternoon is far easier than finding it while soaked boxes and hardwood flooring compete for your attention.
How a Water Shut Off Valve Actually Stops the Flow
A leak may begin behind a wall, under a sink, or beside an appliance. The handle you turn works by interrupting the water passage inside a pressurized pipe. That makes a shutoff valve an isolation device, a mechanical gate that separates the leaking section from the water supply.
Residential valves commonly close with either a rotating ball or a rising gate. Their internal designs explain why one handle stops flow with a quarter-turn while another requires several rotations.
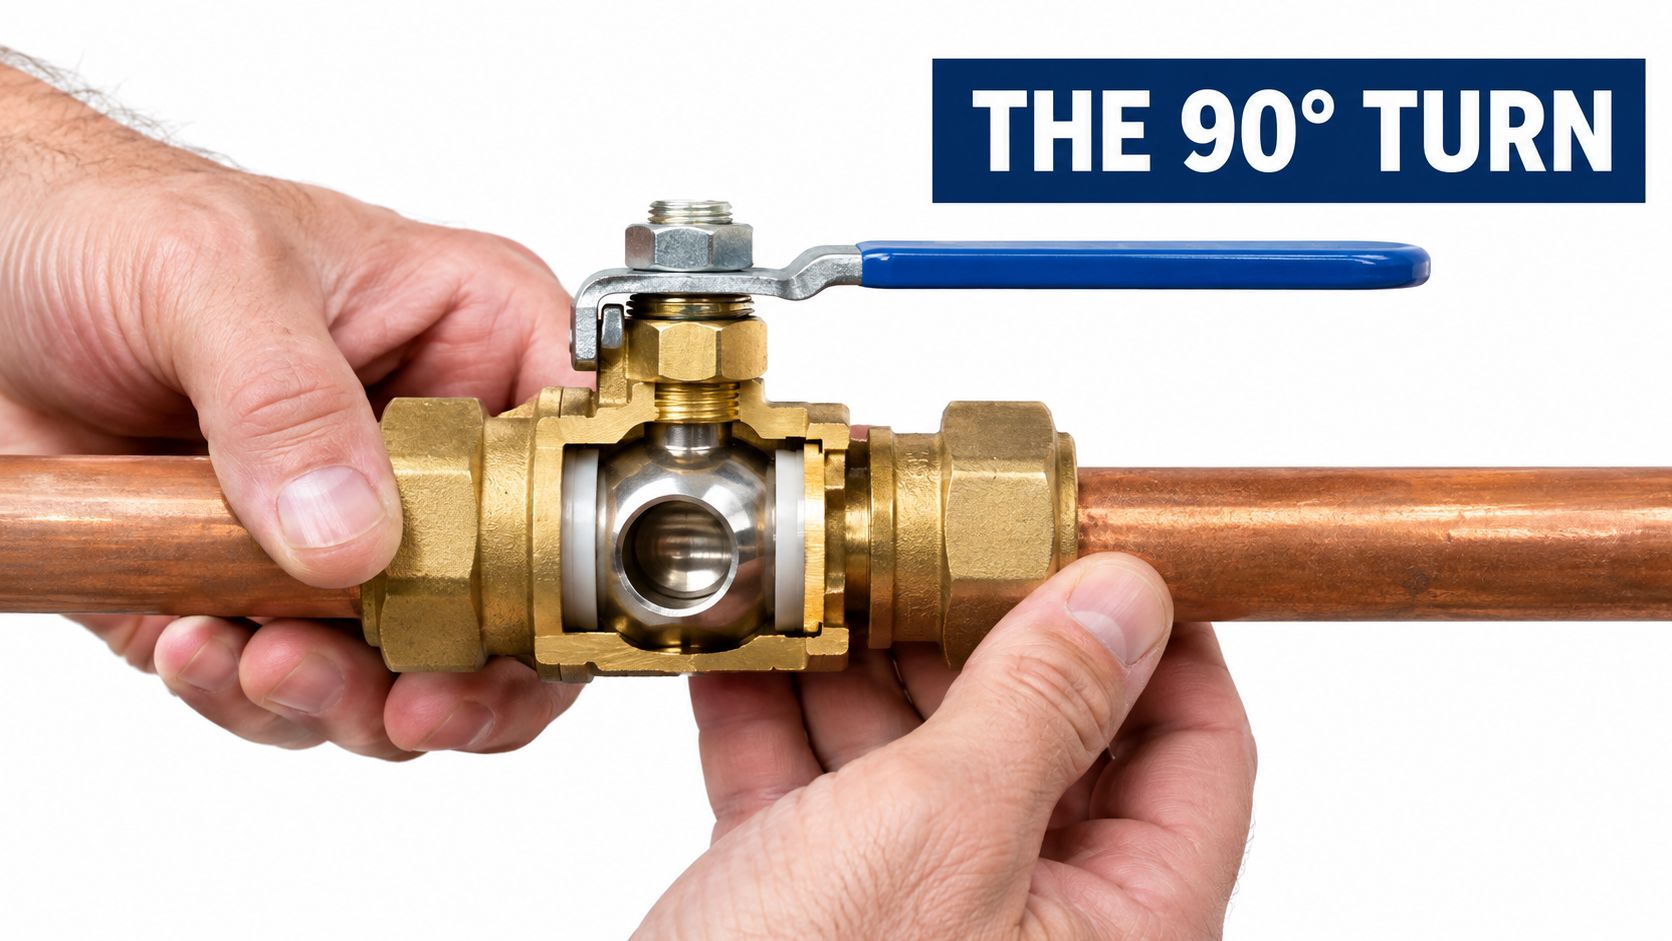
The ball valve
A ball valve contains a spherical plug with a hole through its center. With the hole aligned to the pipe, water travels straight through. Rotate the handle a quarter-turn, or 90 degrees, and the solid side of the ball faces the passage, blocking it like a cork placed across a tube.
Use this rule when you reach a lever-style valve:
Lever parallel to the pipe means open. Lever perpendicular to the pipe means closed.
The lever turns a stem, and the stem rotates the ball. A packing seal around the stem helps prevent water from escaping through the point where the stem enters the valve body. A small nut beneath the handle is commonly the packing nut. It is not a general adjustment point, so avoid tightening it aggressively while the line is pressurized.
Ball valves suit main lines because they close quickly with little effort. In a full-port design, the opening through the valve is approximately the same size as the pipe, limiting added restriction. Reduced-port designs have a smaller internal opening and often serve fixture branches, where one appliance or fixture already uses the line. Technical ball-valve guidance explains these internal differences and lists common residential sizes such as 1/2 in, 3/4 in, and 1 in.
The gate valve
A gate valve closes with a sliding barrier inside the pipe. Turning the round wheel moves a threaded stem, raising or lowering the gate against its seat. Clockwise generally closes the valve, and counterclockwise opens it, often after several turns.
The parallel-perpendicular rule applies to quarter-turn levers, not round-handled gate valves. An old gate valve may feel stiff after years of sitting untouched. Use steady hand pressure only. If the stem or valve body begins to bend, stop. Adding a wrench or pipe extension can break the stem and turn a controlled shutoff into a main-line repair.
The handle, stem, packing area, and internal closure each have a job. Knowing how they work lets you operate the valve deliberately, especially when high pressure and an aging valve make an emergency more stressful.
The Main Types of Valves in a Typical Home
Homeowners often use “the shutoff valve” to describe several different components. Their purposes overlap, but their locations and operating methods don't. A main valve protects the entire property, while a local valve lets you isolate one fixture and leave the rest of the plumbing in service.
| Valve Type | Where It Is Found | How to Operate | Best Use |
|---|---|---|---|
| Main shut off | Where the service line enters the home, near a foundation or front wall | Quarter-turn lever or clockwise wheel | Stop water to the whole property |
| Fixture or isolation valve | At a water heater, washing machine, appliance, or equipment branch | Usually a lever or handle | Isolate one appliance or system |
| Angle stop | Under sinks and behind toilets | Turn the handle clockwise, or use the small lever as designed | Stop one fixture supply |
| Ball valve | On main lines and branch lines | Lever parallel is open, perpendicular is closed | Fast emergency isolation |
| Gate valve | Older main lines and some older branch connections | Turn the round wheel clockwise to close | Older installations where a valve remains serviceable |
Main shutoff
The main shutoff sits on the private side of the service connection. It may be a ball valve with a colored lever or an older gate valve with a round wheel. Closing it stops water throughout the home, so use it when the leak is hidden, widespread, or too forceful for a local valve.
Fixture and angle stops
An angle stop is the compact valve you'll usually find below a sink or behind a toilet. It changes the direction of the supply line and gives that fixture its own control. A similar local valve may serve a dishwasher, refrigerator ice maker, washing machine, or other appliance. These valves are convenient because they let you repair one connection without shutting down every faucet.
Ball and gate valves
“Ball” and “gate” describe the internal mechanism, not necessarily the valve's location. A ball valve may be the main valve or a local valve. A gate valve may also appear in either position, particularly in older Los Angeles plumbing. Older gate valves can seize or fail to seal, while a functioning quarter-turn ball valve is generally easier to operate during an emergency.
Look at your own home and label the valves mentally. Identify the main, then identify the local controls under each sink, behind each toilet, at the laundry hookups, and near the water heater. That small exercise turns unfamiliar brass hardware into a set of clearly assigned controls.
Where to Find Every Valve in Your House
Start outside and work inward. Near the sidewalk or property line, look for a curb-stop box, often covered by a rectangular lid or a round brass cover. The exact appearance varies by utility and property, but the box typically marks the connection near the water meter. The curb stop is generally the utility's control, not the valve you should rely on for routine homeowner work.
Your private main shutoff is usually closer to the building. Check where the water service enters through an exterior wall or foundation, then inspect the garage, a mechanical closet, a laundry area, or a front-wall access point. Slab-on-grade Los Angeles homes may hide the valve in a planter box, a garage, or a closet rather than placing it in a basement or crawlspace.
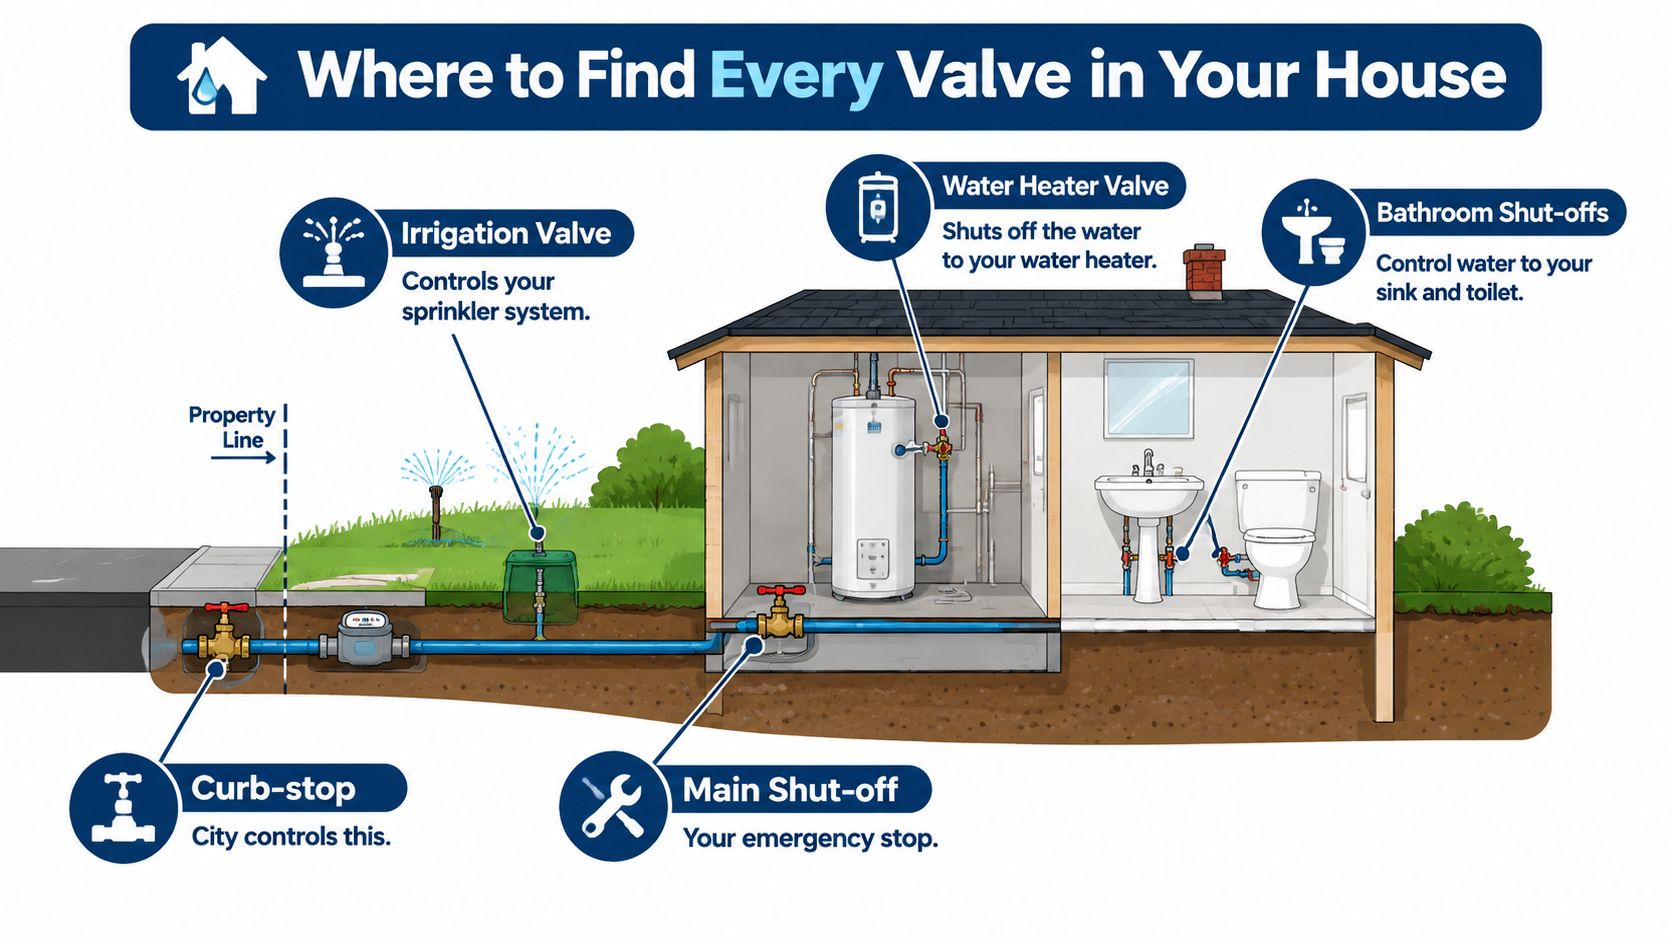
Follow the branches
After you've found the main, trace the branches serving the home:
- Irrigation: Look for a valve box in the yard near sprinkler piping. This branch may have its own shutoff, but it won't necessarily stop a leak inside the home.
- Water heater: Find the cold-water supply entering the tank and identify the isolation valve on that line. It controls water entering the heater, not every fixture in the property unless the plumbing layout makes it part of the main path.
- Kitchen and bathrooms: Check below every sink and behind every toilet for angle stops. They're usually small, metallic valves connected to flexible supply tubes.
- Laundry area: Inspect the hot and cold washing-machine connections. These local valves are valuable during a hose failure.
- Specialty fixtures: Dishwashers, refrigerators, filtration equipment, and other devices may have small branch valves tucked inside cabinets or beside the equipment.
If storage hides a sink valve, reorganizing the cabinet can make emergency access much easier. A practical collection of clever under sink storage ideas can help you keep cleaning supplies away from the valve and leave enough room for a hand and flashlight.
In a multi-unit building, don't assume a valve in a shared garage or utility room is yours to operate. It may control several apartments or belong to the building's plumbing system. Ask the property manager or HOA to identify your unit's shutoff and the building emergency valve.
Warning Signs a Valve Is About to Fail
A valve usually gives you clues before it becomes unusable. A handle that once moved smoothly may become stiff. A stem may leave a bead of water on your finger when you touch it. Brass may develop a green, blue-green, or white crust, while nearby pipe surfaces show staining or orange corrosion.
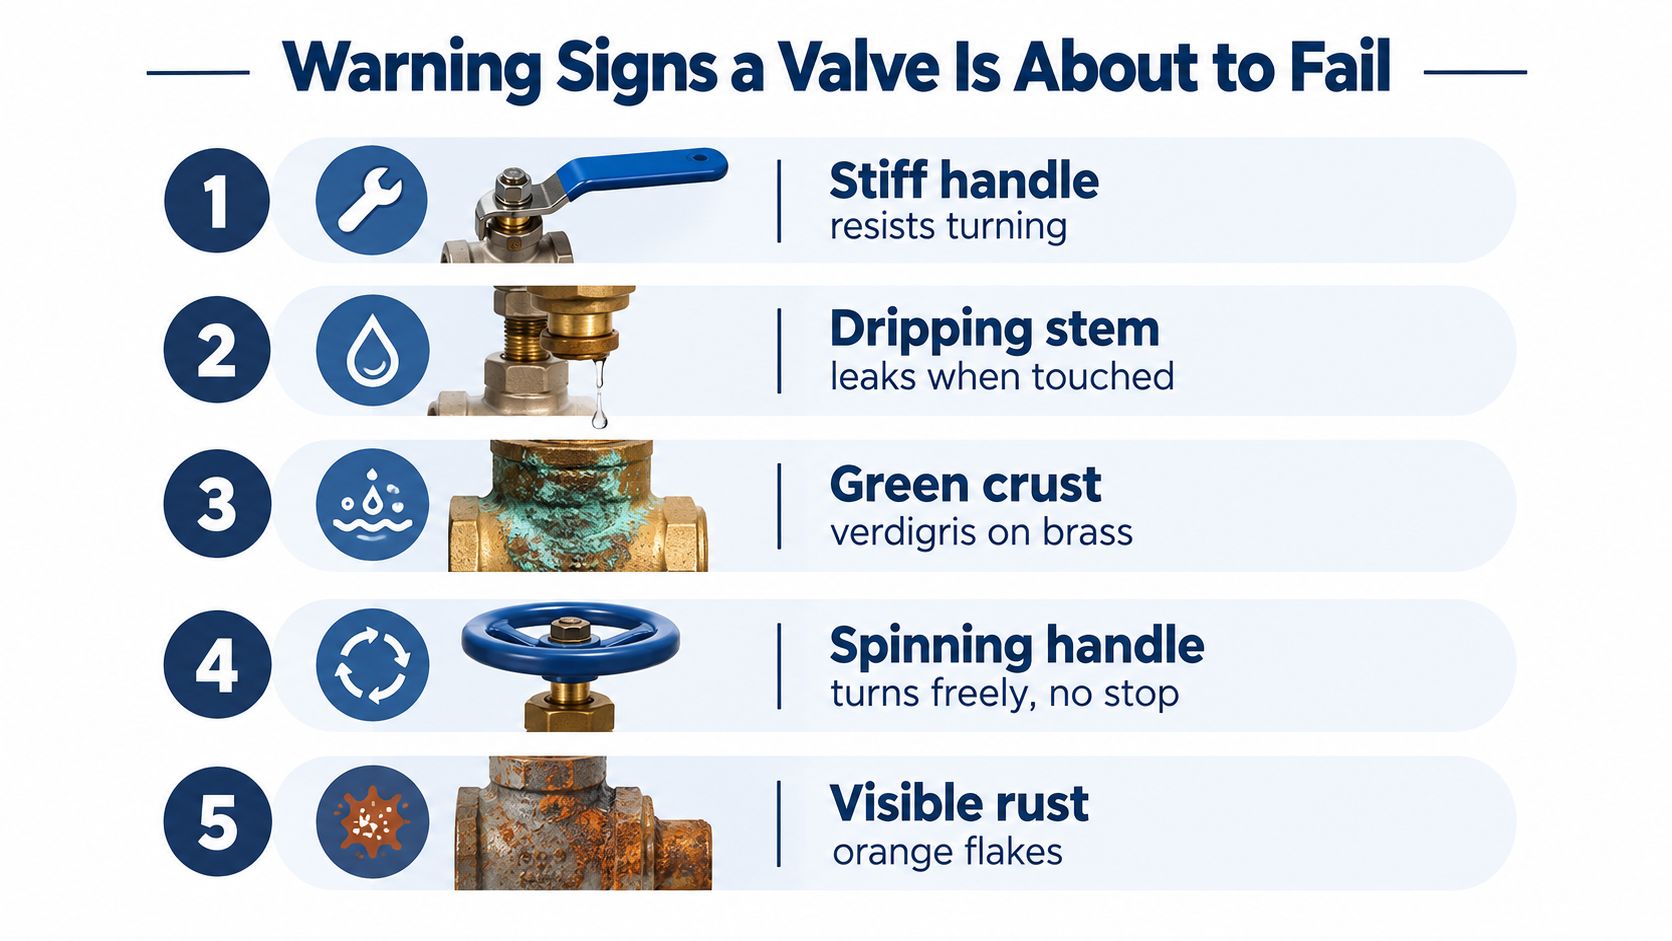
The correct response depends on the symptom, not just the age or appearance of the fitting.
- Stiff handle: If there's no active leak, try gentle movement without forcing it. A valve that resists turning needs attention before an emergency, because extra force can damage the stem or connected pipe.
- Dripping stem: Water escaping around the stem or packing area can indicate a worn seal. Turning a nut harder isn't a guaranteed repair, and excessive tightening may make operation worse.
- Green or white buildup: Crust on brass suggests corrosion or mineral deposits. Clean the surrounding area carefully so you can watch it, but arrange an evaluation if the valve body or connection is deteriorating.
- Handle that spins freely: A handle that turns without reaching a firm stop may no longer be engaging the internal mechanism. Treat it as unreliable, even if the fixture still has water.
- Rust and discoloration: Orange flakes or staining on the valve or adjacent pipe can signal deterioration. Don't wait for the fitting to split before planning replacement.
A local fixture valve that fails to stop flow can justify shutting the main and replacing the local valve. For practical guidance on a valve that is already leaking, see what to do about a leaking shut-off valve. If the main valve is cracked, actively spraying, or impossible to operate, keep clear of improvised repairs and call a licensed plumber.
How to Turn the Water Off and Back On Safely
A leaking supply line can turn a small repair into a spreading mess. Start with the valve closest to the problem when you can identify it. Use the main shutoff for an unknown leak, a concealed leak, or water moving toward electrical equipment.
For a quarter-turn valve, check the lever before touching it. A lever aligned with the pipe means water is flowing. Grip the handle and rotate it a quarter-turn until it crosses the pipe. Keep your other hand off the valve body, and do not add a second wrench or a long bar to force a seized handle. Excessive force can damage the stem, valve, or connected pipe.
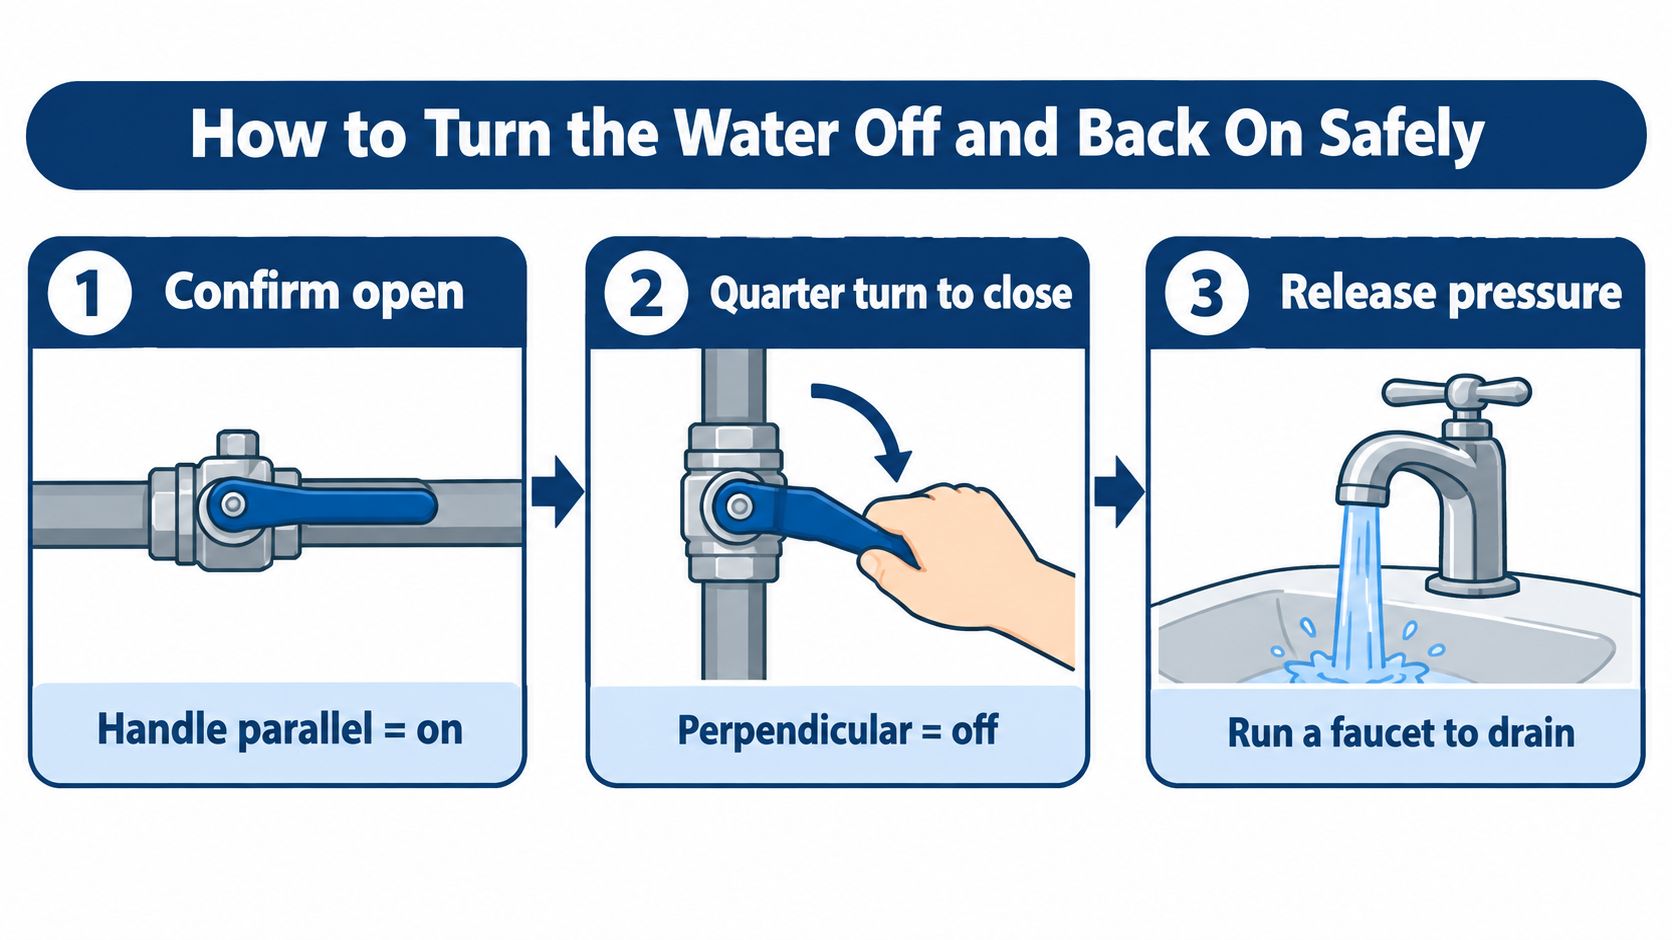
Confirm the isolation
Open a nearby faucet after closing the valve. Water already under pressure in the line may run briefly, then the stream should taper off. A steady stream suggests the wrong valve was closed or the valve is not sealing.
For one fixture, test its local stop. For an unknown or concealed leak, close the main. If water has reached an outlet, appliance, or electrical component, do not reach into the water or disconnect equipment from a wet area. Move away and use the appropriate electrical disconnect only when you can do so safely.
Review the main water supply shutoff procedure before an emergency. Store a flashlight and adjustable wrench near the main. The wrench is for suitable service nuts and fittings, not for forcing a frozen handle.
Reopen gradually
After the repair, open the main slowly. Gradual repressurization reduces the chance of water hammer, a pressure surge that can stress pipes, fittings, and fixtures. Open a faucet slightly, then listen while walking through the house. Banging, sharp knocks, or unusual rushing indicate that air or pressure is still moving through the system. Open fixtures one at a time to let trapped air leave in a controlled way.
For broader bathroom work, a bathroom finish project by NorCal Construction can help you plan shutoff access before walls or cabinets cover the plumbing.
Here's a visual reminder of the sequence:
Smart Valves, Lead-Free Rules, and When Upgrading Makes Sense
A smart shutoff valve is usually a motor-driven ball valve installed on the main line. A paired leak sensor can detect water and signal the valve to close, or you can operate it through a phone or connected control system. That adds remote oversight, but it doesn't eliminate the need for a properly installed manual shutoff that you can reach and operate.
Smart equipment makes the most sense when nobody is present to catch a leak quickly. A second home, rental property, frequently vacant unit, or household that travels may benefit from automatic isolation. Property managers and HOAs may also value remote alerts when one person oversees several units. Older Los Angeles homes with aging supply piping can be candidates for evaluation, but a smart device won't correct corroded pipe or a failing valve connection.
The other upgrade question is material compliance. EPA guidance says potable-water components, including valves, fall under the Safe Drinking Water Act's lead-free definition of no more than 0.25% weighted average lead on wetted surfaces, while products used exclusively for nonpotable service may be exempt. EPA's lead limits for plumbing fittings and fixtures explains the distinction. NSF also describes more stringent leaching criteria for small shutoff valves and related plumbing components taking effect in 2024, while EPA materials updated in late 2025 emphasize compliance across the supply chain.
Choose a valve certified for the intended potable-water application, and verify local permitting requirements before changing a main line. Installing a sensor and configuring an app is reasonable homeowner work. Cutting into the service line, selecting a compatible valve, and completing permitted work belong with a licensed professional. You can review the practical role of an automatic shut-off valve before deciding whether the added control matches your property's risk.
When the Right Move Is Calling a Licensed Plumber
Some valve jobs are small. Others sit at the point where water pressure, concealed piping, electrical equipment, permits, and property damage overlap. A corroded main valve that won't budge is not a good place to practice with a pipe wrench. If the stem weeps, the body cracks, or the valve refuses to stop flow, a plumber can isolate the system and replace the component without turning the repair into a larger break.
Call for professional help when a fixture stop repeatedly fails to shut off, when the main connection is deteriorated, or when work involves the cold inlet serving a water heater. Water-heater connections require careful isolation, and the surrounding installation may involve scalding water, electrical equipment, gas, or code requirements. A licensed technician can also distinguish a bad valve from a pressure, piping, or fixture problem.
For Los Angeles homeowners, main-line modifications may require review by the Los Angeles Department of Building and Safety. California contractor law places this plumbing work under the C-36 plumbing classification, so verify the contractor's license and insurance before authorizing repairs. Don't rely on an unlicensed person for work that affects the service entrance or a shared building system, and check your insurance requirements before an emergency occurs.
EZ Plumbing serves Los Angeles homes, HOAs, property managers, and commercial properties with valve locating, isolation, repair, and replacement services. If you're in the greater Los Angeles area, arranging an inspection before a burst pipe is far easier than searching for a hidden handle while water runs across the floor.
If you're unsure which valve controls your Los Angeles home, EZ Plumbing can locate it, test its operation, and replace a seized or leaking shutoff with the right permitted solution. Visit EZ Plumbing to schedule service or request help before the next plumbing emergency turns into property damage.