
Water Valve Leaking? a Los Angeles Repair Guide
You open a cabinet for a routine check, or a tenant calls saying there's water under the sink. The valve looks like it's only seeping. Then you touch the supply line, hear a faint hiss, or see the cabinet floor already swelling. That's the point where a small maintenance issue can turn into drywall damage, flooring replacement, tenant disruption, and an insurance headache.
For Los Angeles property owners, the question isn't just how to fix a leaking valve. It's when a quick fix is reasonable and when touching the valve is the risky move. In older homes, small apartment buildings, and mixed-age plumbing systems, the shutoff valve that drips today can be the same one that snaps, seizes, or refuses to close when you need it most.
Table of Contents
- First Response What to Do When You Find a Leak
- Diagnosing Your Leak Identifying the Valve and Problem
- DIY Fixes for Common and Minor Valve Leaks
- Replacing a Shutoff Valve A Step-by-Step Guide
- Know Your Limits When to Call a Professional Plumber
- Preventing Future Leaks A Maintenance Checklist for LA Properties
First Response What to Do When You Find a Leak
If you've got active water, your first job is simple. Stop flow, protect finishes, and avoid turning a small leak into a burst line. A valve leak is never something to “watch for a while,” because even a small opening can waste a lot of water. A 1/16-inch leak can waste 943 gallons per day, and a 1/4-inch leak can release 1,181,500 gallons in three months, according to Ringwood leak reference data.
Start under the fixture if the leak is localized to a sink, toilet, or dishwasher supply. Look for the small shutoff at the wall or floor. Under sinks and behind toilets, that's usually an angle stop. Turn it gently clockwise. Don't force it. If the handle keeps turning, feels soft, or starts leaking more from the stem, stop and move to the main shutoff.
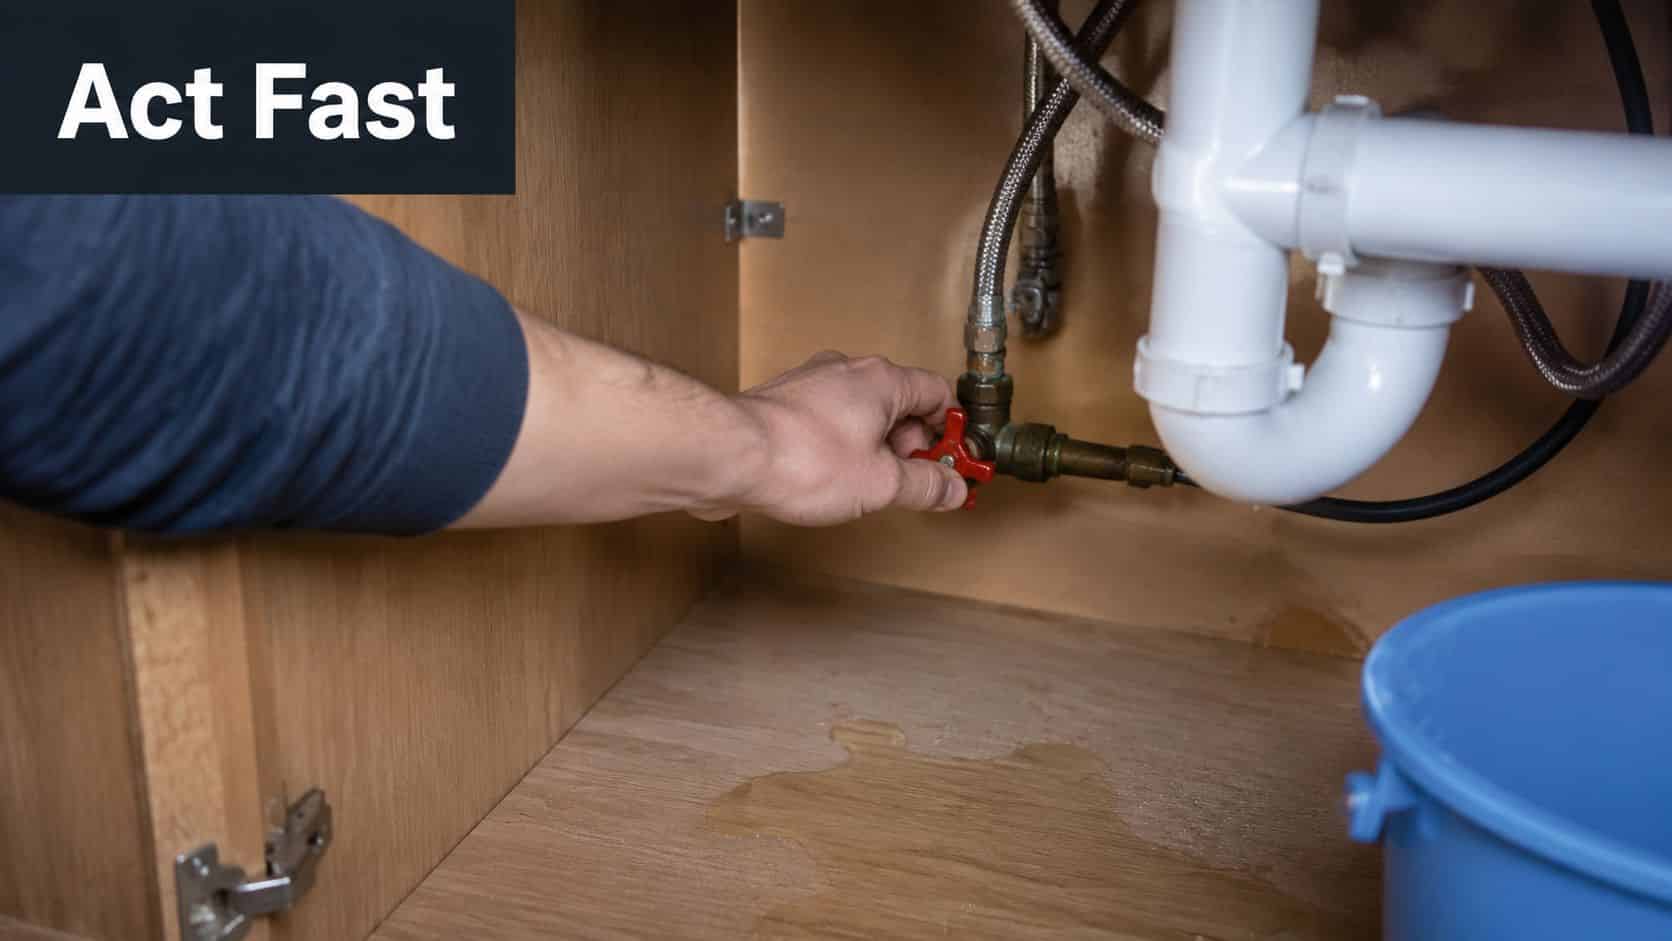
The first five minutes
- Contain the area first. Put a bucket, pan, or thick towels under the leak. If water is near a power strip, appliance cord, or outlet, cut power to that area if you can do it safely.
- Try the local shutoff once. One controlled attempt is enough. If the valve resists or worsens the leak, don't keep working it back and forth.
- Go to the main water shutoff if needed. For many owners, this is outside near the meter, at the side yard, in a garage, or where the service line enters the building. If you're not sure where yours is, this guide to shut off the main water supply is worth bookmarking before you need it.
- Open a faucet after shutdown. That relieves pressure and drains some remaining water from the line.
- Document what you found. Take photos of the leak source, any swelling cabinets, damaged flooring, wall staining, and the valve position.
Practical rule: If turning the valve requires force, the safest move is usually to stop and isolate the system another way.
What not to do
A lot of secondary damage happens because someone is in a hurry and grabs pliers, reefing on an old stop valve. That works on a newer, healthy valve sometimes. On older brass, chrome-plated stops, or valves sitting on brittle supply tubes, it can crack the body, distort the packing, or loosen the pipe in the wall.
For a property manager, there's also a liability side. If a unit is occupied, tell the resident not to keep testing the fixture. Shut it down, document the condition, and keep the area accessible until the valve is assessed properly.
Diagnosing Your Leak Identifying the Valve and Problem
Once the water is under control, the next step is identifying what valve is leaking, where it leaks from, and whether that leak suggests adjustment or replacement. Don't guess. The repair decision depends on the leak point more than the drip size.
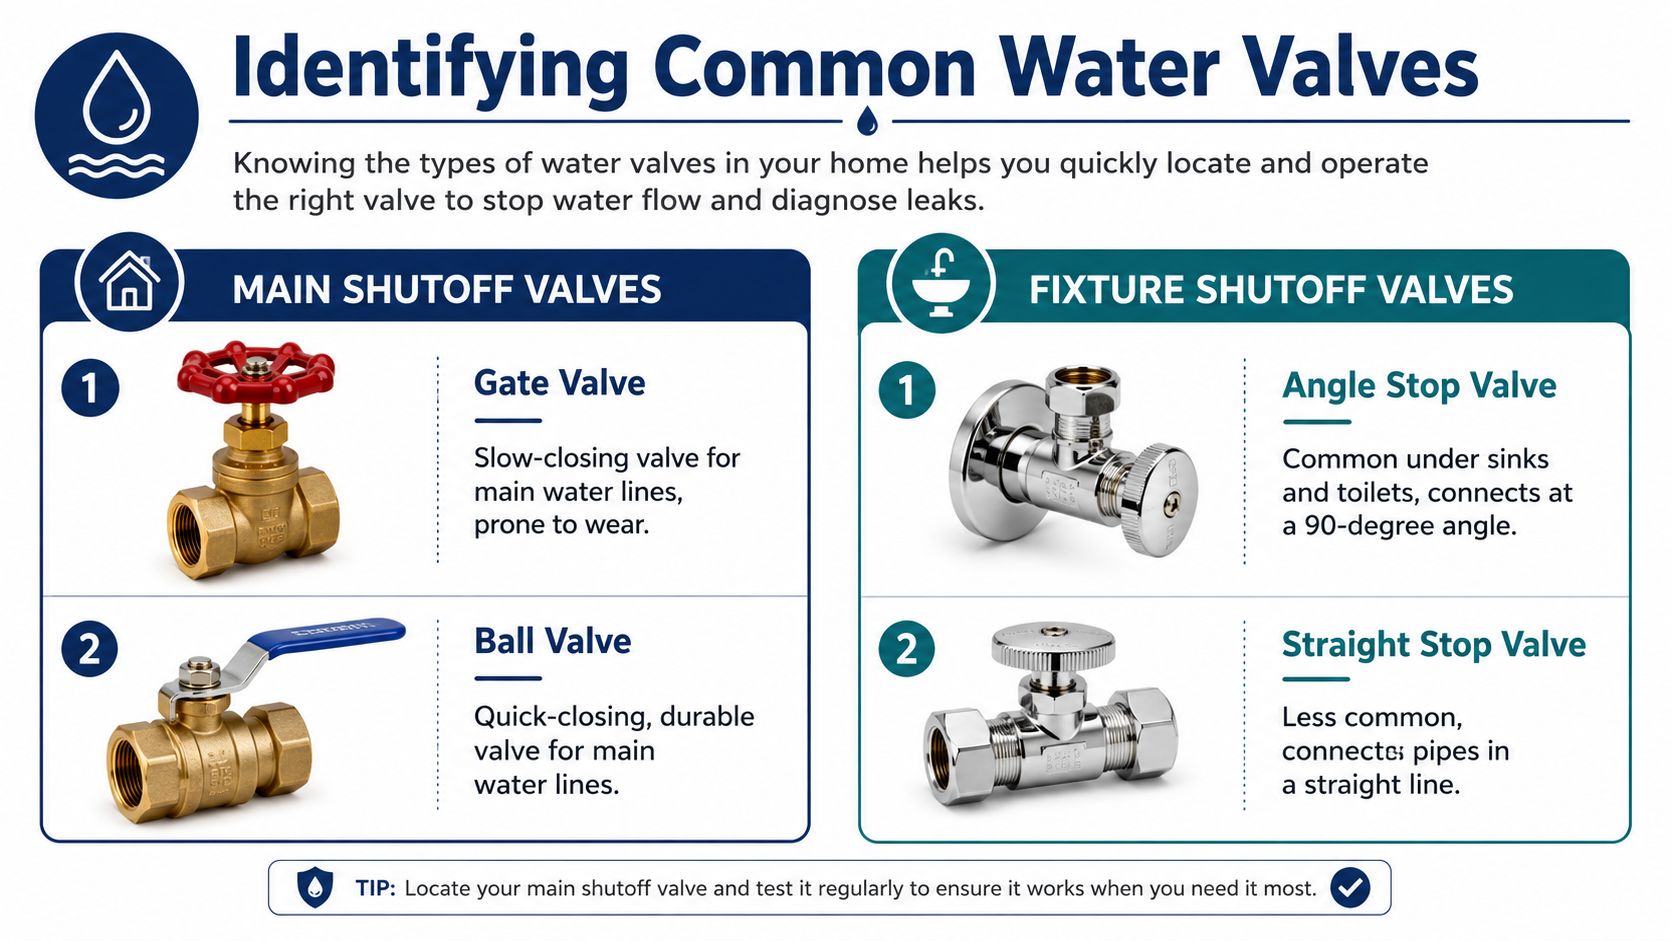
What valve you are looking at
In LA properties, you'll usually run into these:
- Gate valve: Wheel handle, often older, usually found on main or branch shutoffs. It closes by lowering an internal gate. These are common in older buildings and often don't like being exercised after years of sitting.
- Ball valve: Lever handle, quarter-turn operation. If the handle is parallel to the pipe, it's open. Perpendicular usually means closed. These are more straightforward and generally more reliable as shutoffs.
- Angle stop: Small fixture shutoff under sinks and toilets, turning water through a right angle.
- Straight stop: Similar to an angle stop, but the pipe continues straight through.
If you manage multiple units, it helps to label shutoff locations and valve types during inspections. That saves time when a tenant calls in a panic.
For broader facility-level thinking, I like how Facility Management Insights on water leaks frames leak response as both a maintenance issue and an asset-protection issue. That's the right mindset for multi-unit properties.
Where the leak is coming from
Look closely with a flashlight and dry the valve first. Then watch where moisture returns.
| Leak location | What it usually means | Typical decision |
|---|---|---|
| Around the handle stem | Packing nut or stem seal issue | Tighten carefully, possibly repack |
| At the outlet connection | Loose supply line or compression connection | Re-seat or tighten carefully |
| At the valve body | Crack, corrosion, or failed casting | Replace valve |
| Behind the wall or escutcheon | Pipe or hidden connection issue | Stop DIY and investigate further |
A stem leak often shows up right below the handle. A body leak is worse. If the metal itself is weeping, pitted, or cracked, there's no meaningful “repair” there.
Dry the valve completely before diagnosing. A drip traveling down the body can make the wrong fitting look guilty.
One more useful check is whether the property is still using water when everything is shut off. A meter test can help confirm whether your visible water valve leaking issue is the whole problem or only one symptom. This guide on reading a water meter for leaks is useful for that step.
DIY Fixes for Common and Minor Valve Leaks
A careful DIY fix makes sense when the leak is minor, accessible, and clearly coming from the packing nut or a simple connection point. It does not make sense when the valve body is damaged, the pipe is corroded, or the shutoff itself feels unstable in the wall.
The one DIY fix that is usually worth trying
If the leak is coming from the stem, try the lowest-risk adjustment first. Hold the valve body steady with one wrench if possible, then use a second wrench to tighten the packing nut slightly. A quarter-turn is plenty for a first attempt. The nut compresses the packing material around the valve stem, which can stop seepage without taking anything apart.
Turn the water back on slowly and watch. If the leak stops, you're done for now, but the valve should still go on your maintenance list. A valve that started leaking once may leak again the next time someone operates it.
Use this quick test before going further:
- Good DIY candidate: Slow seep at the stem, solid valve body, no visible corrosion, easy access.
- Borderline: Slight connection leak at the outlet, but the tubing and nut look clean and undamaged.
- Bad DIY candidate: Green corrosion, white mineral crust, wobbling pipe stub-out, cracked handle, or any leak from the valve body.
A shutoff valve that hasn't moved in years often leaks because the valve has aged internally, not because the nut suddenly became loose.
That matters because some old shutoff valves leak only in certain handle positions after long periods of non-use, which points to wear or a failed packing assembly rather than a simple adjustment. The plumbing discussion at PLBG on leaking angle valves captures this issue well. Forcing a fix on that kind of valve can leave you with a valve that won't shut off when you need it.
When repacking makes sense
Repacking is the middle ground between tightening a nut and replacing the whole valve. It can work on older valves with accessible packing assemblies, but it requires patience.
Basic repacking flow:
- Shut off the water to that section.
- Open the fixture to relieve pressure.
- Remove the packing nut carefully.
- Add fresh packing material around the stem.
- Reinstall the nut and tighten just enough to compress the new packing.
- Test slowly.
What doesn't work is over-tightening. If you crank down the nut hard, you can make the handle difficult to turn and damage the stem seal further.
For most property owners, the right way to think about DIY is this: try one controlled adjustment, maybe one simple repack if the valve design supports it, and stop before the repair depends on muscle or luck.
Replacing a Shutoff Valve A Step-by-Step Guide
If the valve itself is worn out, replacement is usually cleaner than chasing repeated drips. The most common DIY replacement is a compression-style angle stop under a sink or behind a toilet. This is manageable if the shutoff is exposed, the pipe is in good condition, and you're comfortable working carefully without rushing.
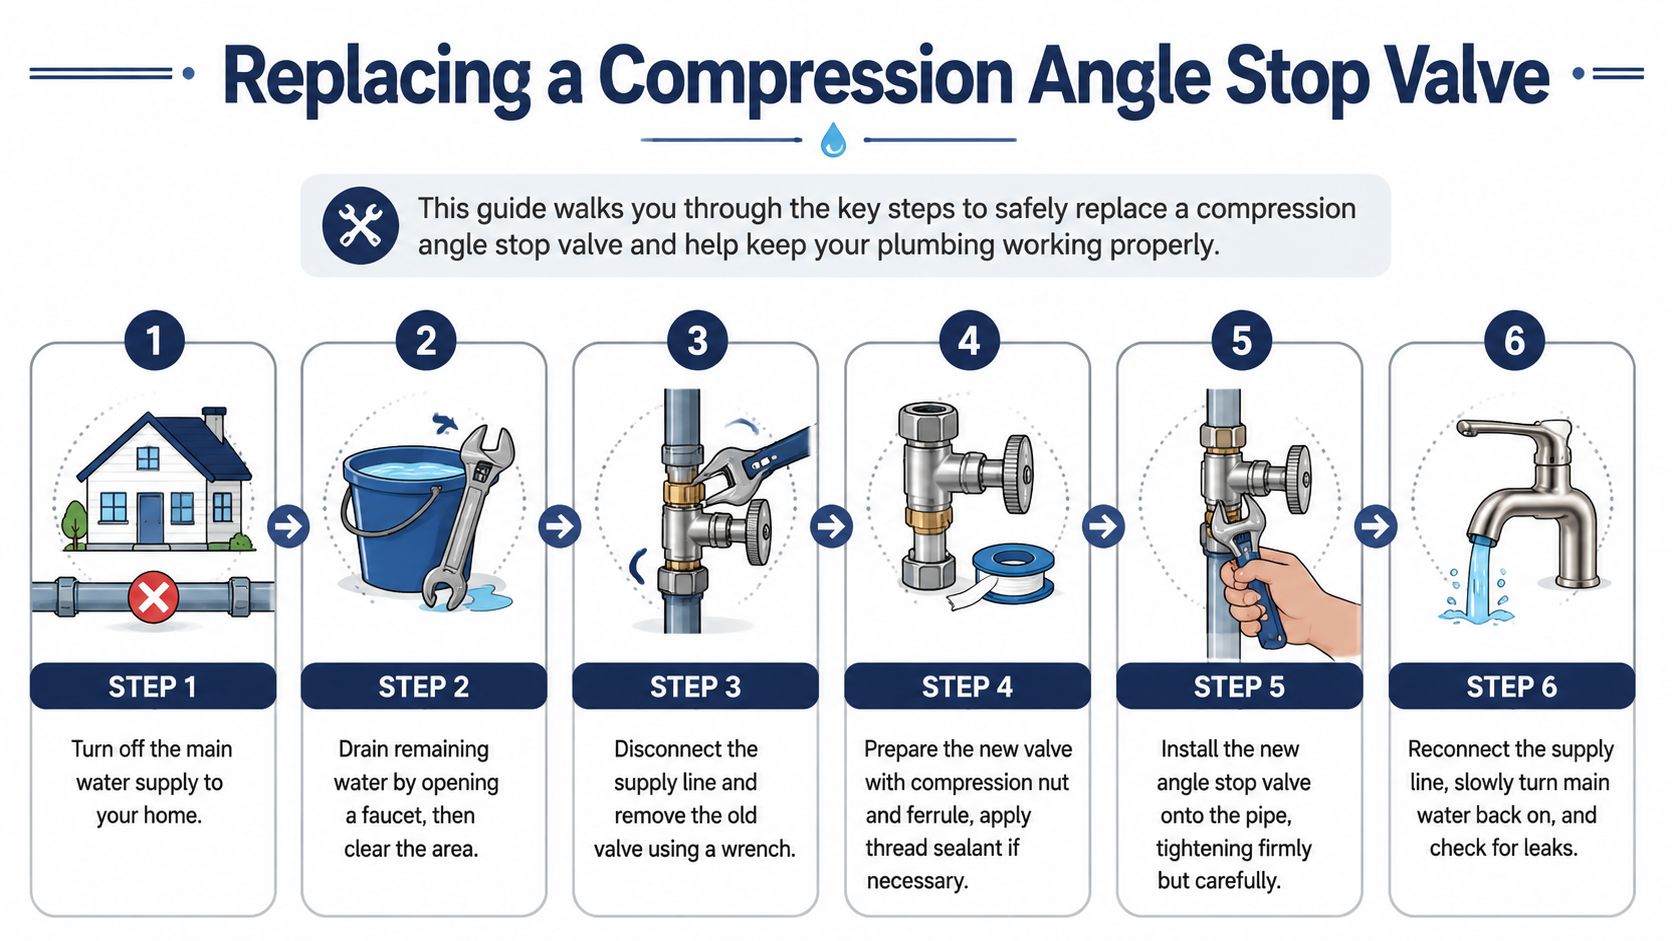
What you need before you start
Here's a practical shopping and tool list.
| Item | Description | Estimated Cost (2026) |
|---|---|---|
| Compression angle stop valve | New shutoff sized to match the pipe and fixture connection | Varies by brand and size |
| Supply line | Replace the old line if it shows age, corrosion, or stiffness | Varies by length and type |
| Two adjustable wrenches | One holds the valve body, one turns the nut | Varies |
| Compression sleeve puller | Helpful if the old ferrule won't come off cleanly | Varies |
| Bucket and towels | Catch residual water and protect cabinets | Minimal |
| Flashlight or headlamp | Improves visibility under sinks and behind toilets | Varies |
| Fine sandcloth or abrasive pad | Cleans the exposed pipe before installing the new valve | Minimal |
| Thread sealant if required | Only for components that call for it, not every connection | Varies |
| Gloves | Helps with grip and protects hands from sharp edges | Minimal |
If you're comparing fixture leak work with other bathroom water intrusion issues, this guide to fixing shower problems is useful because it shows the same principle. You have to identify whether the leak is at a fitting, at a seal, or in the surrounding assembly before choosing the repair.
How to remove and replace a compression angle stop
Turn off the main water supply. Then open the nearest faucet and let the line drain. Place a bucket under the valve and disconnect the fixture supply line from the valve outlet.
Now inspect the old stop. If it's a compression stop, you'll usually see a nut that tightens the valve onto the pipe. Put one wrench on the valve body and one on the compression nut. That first wrench matters. It keeps you from twisting the stub-out pipe inside the wall.
Then remove the old valve. If the valve slides off and leaves the old compression sleeve and nut behind, decide whether they're reusable. In many cases, they're better replaced. If the old ferrule is stuck, use a sleeve puller or remove it carefully without scoring the pipe.
The pipe coming out of the wall is not a handle. If it moves, stop and reassess before you create a hidden leak inside the wall cavity.
Clean the exposed pipe. You want a smooth surface free of scale, corrosion, and old sealant residue. Slide on the new compression nut and ferrule in the correct order, then push the new valve onto the pipe with the outlet oriented correctly for the fixture supply line.
Tighten the compression nut firmly, but not aggressively. Compression fittings seal by controlled pressure on the ferrule. More force doesn't always mean a better seal. It can deform the ferrule or stress the valve.
Reconnect the fixture supply line. If the old line is kinked, corroded, or stiff, replace it now instead of trusting a worn line on a new valve.
Then restore water slowly:
- Keep the new fixture valve closed.
- Turn the main water back on gradually.
- Check the new compression connection first.
- Open the fixture valve slowly.
- Check the outlet connection and supply line.
- Wipe everything dry and recheck after several minutes.
A valve that stays dry under full pressure and through a few open-close cycles is usually set properly. If it seeps at the compression joint after careful tightening, shut it down and inspect the ferrule alignment before trying again.
If you want a service benchmark before deciding to DIY, EZ Plumbing has a straightforward page on shutoff valve leaking repair that reflects the kinds of valve issues owners usually run into.
Know Your Limits When to Call a Professional Plumber
The most expensive valve repairs usually start with a sentence like this: “It was only dripping, so we tried to snug it up.”
In a single-family home, that may only flood one cabinet if things go wrong. In a Los Angeles duplex, condo stack, or apartment building, it can affect several units, trigger emergency mitigation, and create a dispute over responsibility. That's why the decision point matters more than the wrench work.

Red flags that change this from repair to risk management
Call a professional immediately if any of these are true:
- The main shutoff is leaking or won't close. That's not the valve to experiment on.
- The pipe is corroded or unstable. Older stub-outs, especially in tired cabinets and older wall penetrations, don't tolerate side load well.
- The leak is at the valve body. Body cracks and failed castings mean replacement.
- Water is appearing from the wall, floor, or ceiling. The visible valve may only be the last point where water emerges.
- You manage occupied units. If a failed attempt could damage another unit, the risk calculation changes fast.
- The valve hasn't been operated in years and already feels compromised. That's when old parts tend to fail in your hand.
A broader risk factor is the cost of water damage itself. Household leaks waste more than 1 trillion gallons nationwide each year, and one industry guide cited by NID Water says water leaks are among the top insurance claim drivers, with average incidents costing about $10,000 to $15,000 to remediate, as summarized in NID Water's leak overview. For owners, that's a significant reason not to push a questionable DIY repair too far.
What a professional call should accomplish
A good service call should do more than stop the drip. It should answer these questions clearly:
| What to expect | Why it matters |
|---|---|
| Is the valve itself bad, or is the pipe or supply line also compromised | Prevents partial repairs that fail again |
| Can the local shutoff be trusted after repair | Critical for future emergencies |
| Is this isolated, or do other similar valves need review | Useful in older multi-unit buildings |
| Is pressure stress contributing to repeat failures | Helps stop recurring problems |
For LA owners, that last point is important. Older housing stock often has layered plumbing history. A shiny new stop valve installed on stressed piping won't solve the whole problem if the system is beating up valves across the building.
Preventing Future Leaks A Maintenance Checklist for LA Properties
The best way to handle water valve leaking is to make sure the next leak is caught before it becomes an event. Most valves don't fail out of nowhere. They give warning signs first. The problem is that owners often don't see those signs until a resident reports cabinet damage or a ceiling stain.
A practical checklist for owners and managers
Use this as a recurring maintenance list for houses, condos, and multi-unit properties:
- Exercise shutoff valves periodically. Turn fixture stops and accessible branch shutoffs gently off and back on. Don't wait years. A valve that never moves is the valve most likely to leak when finally touched.
- Look for early leakage marks. Check for green corrosion, white mineral buildup, rust stains on escutcheons, swollen cabinet floors, and dried drip trails.
- Replace tired supply lines with suspect valves. If the shutoff is being changed, review the connector too.
- Label key shutoffs. Main, irrigation, water heater, and unit shutoffs should be easy to identify fast.
- Track repeat problems by building and unit. Recurring stop-valve failures often point to a larger system issue, not bad luck.
In older buildings, valve leaks are often maintenance signals, not isolated surprises.
Why pressure matters more than most owners think
A lot of leaking valve calls are treated like one bad fitting. Sometimes that's true. Sometimes it isn't. High water pressure and water hammer can stress shutoff valves repeatedly, especially in older LA properties with aging piping and long runs. Ben Franklin Plumbing's discussion of old angle stops and pressure-related leakage is useful on that point.
If one unit has a single bad stop, replace the stop. If multiple units keep developing seepage at shutoffs, supply connections, or fixture valves, inspect the building more broadly. That can include pressure regulation, fixture behavior, and how often neglected valves are being forced during turnovers or repairs.
For property managers, the long-term lesson is simple. Treat valve maintenance as building protection, not just plumbing upkeep. The cabinet drip is the symptom you see. The primary job is preventing the next emergency shutoff from becoming a flood.
If you're dealing with a leaking valve in Los Angeles and need a clean diagnosis before someone turns a manageable seep into property damage, EZ Plumbing handles emergency plumbing, shutoff valve repairs, and leak response for homes, HOAs, and multi-unit buildings. Call when the valve won't shut off, the pipe is questionable, or you need the repair done without risking a larger failure.