
How to Prevent Burst Pipes: A Homeowner’s Guide
The most effective way to prevent burst pipes is to maintain indoor heat at no lower than 55°F, insulate exposed runs, disconnect outdoor hoses before the first freeze, and know exactly where your main water shutoff is located. These five steps, done before temperatures drop, prevent the majority of freeze-related pipe failures that send homeowners scrambling for emergency plumbers every winter.
Act on these right now if cold weather is approaching:
- Set your thermostat to at least a recommended minimum temperature to protect pipes, even when you leave for an extended trip.
- Open cabinet doors under kitchen and bathroom sinks on exterior walls to let warm air reach the pipes.
- Let a thin drip run at faucets on exterior-wall lines during sustained freezing temperatures as a precautionary measure.
- Disconnect and drain all outdoor hoses, and shut off the interior valve feeding each hose bib.
One safety rule that applies throughout this entire guide: never use an open flame, propane torch, or kerosene heater to thaw a frozen pipe. The risk of fire and pipe damage far outweighs any time saved.
Table of Contents
- How to prevent burst pipes: your two-stage winterization checklist
- What to do during an active cold snap
- Which pipe insulation materials work best for each location?
- How to safely thaw a frozen pipe
- What to do immediately if a pipe bursts
- What landlords and property managers should do differently
- When should you call a licensed plumber?
- What the most important prevention steps come down to
- What a licensed plumber sees that most homeowners miss
- Ez-plumbing handles winterization and emergency repairs across Los Angeles
- Sources
How to prevent burst pipes: your two-stage winterization checklist
Treating winterization as a single event is how homeowners miss things. A two-stage approach, one round in early fall and a second pass just before the first hard freeze, keeps the process manageable and thorough.
Stage 1: Early fall tasks (September through October)
These are the structural, one-time-per-season jobs best done while the weather is still mild:
- Insulate exposed pipes in unheated spaces: crawl spaces, garages, attics, and along exterior walls. Foam pipe insulation is the fastest DIY option for straight runs; rubber insulation handles damp areas better.
- Disconnect and drain outdoor hoses. A hose left connected traps water in the bib and the supply line behind it, which is exactly where freezes start. Per Portland Water’s winter preparation guidance, draining outdoor lines and knowing your main shutoff location are foundational steps.
- Shut off and drain hose bibs using the interior shutoff valve, then leave the outdoor valve open so any residual water can expand without cracking the fitting.
- Test your main water shutoff valve. Turn it fully off and back on to confirm it moves freely. A valve that hasn’t been operated in years can seize when you need it most.
- Insulate the first six feet of pipe from your water heater on both the hot and cold lines to at least R-3, as Energy recommends. Keep insulation clear of draft diverters and seal all seams for continuous coverage.
- Schedule a professional inspection if your home has a history of freezing in the same location, or if you have older galvanized or copper lines in unheated spaces.
Stage 2: Pre-freeze final checks (before the first hard freeze)
- Air-seal gaps around pipes where they pass through exterior walls, using caulk or expanding foam.
- Confirm heat tape or heat cable is plugged in and functioning on any runs that froze last year.
- Write down your main shutoff location and share it with everyone in the household, including tenants if you manage rental units.
- Confirm your emergency plumber’s contact number is saved in your phone.
Thermostat baseline: Texas A&M’s winter storm guidance recommends keeping your home no cooler than 55°F when unoccupied. Pipes in uninsulated interior spaces can freeze when ambient temperatures drop below that threshold for extended periods.
Pro Tip: Two small jobs deliver outsized protection on a tight budget: insulate the first six feet of pipe from your water heater, and install insulated covers on every hose bib. Together, these two tasks address the two most common freeze points in a typical home.
What to do during an active cold snap
When a sudden freeze arrives before you’ve completed full winterization, a few targeted actions can reduce your risk significantly without requiring tools or materials.
The priority list, in order:
- Keep the heat on. Even if you’re leaving for a few days, do not turn the thermostat below 55°F. The cost of a slightly higher heating bill is a fraction of a burst-pipe repair.
- Open cabinet doors under sinks on exterior walls in the kitchen and bathrooms. This lets the home’s ambient heat circulate around supply lines that would otherwise sit in a cold, enclosed cabinet.
- Let specific faucets drip. When temperatures are sustained below freezing, the City of OKC’s frozen pipe guidance recommends a steady drip roughly the size of a pencil lead at faucets served by exterior or uninsulated pipes. This is a short-term emergency tactic, not a substitute for insulation.
- Keep the garage door closed if water supply lines run through the garage. An unheated garage can drop to outdoor temperatures within hours.
- Use a space heater carefully in an unheated space with exposed pipes, but only a UL-listed model plugged into a GFCI outlet, kept at least three feet from flammable materials, and never left unattended.
Pro Tip: Drip the faucet farthest from where the water supply enters your home, not the nearest one. That’s the run most likely to freeze first, because it has the longest exposure to cold before water reaches it.
A firm safety note: never use a propane torch, open flame, or any combustion-based heat source near pipes. Consumer Reports’ frozen pipe guidance is explicit that thawing must be done with safe, controlled heat sources to avoid fire risk and to catch a burst before it floods the space.
Which pipe insulation materials work best for each location?
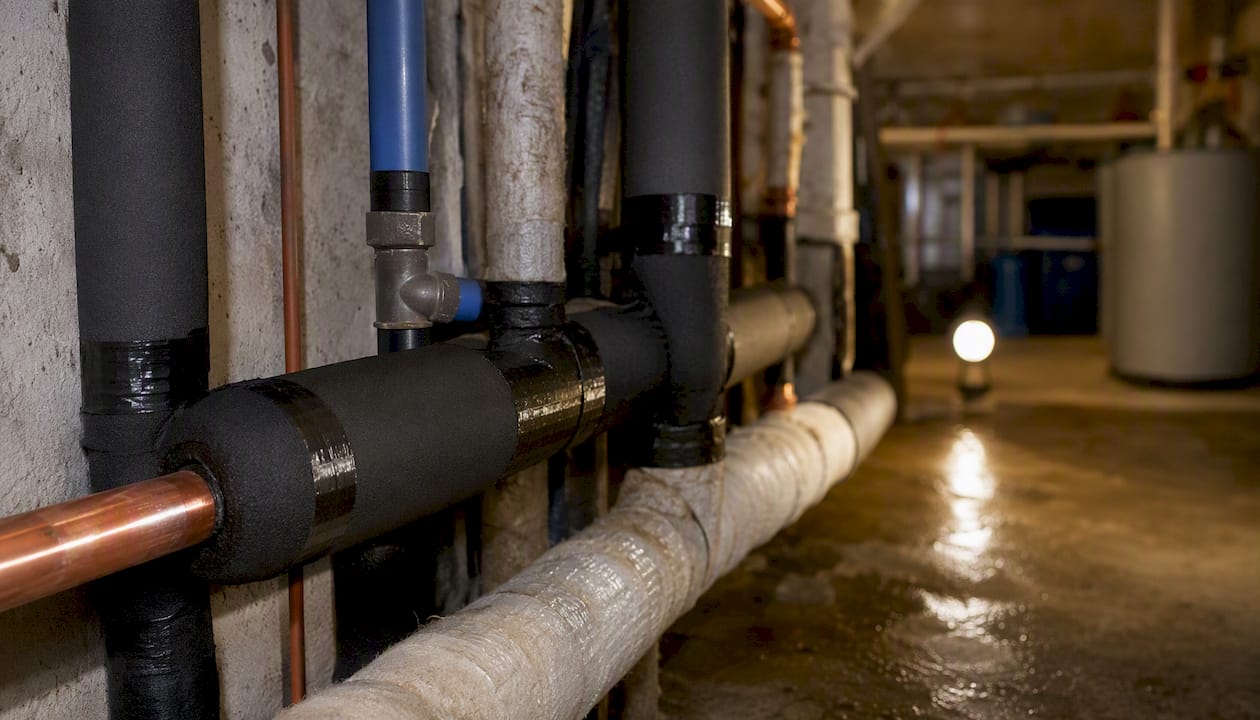
Pipe insulation slows heat transfer between the pipe and the surrounding air, reducing the rate at which water inside approaches freezing. According to Modernize’s pipe insulation guide, it should be sized to the pipe’s outer diameter and installed with sealed seams for continuous coverage to be effective. Gaps in insulation create cold bridges where freezing concentrates.
| Location | Recommended material | Notes |
|---|---|---|
| Interior exposed runs (basement, utility room) | Foam pipe insulation (polyethylene) | Easy to cut and install; adequate for most interior applications |
| Crawl spaces and damp areas | Closed-cell rubber insulation | Moisture-resistant; resists mold better than open-cell foam |
| Attic or unheated garage runs | Fiberglass pipe wrap with vapor barrier | Higher R-value for extreme cold; requires sealing tape on all seams |
| Outdoor spigots and hose bibs | Insulated bib cover (foam or hard shell) | Inexpensive; install after disconnecting and draining the hose |
| Pipes with history of freezing | UL-listed heat tape or self-regulating heat cable | Electrical solution; follow manufacturer instructions precisely |
Different pipe materials, including copper, PEX, PVC, CPVC, and galvanized steel, have different thermal properties and require compatible insulation products. PEX is more flexible and slightly more freeze-tolerant than rigid copper, but it still bursts under sustained freezing pressure. Per ASHRAE pipe insulation fundamentals, using the wrong insulation type or leaving installation gaps can cause condensation and microbial growth, so matching material to pipe type matters.
For heat tape and heat cable, the rules are straightforward: use only UL-listed products, follow the manufacturer’s installation instructions without improvising, and never overlap heat tape on itself or cover it with additional insulation unless the product is specifically rated for that configuration. Lowe’s pipe insulation buying guide notes that seams on insulation in damp areas should be sealed with seaming tape to prevent moisture intrusion.
- Seal insulation at elbows, valves, and T-fittings, where gaps are most common.
- Maintain the clearances specified by Energy.gov around water heater draft diverters.
- Secure insulation with zip ties or tape so it doesn’t shift and expose pipe sections over time.
Pro Tip: If your budget only covers one area, prioritize pipes on exterior walls and in unheated crawl spaces. These locations account for the large majority of residential freeze events.
How to safely thaw a frozen pipe
Before you apply any heat, open the faucet the frozen pipe serves. This releases pressure and lets you see immediately whether water flows (partial freeze) or nothing comes out at all (full blockage). Then inspect the visible pipe for bulging, cracking, or frost. If you see any deformation, stop and shut off the main water supply before proceeding, because the pipe may already be compromised.
- Confirm the faucet is open so steam and water have somewhere to go as the ice melts.
- Apply a hair dryer to the frozen section, starting closest to the faucet and working back toward the wall. Keep the dryer moving; don’t concentrate heat in one spot.
- Use an electric heating pad or warm towels wrapped around the pipe as an alternative, especially in tight spaces where a dryer won’t fit.
- Place a space heater (UL-listed, GFCI-protected) in the room if the frozen section is in an enclosed space like a crawl space, but keep it clear of any flammable material.
- Monitor water pressure as you work. When flow returns to the open faucet, the ice has cleared. Run the water for a few minutes and check all nearby joints for drips.
- If pressure doesn’t return within 20–30 minutes, or if you cannot locate the frozen section, stop and call a licensed plumber.
The American Red Cross frozen pipe guidance is clear: never use a blowtorch, propane heater, or any open-flame device near pipes. Beyond fire risk, rapid localized heat can cause a pipe to crack or weld a fitting failure that releases water into the wall cavity before you can react. For more on whether frozen pipes can clear on their own and when that’s risky, see Ez-plumbing’s guide on whether frozen pipes thaw safely without intervention.
When to stop and call a pro: If the frozen section is inside a wall, under a slab, or in an inaccessible crawl space, DIY thawing isn’t viable. A licensed plumber can use professional-grade equipment to locate and address the freeze without opening walls unnecessarily.
What to do immediately if a pipe bursts
Speed matters. Water from a burst pipe can cause structural damage, mold, and electrical hazards within minutes. The IBHS winter weather bulletin identifies freeze-related burst pipes as one of the most frequent and costly sources of residential property damage, and the difference between a manageable repair and a major restoration often comes down to how fast the water is stopped.
Emergency checklist:
- Shut off the main water supply valve immediately. If you don’t know where it is, check near the water meter, in the utility room, or along the front foundation wall.
- Open faucets throughout the home to drain remaining water from the lines and relieve pressure.
- Turn off the water heater (gas or electric) once the water supply is off, to prevent the unit from running dry and overheating.
- Isolate electricity in any area where water is spreading near outlets, panels, or appliances. Do not enter a flooded area with live electricity.
- Call a licensed emergency plumber. For LA homeowners managing a plumbing emergency, having a plumber’s number saved before an emergency is the single most time-saving preparation you can make.
- Document everything before cleanup: photograph the burst location, the water spread, and any visible damage. Note the time the break was discovered.
- Contact your homeowner’s insurance as soon as the immediate emergency is under control. Most policies cover sudden and accidental water damage from burst pipes, but documentation is required.
For temporary fixes while you wait for a plumber, Ez-plumbing’s emergency leaky pipe guide covers shutoff steps and short-term containment options.
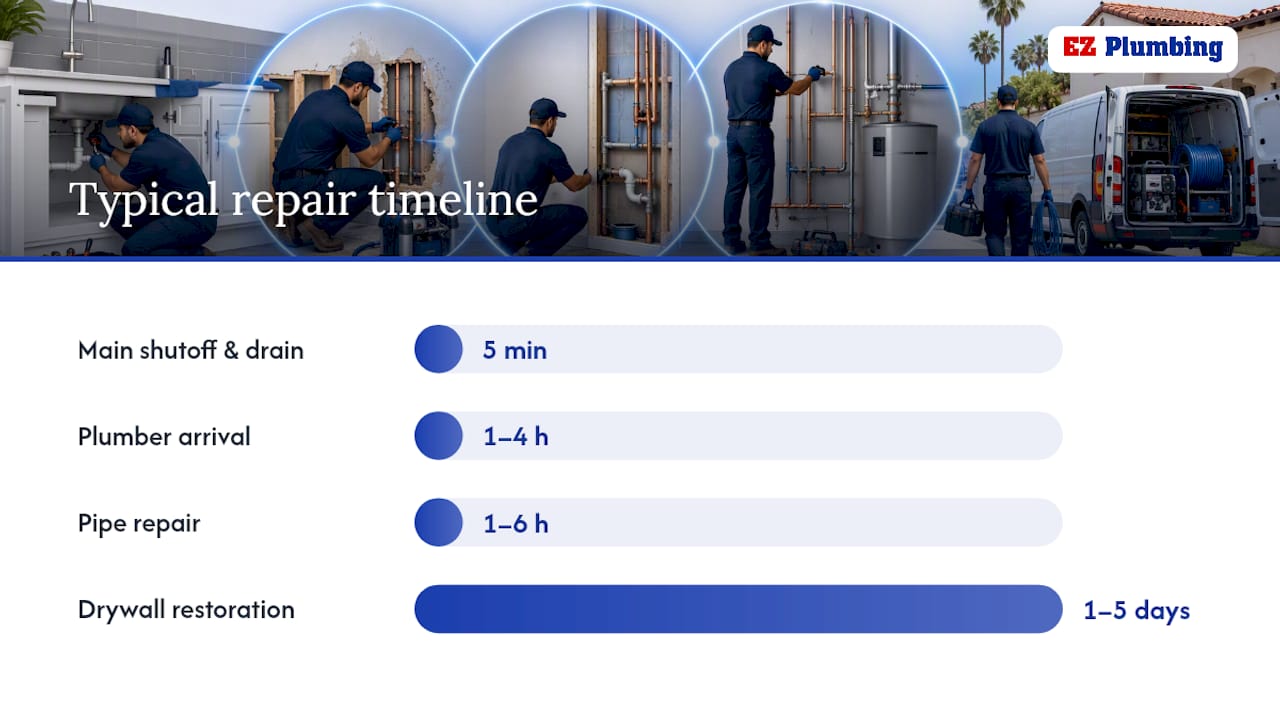
Typical repair timeline and what to expect:
| Phase | Approximate timeframe | What happens |
|---|---|---|
| Main shutoff and water drain | 5 minutes | Stop water flow; open faucets to drain lines |
| Plumber arrival (emergency call) | 1–4 hours | Depends on time of day and location |
| Pipe repair or section replacement | 1–6 hours | Varies by pipe material, access, and damage extent |
| Drywall/restoration (if needed) | 1–5 days | Separate contractor; depends on water spread |
Repair costs vary widely based on pipe location, material, and damage extent. A straightforward accessible pipe repair typically runs a few hundred dollars; repairs inside walls or under slabs can reach several thousand. Getting a written estimate before work begins is standard practice with any reputable plumber.
What landlords and property managers should do differently
Managing multiple units means a single missed winterization task can affect dozens of residents. The approach needs to be systematic, not reactive.
Property manager checklist:
- Test and document the location of all exterior shutoff valves and communal main shutoffs before November.
- Send written winterization guidance to tenants: where the shutoff is, what to do if they suspect a freeze, and who to call after hours.
- Schedule insulation of communal pipes in shared spaces (boiler rooms, laundry areas, parking structures) with a licensed contractor.
- Verify that your property insurance covers freeze-related water damage and confirm your emergency plumber is on call for after-hours response.
- Consider a preventive pipe maintenance contract for seasonal inspections, particularly for older buildings with galvanized or copper supply lines.
- For larger portfolios, automated water shutoff systems with leak sensors can detect and stop a burst before it spreads, significantly reducing damage in unoccupied units.
What to tell tenants: A simple one-page notice before the cold season should cover the thermostat minimum (55°F), the location of the unit shutoff valve, what a frozen pipe sounds like (reduced or no flow, banging sounds), and the emergency contact number. Timing matters: send the notice in October, not after the first freeze warning.
Legally, landlords in California are responsible for maintaining habitable conditions, which includes functional plumbing. Arranging professional winterization for shared systems and confirming access to all shutoff valves is both a maintenance obligation and a liability protection measure.
When should you call a licensed plumber?
DIY winterization covers a lot of ground, but certain situations require a licensed professional. Knowing the line between the two saves time and prevents a manageable problem from becoming a major one.
Call a plumber when:
- You see active water spreading from a pipe, joint, or wall.
- You cannot locate or operate the main shutoff valve.
- The same pipe or location has frozen in two or more consecutive winters, which indicates a structural insulation gap a licensed plumber can diagnose and address permanently.
- The frozen section is inside a wall, under a concrete slab, or otherwise inaccessible.
- You’ve attempted safe thawing for 30 minutes with no result.
- You suspect a pipe has already burst but haven’t found the break yet.
Hiring checklist:
- Verify the plumber holds a current California C-36 license (the state’s plumbing contractor license).
- Confirm they carry general liability and workers’ compensation insurance.
- Ask specifically about experience with winterization, heat tape installation, and freeze-related repairs.
- Request a written estimate with a clear scope of work before any job begins.
- Confirm they offer emergency response and ask about typical arrival times for after-hours calls.
Ez-plumbing holds C-36 License #583868 and provides licensed emergency plumbing services across the greater Los Angeles area, including 24/7 response for burst pipes, freeze-related failures, and leak detection.
What the most important prevention steps come down to
Preventing burst pipes requires maintaining heat, insulating vulnerable runs, draining outdoor lines before the season, and having a clear emergency plan before cold weather arrives.
| Point | Details |
|---|---|
| Thermostat minimum | Keep your home at no lower than 55°F when unoccupied to protect pipes in uninsulated spaces. |
| Insulate exposed runs | Prioritize exterior-wall pipes, crawl spaces, and the first six feet from your water heater. |
| Drain outdoor lines | Disconnect hoses and shut off hose bibs before the first freeze; leave the outdoor valve open. |
| Open cabinet doors | Allow warm air to reach supply lines on exterior walls during cold snaps. |
| Know your shutoff | Locate and test your main water shutoff valve now, before you need it in an emergency. |
| Ez-plumbing | For Los Angeles homeowners, Ez-plumbing provides 24/7 emergency response and professional winterization services under C-36 License #583868. |
One final safety reminder: no open flame, propane torch, or combustion heater should ever be used to thaw a frozen pipe. A hair dryer or electric heating pad is the right tool.
What a licensed plumber sees that most homeowners miss
The single most common cause of winter pipe failures we see in Los Angeles homes isn’t a dramatic cold snap. It’s a pipe that was always vulnerable, in a garage, a crawl space, or along an exterior wall, that went uninsulated for years because the climate here rarely demands attention to it. Then one night the temperature drops into the low 30s, and a run that was never designed to handle sustained cold finally gives way.
The fix homeowners most often skip is also the cheapest: insulating the supply lines in the garage and the first few feet from the water heater. These are accessible, inexpensive jobs that take an afternoon. Yet we consistently respond to burst-pipe calls in January and February where the break is in exactly those locations.
If your home has had even one freeze event in the past, treat it as a warning about a structural gap in your winterization, not a fluke. A licensed plumber can identify where your system is most exposed and address it before the next cold season.
Ez-plumbing handles winterization and emergency repairs across Los Angeles
When a pipe bursts at 2 AM or you want a professional to handle winterization before the cold season hits, Ez-plumbing is ready to respond across the greater Los Angeles area, from Van Nuys and Studio City to Pasadena and Santa Monica.
Ez-plumbing’s licensed team (C-36 License #583868) provides full winterization inspections, pipe insulation installation, heat cable setup, and water heater service to protect your system through cold weather. For emergency calls, the team targets arrival within 1–4 hours depending on location and time of day. A typical winterization visit covers a full pipe inspection, insulation of vulnerable runs, hose bib protection, and confirmation that your shutoff valve operates correctly.
To book a winterization inspection or request emergency plumbing service, contact Ez-plumbing directly at Ez-plumbing.
Sources
- Texas A&M winter storms frozen pipes (PDF)
- Prevent Frozen Pipes | City of OKC
- Prepare winter guidance | Portland Water
- Energy
- How to keep pipes from freezing | Consumer Reports