
Ceiling Leak? Homeowners Find the Upstairs Bathroom Source by Timing
A water stain on your ceiling below an upstairs bathroom almost always traces back to a toilet wax ring, a shower or tub drain seal, a sink connection, or a pressurized supply line. If water is actively dripping or the ceiling is sagging, shut off the water supply and check for electrical hazards right away. Whether the leak shows up only when a fixture runs or continues nonstop tells you a great deal about which one it is.
TL;DR:
- A stain during showers points to drain seals, grout, caulk, or the pan; staining after flushing suggests a failed wax ring or loose tank bolts.
- For continuous leaks, sagging ceilings, or water near wiring, shut off the supply, cut power to that circuit, and call a plumber today.
- Plumbing labor runs $150 to $280 per hour; ceiling and drywall restoration cost extra, and damaged subfloor replacement can raise the total.
- Dry wet drywall and insulation within 24 to 48 hours; soaked drywall, insulation, and ceiling tiles usually need removal rather than drying in place.
- Photograph and timestamp the damage before cleanup, then record when the stain appeared because insurers distinguish sudden accidental damage from gradual seepage.
Table of Contents
- Where to Check First: Toilet, Shower, Sink, and Supply Lines
- Actions to Limit Damage and Keep People Safe
- Use Timing to Identify the Likely Source
- What Repairs Typically Involve and What They Cost
- Preventing Mold and Documenting the Damage for Insurance
- When This Is an Emergency and What a Plumber Will Do
- Recent Jobs That Show How This Plays Out
- A Straightforward Way to Think About This
- Getting the Leak Found and Fixed the Same Day
- FAQ
- Sources
Where to Check First: Toilet, Shower, Sink, and Supply Lines
Before calling anyone, a short walkthrough of the upstairs bathroom usually narrows down the source. Start with the toilet, then move to the shower or tub, the sink and vanity, and finally the supply lines feeding each fixture.
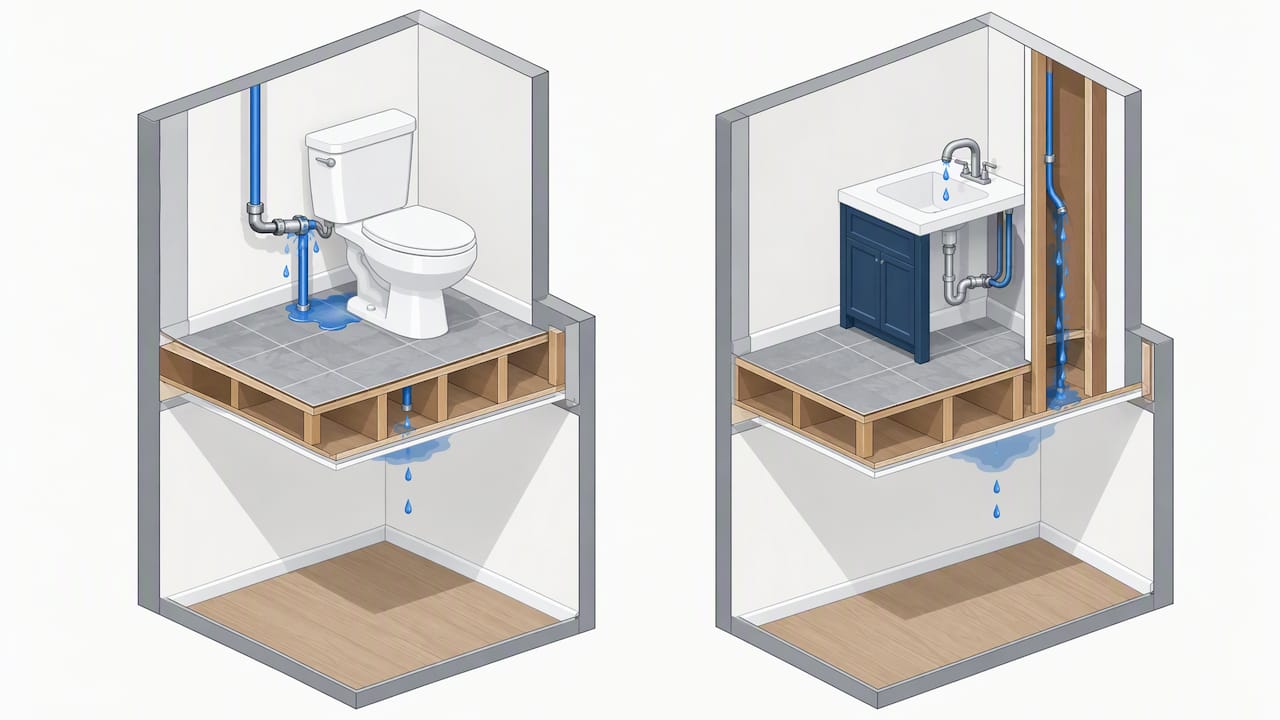
- Toilet: Look for a wobble at the base, a sewer-gas smell, or softness in the floor around it. A failed wax ring often leaks into the subfloor with no visible puddle on top, which is why the ceiling below can show water with no obvious mess upstairs, according to WaterInMyHouse.
- Shower or tub: Run the shower for several minutes and watch for drips at the drain flange, cracked grout, or worn caulk along the pan.
- Sink and vanity: Check under the cabinet for dampness around the P-trap and supply connections, and look for water stains on the cabinet floor.
- Supply lines and valves: Feel along the flexible hoses and shutoff valves for continuous dampness, which points to a pressurized leak rather than a drain issue.
The most reliable test is a controlled one. Have someone run each fixture for a few minutes while you watch the ceiling from below, and record it on your phone. That short video becomes useful both for narrowing down the source and for documenting the timeline for insurance later. For shower-specific symptoms, our guide to diagnosing a shower leak through the ceiling walks through the checks in more detail.
Actions to Limit Damage and Keep People Safe
Once you suspect an active leak, speed matters more than precision. These steps reduce damage while you wait for a proper diagnosis.
- Shut off the water at the fixture’s isolation valve if you can reach it, or at the main shutoff if the source isn’t clear.
- Place buckets and towels to catch dripping water, and move furniture or electronics out of the drip path.
- If water is pooling near a ceiling light fixture or outlet, turn off the breaker for that circuit before doing anything else.
- Take photos and short videos with timestamps of the stain, any dripping, and affected belongings before you start cleanup.
Pro Tip: Never poke or press on a sagging ceiling to drain it. The water has already weakened the material, and puncturing it can trigger a collapse.
Use Timing to Identify the Likely Source
The moment a leak appears, or fails to stop, is one of the clearest diagnostic clues available to a homeowner. According to WaterInMyHouse, matching the timing pattern to a fixture narrows the list of suspects before anyone opens the ceiling.
- Only during a shower or bath: Points to the drain, grout, caulk, or the shower pan itself.
- Only when the toilet is flushed: Suggests a wax ring or loose tank bolts.
- Delayed dripping after the fixture is used: Often means water trapped in the subfloor is slowly working its way down, or a drain is leaking slowly during use.
- Continuous leak with no connection to fixture use: Indicates a pressurized supply line or valve failure, and should be treated as urgent.
Run the same controlled test described earlier, this time noting exactly when the ceiling starts to wet and when it stops. A continuous drip that doesn’t let up between fixture uses is the pattern that should move you toward calling for help the same day.
What Repairs Typically Involve and What They Cost
Once the source is confirmed, the repair itself usually falls into one of a few categories, each with its own cost drivers.
- Wax ring replacement: A straightforward toilet reseal, though if water has soaked the subfloor for a while, that wood may need to be cut out and replaced before the toilet goes back in.
- Shower or tub drain and flange repair: Simple seal replacement is on the lower end of cost, while a full shower pan replacement, needed when the pan itself has cracked or the waterproofing has failed, involves tile removal and is considerably more involved.
- Supply line or valve replacement: A pressurized leak needs the damaged line or valve replaced promptly, since these leaks don’t stop on their own and keep damaging the structure until fixed.
- Ceiling and drywall restoration: Once the plumbing issue is resolved, the wet drywall, insulation, and any damaged texture or paint need to be removed and replaced.
Our residential plumbing hourly rate runs $150 to $280, and the final number depends on how much subfloor or drywall damage has occurred before the leak is found. Larger restoration jobs, especially ones involving torn-out ceilings or soaked insulation, sometimes require a separate restoration contractor working alongside the plumbing repair, which adds to the overall cost but keeps the drywall and plumbing work properly sequenced.
Preventing Mold and Documenting the Damage for Insurance
Mold risk starts almost immediately after a leak, which makes the first two days after discovery the most important window for action.
- Dry fast: The EPA advises drying wet materials within 24 to 48 hours to usually prevent mold growth on porous materials like drywall and insulation.
Statistic: Materials like drywall and insulation that stay wet past 24 to 48 hours are at meaningfully higher risk of mold growth, which is why speed matters more than a perfect repair plan in the first two days.
- Know what gets discarded: EPA remediation guidance identifies ceiling tiles, soaked insulation, and saturated drywall as materials that typically need to be removed rather than dried in place.
- Understand your coverage: Homeowners policies generally cover sudden, accidental discharge from a failed pipe or fixture, but long-term seepage or neglected maintenance issues are often excluded, so how the leak started matters to your claim.
- Document before you clean: Photos, timestamped video, and a written timeline of when the stain appeared and how it changed are often what determines whether an insurer treats the claim as sudden damage.
For a deeper walkthrough of safe drying steps and when a situation has moved past what a homeowner should handle alone, see our guide on water damage and mold removal.
When This Is an Emergency and What a Plumber Will Do
Some signs mean the leak shouldn’t wait for a scheduled appointment.
- Water is actively dripping or pooling and you can’t isolate the fixture causing it.
- The ceiling is visibly sagging or bulging.
- Water is near a light fixture, outlet, or any wiring.
- The leak is continuous rather than tied to fixture use.
On an emergency visit, a plumber isolates the water supply, confirms the source using tools like moisture meters or camera inspection when the leak isn’t visible, and documents findings in writing before starting permanent repairs. Having your timestamped photos and notes on when the leak occurs ready for that visit speeds up the diagnosis considerably. Our emergency water leak repair guide covers what to expect step by step.
Recent Jobs That Show How This Plays Out
A Woodland Hills pipe leak repair completed in May 2026 traced a ceiling stain back to a supply connection rather than the toilet residents suspected. A Sherman Oaks job in July 2026 found a leaky faucet feeding water into a wall cavity that surfaced as a ceiling stain one floor down. We operate as a licensed plumbing contractor.
A Straightforward Way to Think About This
Stop the active water first, document everything before you touch a sponge, and treat the plumbing fix as the real repair. Cosmetic ceiling work is the easy part that comes after.
— EZ
Getting the Leak Found and Fixed the Same Day
We send a licensed plumber to your door, not a call center, for leak detection and ceiling-access repairs in our service area. You get an on-site diagnosis, a written estimate before work starts, and documented repair receipts that support your insurance claim.

If water is actively leaking right now, reach our emergency plumbing team for 24/7 dispatch and a same-day fix.
FAQ
Does homeowners insurance cover a water leak from the ceiling?
Coverage usually depends on whether the leak was sudden and accidental or the result of long-term seepage. HO-3 policies generally cover sudden, accidental discharge from a pipe or fixture, but damage from a leak that went unaddressed for months is often excluded.
How much does it cost to fix an upstairs shower that leaks through the ceiling?
Cost depends on whether the fix is a simple drain seal replacement or a full shower pan replacement with tile removal. Our residential plumbing rate runs $150 to $280 per hour, with ceiling and drywall restoration priced separately once the plumbing source is confirmed.
How do you know if a ceiling leak is serious?
A continuous leak that isn’t tied to fixture use, a sagging or bulging ceiling, or water near any electrical fixture all signal an emergency. In those cases, shut off the water supply and call a licensed plumber the same day rather than waiting to see if it stops.
My ceiling is leaking from the second floor. What should I do?
Shut off the water to the fixture if you can isolate it, or the main if you can’t, and move anything valuable out from under the drip. Take timestamped photos and video right away, since documentation before cleanup often determines how smoothly an insurance claim goes.
Sources
- A brief guide to mold, moisture, and your home | US EPA
- Am I covered? | Insurance Information Institute
- Water leak from upstairs bathroom | WaterInMyHouse
- How to document water damage for insurance | Cat3 Recovery
- Mold remediation guide chapter 4 | US EPA