
How to Fix Low Water Pressure in House
You step into the shower expecting a strong rinse, but the water barely clears the shampoo from your hair. Then the kitchen faucet fills a glass at a crawl, and the outdoor hose bibb produces the same weak stream. When several fixtures behave this way, replacing the showerhead won't solve the underlying problem. The reliable way to learn how to fix low water pressure in a house is to diagnose the supply system first, then work toward individual fixtures.
Start with the main shutoff, pressure-reducing valve, leaks, filters, and older piping. Only after those checks should you spend time cleaning aerators or changing a showerhead. The sequence below separates a whole-house restriction from a localized blockage and shows where a DIY repair ends and licensed plumbing work begins.
Table of Contents
- When Low Pressure Is a Whole-House Problem
- Pinpointing Whether One Fixture or the Whole House Is Affected
- Testing Your Static Water Pressure the Right Way
- The Highest-Yield DIY Fixes You Can Do Today
- Deeper Causes That Need a Licensed Plumber
- Tools, Safety, and Knowing When to Make the Call
When Low Pressure Is a Whole-House Problem
A weak shower can mislead you. If the bathroom sink, kitchen tap, toilet refill, and outdoor hose bibb all produce weak flow, replacing the showerhead will not correct the cause. The shower is reporting a restriction somewhere in the shared supply, not creating it.
Pressure is a property of the supply system, not of any single fixture. Water enters through the service line, passes the meter and main shutoff, may pass through a pressure-reducing valve, and then travels through branch piping. A restriction near the beginning of that path can affect every outlet downstream.
Start upstream, not at the fixture
Residential supply pressure is commonly designed around about 45 to 60 psi, while 80 psi is often treated as the upper limit requiring pressure-reducing protection under many plumbing codes, according to Portland's home water pressure troubleshooting guidance. That guidance also identifies homes below roughly 40 psi as having low pressure. If the stream is weak throughout the property, inspect the supply before upgrading a fixture.
Check that the main shutoff is fully open. Look for visible leaks and identify whether a regulator or whole-house filter is installed on the incoming line. A partially closed valve or clogged filter can restrict the entire home while every faucet remains mechanically sound.
Practical rule: If multiple fixtures lose pressure at the same time, diagnose the shared supply path before touching individual outlets.
A leak may divert water before it reaches the fixtures. Inspect exposed piping under sinks, near the water heater, in the garage, and around the main entry point. If you suspect a hidden leak, arrange a water line leak inspection instead of repeatedly replacing fixtures.
Older galvanized plumbing also deserves close attention. Corrosion builds inside the pipe and narrows the passage available for water, so the symptom can appear throughout the house rather than at one faucet. Portland's water utility notes that corrosion in older galvanized plumbing can restrict flow.
If the main valve, regulator, filter, and visible piping check out, the next diagnostic step is pressure testing. A gauge on a hose-bibb connection can show whether the incoming supply is low or whether the restriction appears farther inside the plumbing. Do not adjust a pressure-reducing valve blindly, especially if pressure is unstable or a leak is possible. A licensed plumber is the better choice when the regulator needs replacement, piping is corroded, or the source of a hidden leak is unclear.
Pinpointing Whether One Fixture or the Whole House Is Affected
Before adjusting anything, create a simple pressure map. Run the cold water at the kitchen sink, bathroom sink, shower, and an outdoor hose bibb one after another. Keep the test consistent, noting whether the stream is weak immediately or fades after the fixture runs.
If only one outlet is poor, the likely trouble is local. An aerator, showerhead screen, stop valve, flexible connector, or short branch line may be restricted. If fixtures on opposite sides of the house show the same weakness, look toward the main supply, regulator, filter, or piping rather than the outlets themselves.
Compare hot and cold water
At the same faucet, test cold-only and hot-only. This comparison narrows the search quickly:
- Cold and hot are both weak: Suspect the shared supply, a branch valve, an aerator, or the faucet cartridge.
- Cold is strong but hot is weak: Look toward the water heater outlet, hot-side piping, a mixing valve, or sediment inside the heater.
- Only the shower is weak: Remove and inspect the showerhead, flow restrictor, and shower valve.
- Fixtures on one floor are weak: Check local branch valves and piping serving that level.
Run fixtures on different floors and on opposite sides of the house. A partially closed branch valve may affect one area while leaving the rest of the home normal. A localized blockage can also be exposed when one bathroom performs poorly but the kitchen and exterior bibb remain strong.
Watch what happens under load
Open a second fixture while the first is running. If each fixture is acceptable alone but flow falls sharply when two or more operate, the system may have a restriction, undersized service piping, a failing regulator, or a supply-side limitation. A drop of about 10 to 15 psi under load is described as normal, while a larger decrease points toward a restriction or regulator problem. Residential low-pressure diagnostic guidance
If the weakness is isolated, clean the affected fixture first. If the pattern is widespread or changes dramatically when water is flowing, move to a static pressure test. Checking the meter for unexplained movement while every fixture is closed can also help identify a leak, and this guide to reading a water meter for leaks explains the process.
Testing Your Static Water Pressure the Right Way
If the kitchen, shower, and outdoor tap all feel weak, test the supply before removing individual fixtures. A hose-bibb pressure gauge gives a useful starting point for a whole-house diagnosis. Choose one with hose-bibb threads and a scale reaching 0 to 100 psi, then connect it to the exterior spigot closest to where the main line enters the house.
Shut off faucets, toilets, washing machines, dishwashers, irrigation, and every other water-using appliance. Thread the gauge onto the bibb without overtightening, open the spigot fully, and wait for the needle to settle. Excessive tightening can damage the washer or threads. Leaving irrigation or an appliance running changes a static test into a flow reading and can mislead you.
Record one reading when household demand is low, then test again at another time of day. Neighborhood demand and temporary utility work can affect the result, so a single measurement may not represent the full supply situation.
Interpreting the gauge
Residential pressure commonly falls within 40 to 80 psi. A reading below that range deserves investigation, while a reading above it can place unnecessary stress on fixtures and piping.
| Pressure Reading (psi) | Likely Meaning | Next Step |
|---|---|---|
| Below 40 | Low incoming pressure, restriction, leak, or regulator problem | Check the main valve, regulator, filter, and utility supply |
| 40 to 45 | Usable but below the preferred operating range | Compare readings under load and arrange diagnosis if persistent |
| 45 to 60 | Preferred operating range for efficient fixture performance | Investigate local fixtures if flow still feels weak |
| 60 to 80 | Elevated but within the commonly cited residential range | Check regulation and monitor for pressure variation |
| Above 80 | Excessive pressure and possible regulator issue | Have a licensed plumber assess regulation and system protection |
A static reading below 40 psi does not automatically make the municipality responsible. The main valve may be partly closed, the pressure-reducing valve may be failing, or a clogged filter may sit between the meter and the house. Check those points before assuming the street supply is inadequate.
A normal static reading with weak flow under use points to a restriction that appears only while water moves. Compare the gauge with one fixture open, then with a second fixture running. A sharp drop indicates that the service line, regulator, filter, or another restriction needs closer examination.
Irrigation can distort the test as well. Identify which valves serve each area before checking demand. This guide to sprinkler system zones for commercial properties explains how separate zones can operate independently and affect pressure during testing.
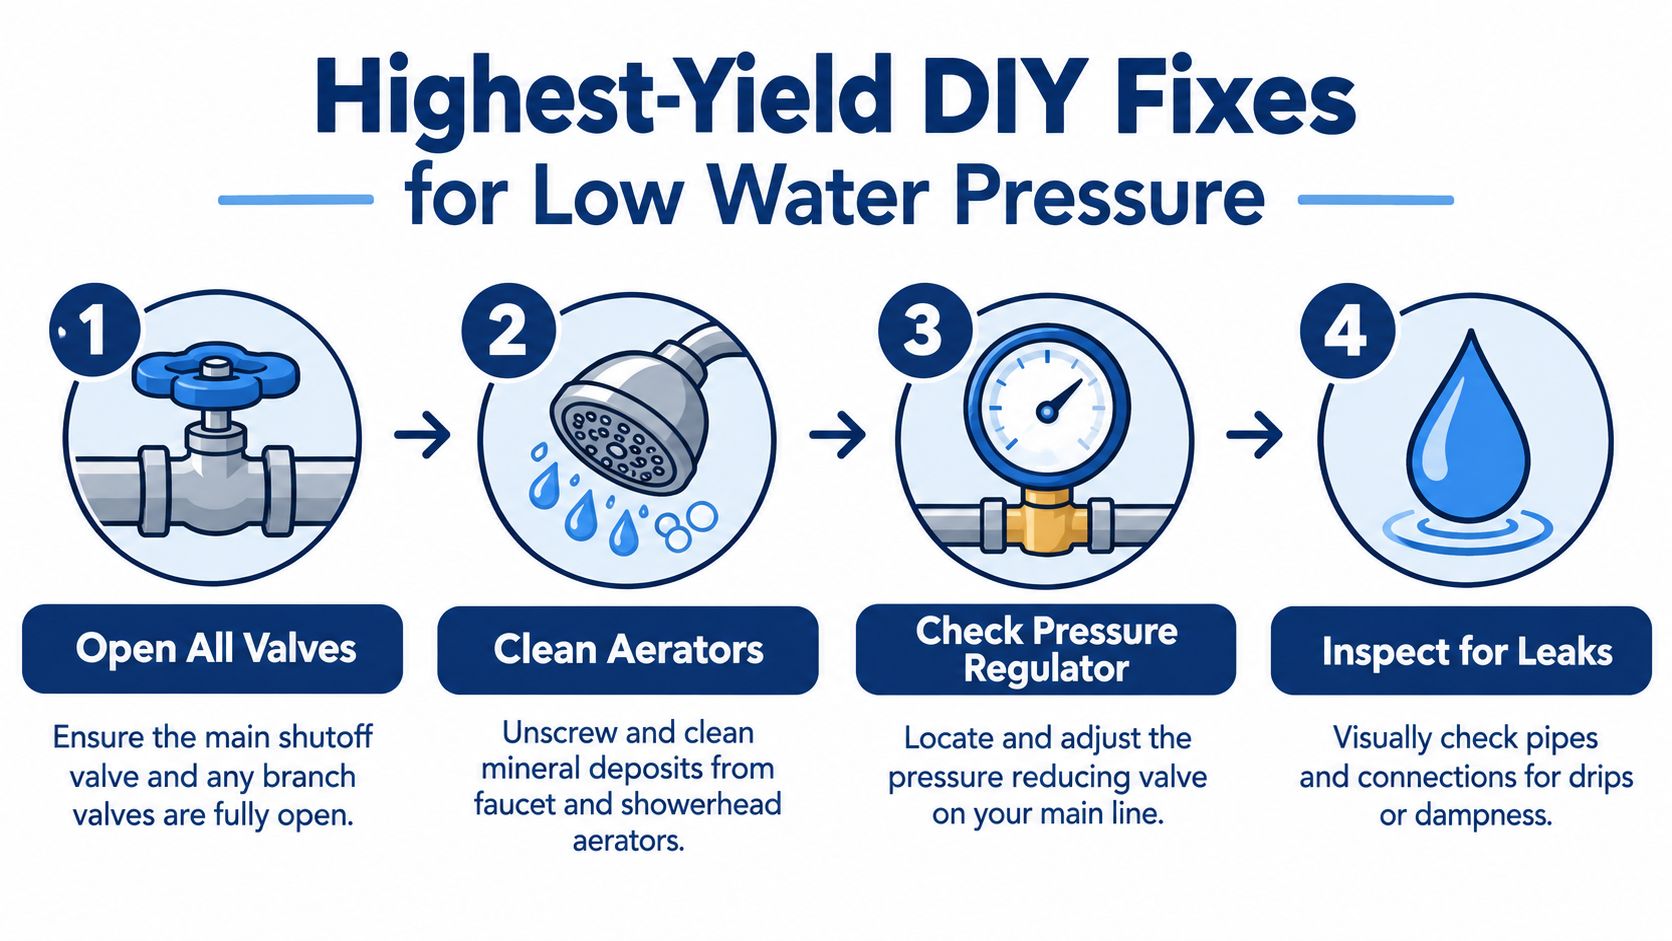
The Highest-Yield DIY Fixes You Can Do Today
Once you've tested the system, begin with repairs that are accessible and reversible. Don't adjust a regulator blindly. Use the gauge to confirm whether the setting is part of the problem.
1. Open the valves fully
Find the main shutoff near the meter or where the service line enters the home. A wheel valve should be opened fully in the normal direction, while a lever-style ball valve should align with the pipe. Check branch shutoffs under sinks, behind toilets, and near appliances if one area is affected.
This takes only a few minutes, but don't force a corroded or stuck valve. A damaged stem can turn a pressure complaint into an active leak. If recent plumbing work preceded the problem, a valve that wasn't reopened completely is a strong possibility.
2. Check the pressure-reducing valve
A PRV usually sits on the main incoming line and may have an adjustment bolt with a locknut. If the gauge shows strong inlet pressure but weak pressure after the valve, the PRV may be restricting flow. Some homeowners can make a small adjustment with a wrench, but record the starting pressure, loosen only what the design requires, and retest after each minor change.
The practical target is generally 45 to 60 psi, not the highest reading the system can produce. Persistent pressure below the preferred range, unstable readings, or pressure above 80 psi calls for professional evaluation rather than continued adjustment. Building-code pressure reference
3. Clean aerators and showerheads
Remove a faucet aerator with channel-lock pliers or an aerator key, protecting the finish with a cloth. Rinse out grit, brush the screen with an old toothbrush, and soak mineral deposits in white vinegar before reinstalling it. A removable showerhead can receive the same treatment.
Cleaning won't repair a restricted main or failing regulator. It works when deposits block the outlet screen, especially when one fixture is weaker than the others. For shower-specific troubleshooting, use this guide on how to increase water pressure in a shower.
4. Flush water-heater sediment
If hot water is weak at several fixtures while cold flow is normal, sediment may be restricting the heater outlet or hot-side path. Turn off the heater according to its fuel type, connect a garden hose to the drain valve, direct the discharge to a safe drain or container, and run water until it clears.
A heater flush can release very hot water and sediment. Stop if the drain valve won't close, the discharge is discolored indefinitely, or the hose connection leaks. Cleaning the heater won't restore cold-side pressure, and it won't correct corroded hot-water piping.
For a visual walkthrough of basic pressure troubleshooting, review the following video after completing the gauge test:
Deeper Causes That Need a Licensed Plumber
Some pressure problems are hidden inside the plumbing and can't be judged safely from a faucet stream. Galvanized steel piping is a common example. Internal corrosion narrows the passage gradually, so the home may continue working while showers, washing machines, and hose bibbs lose usable flow. Cleaning an aerator might improve one outlet, but it won't reopen a corroded supply network.
A plumber can compare pressure at the meter, regulator, and selected fixtures, then evaluate flow while several outlets run. If the inlet pressure is healthy but the house loses pressure through the regulator or filter, the restriction is identifiable without opening walls. If pressure remains poor after the regulator, the service line or municipal supply deserves attention.
Hidden leaks and hot-side failures
A slab leak can produce a confusing pattern, particularly when hot-water piping beneath the foundation is involved. The cold side may appear normal while multiple hot fixtures lose flow, and the leak may not be visible at any fixture. Confirming that condition can require pressure testing, acoustic equipment, or thermal imaging. Homeowners who suspect water beneath a foundation can learn more about professional slab leak detection before deciding how urgently to arrange service.
Other supply-side causes include a shared service line that can't deliver adequate flow, restrictions at the meter, municipal pressure changes during high demand, and a failed backflow preventer. These conditions can look similar from inside the house, but the repair path differs.
A licensed plumber separates pressure from flow. A gauge may show acceptable static pressure while a restricted pipe fails as soon as the home demands water.
Don't authorize a repipe based only on a disappointing shower. The better diagnosis compares readings at multiple points, checks hot and cold separately, inspects pipe material and condition, and confirms whether the problem follows the house or the public supply. That evidence determines whether the answer is a valve repair, regulator replacement, service-line work, leak repair, or repiping with modern materials.
Tools, Safety, and Knowing When to Make the Call
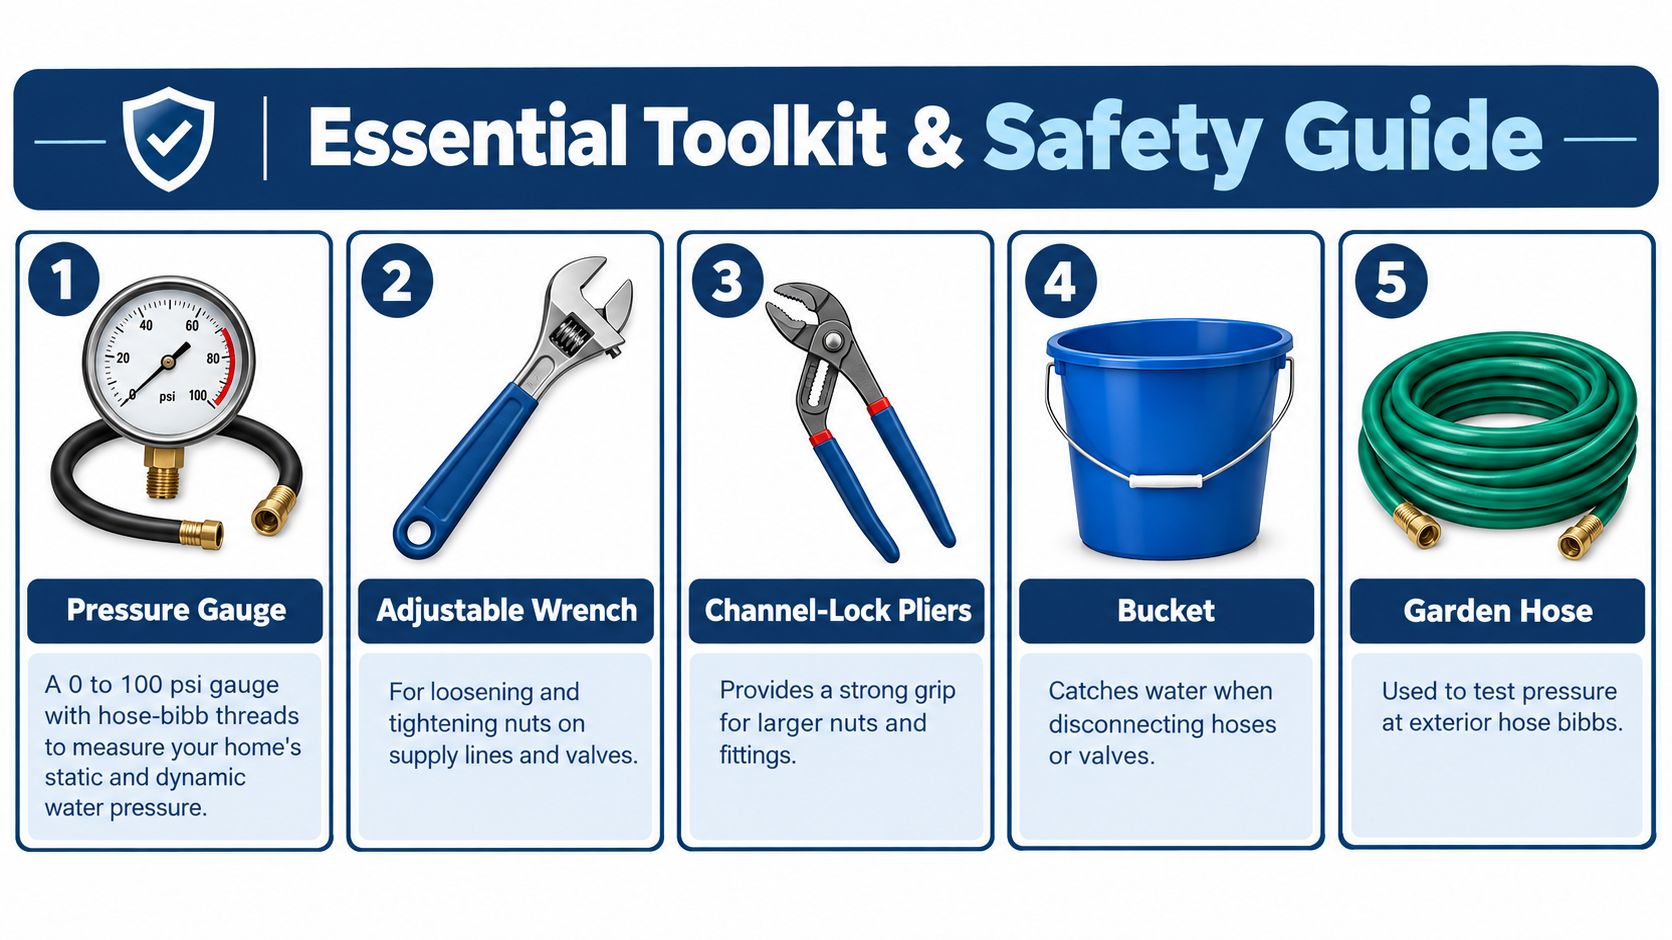
You don't need a truck full of equipment for the first round of checks. A compact kit covers most safe homeowner diagnostics:
- Pressure gauge: Use a hose-bibb gauge scaled from 0 to 100 psi for static and operating readings.
- Adjustable wrench: Handle nuts on supply connections and regulator hardware without using excessive force.
- Channel-lock pliers: Grip larger fittings and help remove stubborn aerators when a cloth protects the finish.
- Bucket: Catch water beneath valves, filters, and disconnected fixture parts.
- Garden hose: Drain or flush a water heater and direct discharge away from finished surfaces.
Protect yourself and the plumbing
Treat water from a heater as scalding until you've confirmed otherwise. Shut off the appropriate energy source before draining, keep your face and hands away from the discharge, and wear eye protection because sediment can spray from the hose. Don't open a drain valve that won't close reliably, and don't leave a heater empty while its burner or electric heating elements are energized.
Use care around the main shutoff and PRV. Confirm that you can isolate the house and restore service before loosening any connection. If a valve is corroded, inaccessible, or under strain, forcing it can cause a break at the service entry.
Stop DIY when the pattern points deeper
Call a licensed plumber when the static pressure reads below 40 psi, pressure drops sharply while fixtures operate, or several hot fixtures are weak together. Professional diagnosis is also the safer choice when the house has galvanized piping, visible leaks, suspected slab leakage, or any problem requiring a wall, foundation, main service line, meter connection, or regulator replacement to be opened.
In Los Angeles, homeowners, property managers, and HOAs can contact EZ Plumbing for pressure diagnosis, leak detection, water-heater service, and related plumbing repairs. Visit EZ Plumbing to request service and provide the pressure readings and fixture pattern you observed. The more specific your notes are, the faster a technician can focus on the actual restriction instead of guessing at the showerhead.