
Bathroom Remodeling Plumbing Tips for Homeowners
Solid bathroom remodeling plumbing tips are the difference between a renovation that passes inspection on the first try and one that costs you weeks of rework. Bathroom plumbing is governed by the IRC 2024 code, which mandates staged inspections, precise drain slope standards, and correct venting for every fixture. Get these fundamentals right before a single wall comes down, and your remodel stays on schedule, on budget, and fully code-compliant.
1. bathroom remodeling plumbing tips: start with a fixture layout plan
Professional plumbers map fixture locations to plumbing constraints like drain slope and vent distances before demolition begins. Correcting errors after waterproofing is already in place can cost thousands of dollars in tile removal and re-installation. Sketch your toilet, sink, shower, and tub positions relative to the existing drain stack and supply lines. This single step prevents the most expensive surprises in any bathroom renovation.
Pro Tip: Bring your fixture layout to a licensed plumber before purchasing any fixtures. Confirming rough-in dimensions early prevents costly returns and layout changes mid-project.
2. schedule all three plumbing inspections in advance
Three inspection stages are required during a bathroom remodel: underground rough-in, above-ground rough-in, and final inspection. Each stage requires notifying your local authority having jurisdiction (AHJ) and receiving approval before moving forward. Missing one stage or closing walls prematurely forces you to tear out finished surfaces, adding both delay and expense. Build each inspection date into your project schedule the same way you schedule tile work or cabinet delivery.
The staged inspection approach exists specifically to catch hidden problems before they become permanent. Treat each approval as a project milestone, not a bureaucratic hurdle.
3. never conceal plumbing before testing is complete
Plumbing testing must occur after all pipes, fittings, and connections are complete but before any wall closure. IRC 2024 Section P2503 requires both water supply pressure tests and drain-waste-vent (DWV) tests using water or air. Closing walls prematurely is one of the most common project failures in bathroom remodels, requiring removal of finished surfaces and adding significant cost. Keep your inspector’s documentation on site and address any correction notices the same day you receive them.
Pro Tip: Take dated photos of all exposed piping before drywall goes up. These photos serve as a record for future repairs and can satisfy inspector documentation requests.
4. pressure test water supply lines before closing walls
Water supply lines during rough-in are pressure tested between 40 and 80 psi and held for a specified period to detect any leaks. Any leak found must be repaired and retested before the wall is closed. Skipping this step risks hidden water damage inside your walls, which leads to mold, structural rot, and repair bills that dwarf the original remodel cost. A 15-minute pressure hold at the required psi is a small investment compared to what a concealed leak costs over time.
5. verify correct drain slope at every run
The minimum horizontal drain slope is 1/4 inch per foot for pipes 3 inches and smaller. Pipes 4 inches or larger may use a reduced slope of 1/8 inch per foot, provided the pipe meets minimum self-scouring velocity. Too shallow a slope allows solids to settle and build up. Too steep a slope causes liquids to outrun solids, leaving waste behind. Both errors produce chronic clogs that are difficult to clear without opening the wall again.
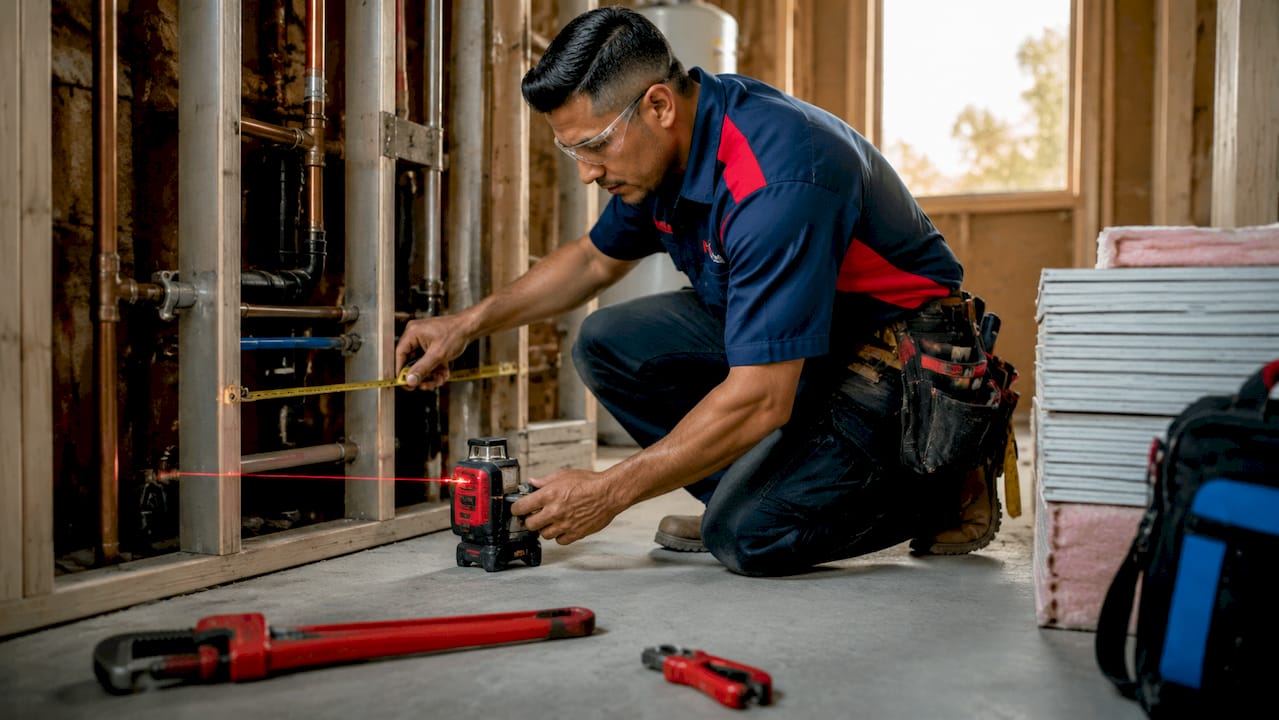
Inspectors check multiple points along drain pipe runs to verify consistent slope and trap arm compliance. Minor elevation errors accumulate across fittings and create persistent drainage problems. Use a digital level or laser reference tool at several points along each run, not just at the ends.
Pro Tip: Measure slope at every fitting, not just at the pipe ends. Fittings can introduce small elevation changes that add up to a non-compliant slope over a 6-foot run.
6. design your venting system before rough-in
Rough-in venting is often misunderstood but is the single most critical factor in preventing sewer gas entry and ensuring smooth drainage. Every fixture trap requires a vent connection, and that vent must rise at least 6 inches above the fixture overflow rim before any horizontal offset toward the roof vent stack. Skipping this height requirement turns the vent into a drain during a backup, which defeats its entire purpose.
IRC 2024 permits several venting methods depending on your bathroom layout. Wet venting is allowed for specified bathroom groups, letting one pipe serve both drain and vent functions within defined fixture unit limits. Other options include individual vents, circuit venting, and common venting. Choosing the right method for your specific fixture arrangement reduces pipe runs and simplifies the rough-in layout.
Here is a quick comparison of the most common venting methods:
| Venting Method | Best Use Case | Key Limitation |
|---|---|---|
| Individual vent | Single fixture, simple layout | Requires dedicated vent pipe per fixture |
| Wet vent | Bathroom groups with close fixtures | Fixture unit limits apply per IRC 2024 |
| Common vent | Two fixtures back to back | Fixtures must connect at same level |
| Circuit vent | Multiple fixtures on one horizontal branch | Requires specific pipe sizing and layout |
7. install quality shutoff valves at every fixture
Every toilet, sink, and shower supply line needs its own dedicated shutoff valve. This is a plumbing consideration during remodel that homeowners frequently skip to save a small amount of money, then regret when a faucet cartridge fails at 11 p.m. on a Sunday. Quarter-turn ball valves are the industry standard for reliability and ease of use. Avoid older gate valves, which corrode internally and often fail to fully close when you need them most.
Shutoff valves also make future maintenance far simpler. A plumber can replace a toilet fill valve without shutting off water to the entire house.
8. upgrade old pipe materials during the remodel
A bathroom remodel is the best opportunity to replace aging galvanized steel or polybutylene supply lines. Galvanized corrosion restricts water flow over time and can contaminate water with rust. PEX (cross-linked polyethylene) and copper are the current standard materials for residential supply lines in Los Angeles and across most of the country. PEX is flexible, freeze-resistant, and easier to route through tight spaces, making it a practical choice for most remodel scenarios.
Replacing old pipe materials while walls are already open costs a fraction of what it would cost to open walls specifically for repiping later. This is one of the highest-value plumbing upgrades you can make during any renovation.
9. understand the cost impact of moving fixtures
Relocating toilets or tubs increases plumbing costs significantly due to complex drain line rerouting. In slab-on-grade homes common throughout the Los Angeles area, moving a toilet even 12 inches requires cutting the concrete slab, repositioning the drain, and patching the concrete after. That work adds labor, concrete repair, and additional inspection requirements. Keeping fixtures in their existing locations, or moving them only a few feet using flexible PEX supply lines, is the most cost-effective approach for most homeowners.
If your design requires a fixture move, consult a licensed plumber before finalizing the floor plan. A plumber can tell you whether the move is feasible within your existing drain slope and vent distances before you commit to the layout.
10. use digital and laser tools to verify slope accuracy
Accurate drain slope verification using digital or laser tools is a hallmark of professional installations. DIY installations frequently miss cumulative slope errors at fittings, which cause future clogs that are difficult to diagnose without a camera inspection. A standard bubble level is not precise enough for plumbing work. A digital level accurate to 0.1 degrees or a laser line level gives you the measurement confidence that inspectors and long-term performance both require.
Rent or borrow a digital level if you do not own one. The cost is minimal compared to the labor of opening a wall to re-slope a drain.
11. confirm rough-in dimensions before ordering fixtures
Rough-in dimensions determine where your toilet flange, shower drain, and sink drain connect to the wall or floor. The standard toilet rough-in is 12 inches from the finished wall to the center of the flange, but older homes sometimes have 10-inch or 14-inch rough-ins. Ordering a toilet before confirming this measurement is a common and expensive mistake. Read the rough-in inspection guide for a full breakdown of what gets measured and verified at each stage.
Shower drain placement is equally critical. A drain positioned even 2 inches off-center from your shower pan can require a custom pan or a full drain relocation.
Key takeaways
Successful bathroom plumbing renovation requires correct drain slope, properly designed venting, staged inspections, and pressure testing before any wall is closed.
| Point | Details |
|---|---|
| Plan layout before demolition | Map fixture positions against drain slope and vent distances before any walls come down. |
| Pass all three inspections | Schedule underground rough-in, above-ground rough-in, and final inspection with your AHJ in advance. |
| Test before closing walls | Hold water supply lines at 40–80 psi and complete DWV tests before drywall goes up. |
| Maintain correct drain slope | Use 1/4 inch per foot for pipes 3 inches and smaller; verify with a digital level at every fitting. |
| Vent every fixture correctly | Vent pipes must rise at least 6 inches above the fixture overflow rim before any horizontal offset. |
What i’ve learned after years of bathroom remodel plumbing
The mistake I see most often is not a technical one. It is a timing one. Homeowners get excited about tile selections and vanity styles, and the plumbing layout becomes an afterthought. By the time someone calls us, the waterproofing membrane is already down and the drain is in the wrong position. Fixing that costs more than the entire original plumbing rough-in would have.
Venting is the other area where I consistently see unlicensed work fall short. A vent that does not rise the required 6 inches above the overflow rim before offsetting horizontally will eventually act as a drain during a backup. The homeowner notices gurgling sounds and slow drains months later and has no idea why. The fix requires opening the wall. That is an entirely avoidable outcome.
My honest recommendation: hire a licensed plumber for the rough-in layout and the pressure testing, even if you plan to handle other parts of the remodel yourself. Those two phases are where code errors are most likely to occur and most expensive to correct after the fact. The role of qualified plumbers in a remodel is not just about turning wrenches. It is about reading the system as a whole and catching problems before they get buried in your walls.
— EZ
Plan your bathroom remodel with Ez-plumbing
Ez-plumbing is a licensed plumbing company (C-36 License #583868) serving the greater Los Angeles area, with direct experience in residential bathroom remodel plumbing from rough-in through final inspection. Whether you need fixture installation, drain cleaning, leak detection, or a full repiping during your renovation, Ez-plumbing handles every phase with code compliance built in.
If your remodel includes a water heater upgrade or relocation, Ez-plumbing provides professional water heater installation for both tank and tankless systems. For ongoing drain maintenance after your remodel is complete, the Ez-plumbing drain cleaning service keeps your new bathroom performing the way it should. Contact Ez-plumbing before your project starts to get the planning right from day one.
FAQ
What is the required drain slope for bathroom plumbing?
The minimum drain slope is 1/4 inch per foot for pipes 3 inches and smaller, per IRC 2024. Pipes 4 inches or larger may slope at 1/8 inch per foot if minimum self-scouring velocity is maintained.
How many plumbing inspections does a bathroom remodel require?
A bathroom remodel requires three inspection stages: underground rough-in, above-ground rough-in, and final inspection. Each requires AHJ approval before the next phase of construction begins.
Can i move my toilet during a bathroom remodel?
Yes, but moving a toilet increases cost and complexity, especially in slab homes where concrete cutting is required. Keeping the toilet within a few feet of its original location using flexible supply lines limits the additional expense.
What pressure should water supply lines be tested at?
Water supply lines are pressure tested between 40 and 80 psi during rough-in and held for a specified period to confirm no leaks exist before walls are closed.
What happens if i close walls before a rough-in inspection?
Closing walls before passing the rough-in inspection requires removing finished surfaces to expose the piping for inspection. This adds significant labor cost and project delay, and it is one of the most common and preventable remodel mistakes.