
How to Fix a Slow Bathroom Drain: A DIY Guide
Most slow bathroom drains clear in under 10 minutes once you know where to look. Start by removing and cleaning the pop-up stopper, then check the P-trap if the stopper is clear. If neither fixes it, a plunger or hand auger usually finishes the job. Stop DIY immediately and call a licensed plumber if multiple fixtures are draining slowly, you hear gurgling, or you smell sewage after attempting these steps.
Guides from HomeFixer101 confirm that 9 times out of 10, the stopper or tailpiece is the culprit — meaning the fix is often closer to the surface than most homeowners expect. Hair and soap scum bind together into a sticky mat that narrows the drain passage gradually, so the slowdown feels gradual until one day the basin barely empties.
Quick action path:
- Clean the pop-up stopper — 2–3 minutes; resolves the majority of cases
- Plunge with overflow sealed — 5–10 minutes; effective for partial blockages
- Remove and clear the P-trap — 10–15 minutes; catches what the stopper missed
- Use a hand auger or hair-removal tool — 10–20 minutes; reaches deeper mats
Call a plumber immediately if: multiple fixtures are slow at the same time, the toilet gurgles when you run the sink, you notice sewage odor, or water backs up into the tub or shower after plunging.
Table of Contents
- What should you try first when your bathroom drain is slow?
- How do you remove and clean the pop-up stopper?
- When and how should you clean the P-trap?
- How to use a drain snake or hair-removal tool safely
- Why chemical drain cleaners often make the problem worse
- Signs your slow drain is a bigger plumbing problem
- How to prevent slow drains from coming back
- What licensed plumbers know that most guides don’t mention
- Key Takeaways
- Ez-plumbing’s perspective on bathroom drain problems
- Ez-plumbing drain cleaning services for Los Angeles homeowners
- Useful sources for further reading
What should you try first when your bathroom drain is slow?
Before you reach for any tools, run the hot tap for 60 seconds and watch the drain. If water pools and clears slowly, you have a partial blockage, not a full clog, and the following steps work in order of speed and effort.
-
Hot-water flush with dish soap (2 minutes). Squirt a tablespoon of dish soap into the drain, then run the hottest tap water your pipes allow for 60–90 seconds. The soap lubricates soap-scum buildup and the heat softens it. This alone clears very early-stage slowdowns.
-
Clear visible hair from the drain opening (2–3 minutes). Pull out the stopper if it lifts free, or peer into the drain with a flashlight. Use gloved fingers or needle-nose pliers to pull out any visible hair mat. You may be surprised how much accumulates just below the drain cover.
-
Baking soda and vinegar flush (30–40 minutes total, 5 minutes active). Pour one cup of baking soda directly into the drain, followed immediately by one cup of white vinegar. Let it fizz for 30 minutes, then flush with hot water for one minute. Note that professional plumbers are candid about the limits here: one plumber quoted by Architectural Digest called the baking soda and vinegar method little more than “a foamy mess” for serious hair clogs. Use it for mild soap-scum buildup, not dense hair mats.
-
Plunger technique (5–10 minutes). Fill the basin with 2–3 inches of water. Seal the overflow hole with a wet rag — without that seal, the pressure wave escapes through the overflow and plunging loses effectiveness. Place a cup plunger (flat-bottomed, not a flange plunger) directly over the drain and push-pull firmly for 20–30 seconds. Check and repeat up to three times.
Pro Tip: If you cannot generate suction with a standard plunger, a wet/dry vacuum set to the liquid setting can create enough pull to dislodge a shallow clog. Cover the drain opening with the hose and run it for 10–15 seconds.
If none of these steps produce noticeable improvement, move to the stopper removal procedure below rather than repeating them. Repeated plunging against a hair mat rarely dislodges it and can stress older slip-joint connections.
Pipe material caution:
— use the hottest water from your tap instead. Most residential bathroom drains built after the 1980s use PVC or ABS plastic, so skip the kettle.
How do you remove and clean the pop-up stopper?
The pop-up stopper is the single most productive place to start for a sluggish bathroom sink. Hair wraps around the pivot rod mechanism underneath the stopper and forms a dense mat that no amount of flushing will shift.
Identify your stopper type
Most bathroom sinks have one of two configurations. A pop-up stopper is connected to a pivot rod that runs horizontally through the drainpipe just below the sink; you operate it with the lift rod behind the faucet. A lift-and-turn stopper simply unscrews or lifts straight out with no pivot rod. If you see a small knob on top of the stopper, it is almost certainly lift-and-turn — just grip and twist counterclockwise to remove it.
Removing a pop-up stopper
Place a towel under the sink and have a small bucket nearby. Reach under the sink and locate the horizontal pivot rod where it enters the drainpipe. Squeeze the spring clip on the clevis strap (the flat metal bar the pivot rod connects to) and slide the pivot rod free. The stopper will now lift straight out from above. Wear gloves — what comes out is rarely pleasant.
Cleaning the stopper and tailpiece
Rinse the stopper under running water and use an old toothbrush to scrub off soap scum and hair. While the stopper is out, insert a flexible hair-removal tool or a bent wire hanger into the drain opening and rotate it to pull out any remaining hair mat from the tailpiece. Rinse the drain with hot water before reassembling.
Reassembly and leak check
Slide the stopper back into the drain, reinsert the pivot rod through the clevis strap, and clip it back into place. Test the lift rod to confirm the stopper opens and closes smoothly. Run water for 30 seconds and check under the sink for drips at the pivot rod connection. Hand-tighten the pivot rod retaining nut if you see any seepage; a quarter-turn with pliers is usually enough to stop a minor drip without risking a cracked fitting.
Pro Tip: Before plunging a sink with the stopper removed, stuff a wet rag into the overflow opening (the small hole near the top of the basin). This seals the pressure path and makes plunging dramatically more effective. Remove the rag before leaving the sink unattended.
From licensed plumbers: “Start mechanical, not chemical. The stopper and tailpiece are where the problem lives 90% of the time — clean those first and you’ll avoid the mess and risk that comes with chemical cleaners.”
When and how should you clean the P-trap?
If cleaning the stopper and tailpiece did not restore normal flow, the P-trap is the next logical stop. The P-trap is the curved U-shaped section of pipe directly under the sink. Its shape holds a small amount of standing water that blocks sewer gases from entering your home, but that same curve also catches hair, soap scum, and small objects that slip past the stopper.
When the P-trap is likely the source
A P-trap clog tends to produce a specific pattern: the sink drains slowly from the start of running water, not just after the basin fills. You may also notice a faint odor even when the stopper is clean, which suggests organic material sitting in the trap. If the slowdown developed over several months rather than suddenly, gradual buildup in the trap is a strong candidate.
What you need
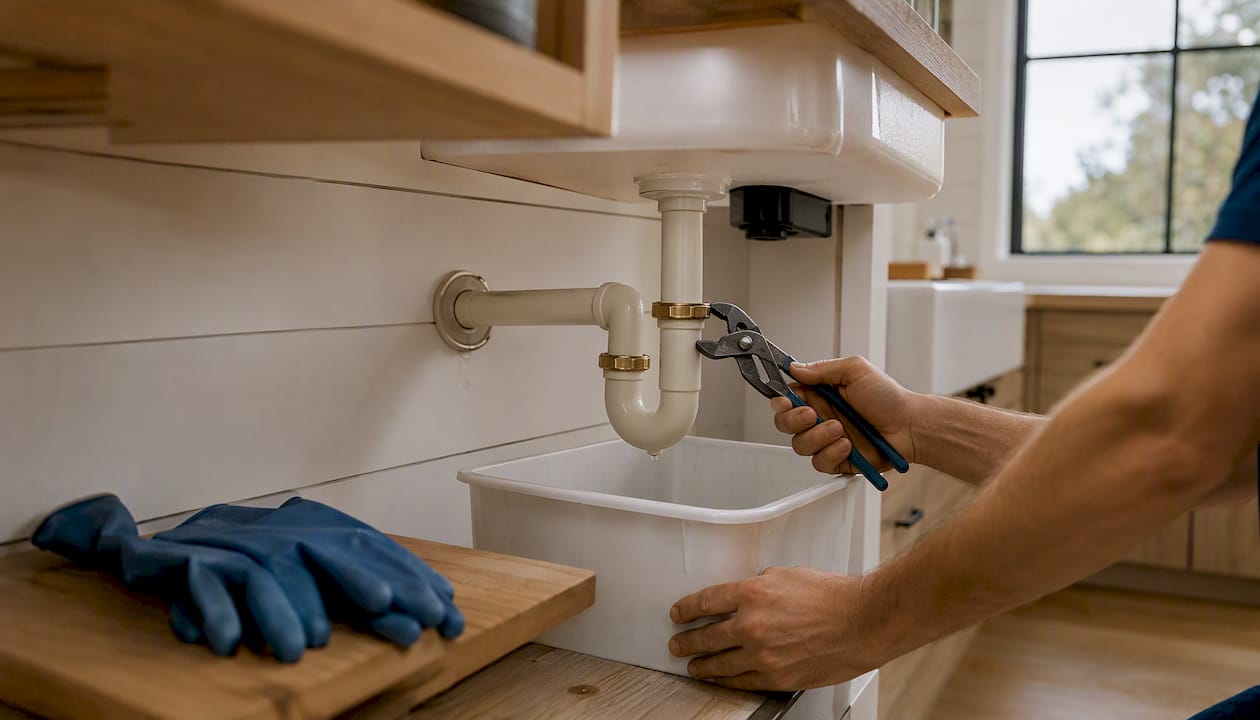
Gather a bucket, rubber gloves, slip-joint pliers, and a few old rags. Have a replacement set of rubber washers on hand — they cost under $5 at any hardware store and are worth replacing if the originals look compressed or cracked. The whole procedure takes 10–15 minutes.
Removing the P-trap
Place the bucket directly under the trap to catch the water inside it. Loosen the slip nuts on both ends of the trap by hand first; on plastic traps, hand pressure alone is usually sufficient. If they resist, use slip-joint pliers with one wrap of a rag to protect the finish. Turn counterclockwise. Once both nuts are loose, slide the trap down and tip its contents into the bucket.
Inspecting and cleaning
Examine the inside of the trap for hair mats, soap buildup, or small objects like a contact lens cap or earring back. Rinse the trap thoroughly under a running faucet and use a bottle brush if needed. While the trap is off, shine a flashlight into the drainpipe going into the wall — if you can see buildup there, a hand auger is the next step.
Reassembly
Check the rubber washers inside each slip nut. If they look flattened or cracked, swap them out now. Slide the trap back into position and hand-tighten both slip nuts. For plastic fittings, hand-tighten first; a gentle quarter-turn with pliers is all you need if a minor drip persists. Overtightening plastic slip nuts cracks the fitting and turns a 15-minute job into a parts run.
Pro Tip: When reinstalling the rubber washers, orient the thin edge of the washer away from the pipe center. That taper is what creates the seal — reversed washers leak even when the nut is tight.
If the trap is clean but the sink still drains slowly, the restriction is deeper in the branch drain or drain line. At that point, a hand auger is the right tool — or it is time to call a licensed plumber if you are not comfortable going further.
How to use a drain snake or hair-removal tool safely
When the stopper and P-trap are both clean and the sink still drains slowly, the blockage is sitting deeper in the tailpiece or branch drain. Two tools handle this well at the DIY level: a plastic hair-removal tool (sometimes called a Drain Weasel or zip-tie style tool) and a hand auger (also called a plumber’s snake or drain auger).
Which tool for which job
- Plastic hair-removal tool / zip-tie style: Best for hair mats in the tailpiece, the vertical pipe section just below the stopper. These tools are inexpensive, flexible, and have barbs that grab hair effectively. Wirecutter and professional plumbers recommend starting with a flexible hair snake for bathroom sink clogs before reaching for anything more aggressive. Expect to pay $3–$10 for a pack.
- Hand auger (drain auger): Better for blockages that sit 12–24 inches or more into the drain line, past where a zip-tie tool reaches. A basic hand auger costs $20–$50 at a hardware store and handles most residential bathroom drain depths. A powered auger is rarely necessary for a bathroom sink and carries a higher risk of pipe damage in inexperienced hands.
How to use a hand auger
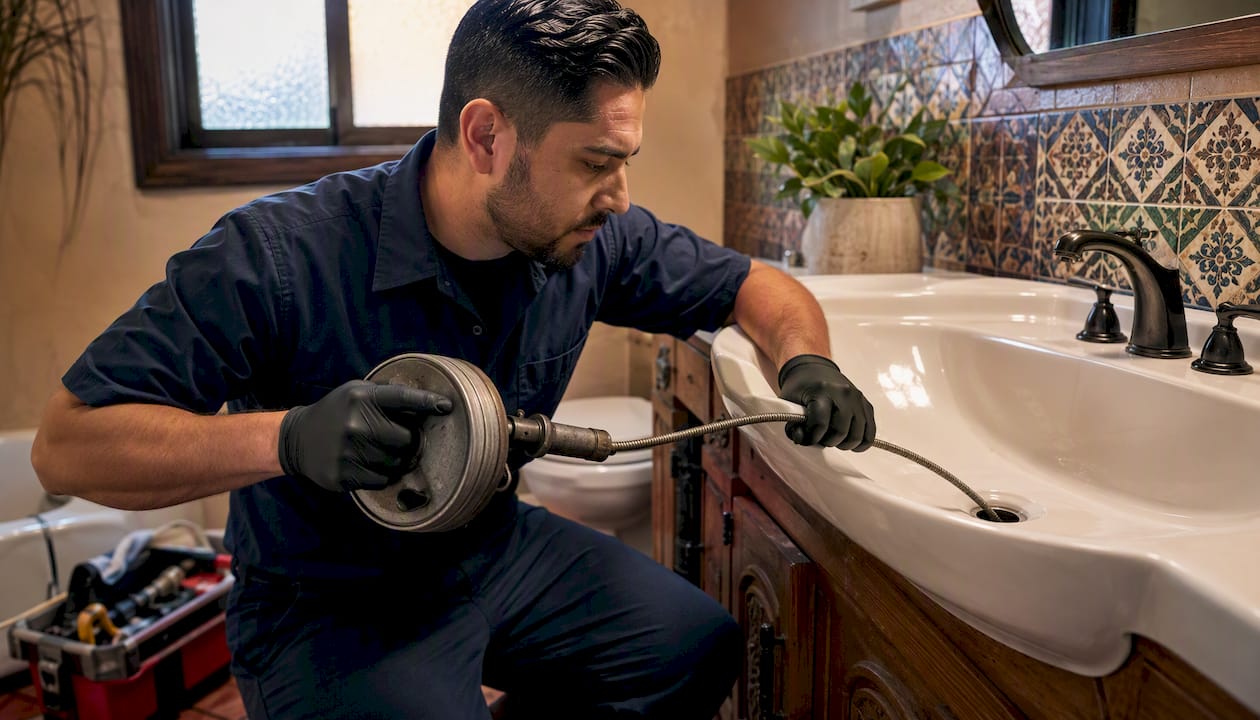
Feed the cable into the drain opening slowly, rotating the handle clockwise as you push. You will feel resistance when the cable tip contacts the clog. Continue rotating while applying gentle forward pressure — the auger tip is designed to break through or hook the mat, not force past it. When you feel the resistance ease or the cable pulls back with weight on it, withdraw the cable slowly while continuing to rotate. Clean the cable with a rag as it comes out. Run hot water for 60 seconds to flush debris and confirm the drain is clear.
Pro Tip: After using a hand auger, wipe the cable clean with a rag dampened with a small amount of dish soap before coiling it for storage. Hair and soap residue left on the cable corrodes the metal over time and makes the cable stiff and harder to feed on the next use.
- Stop immediately if resistance feels hard and immovable — this may indicate a mineral deposit, a collapsed pipe section, or a solid object, none of which a hand auger will clear safely.
- Never force the cable. Excessive pressure can score the inside of PVC pipe or, in older homes, dislodge corroded metal fittings.
- If the auger travels more than 3 feet without clearing the blockage, the problem is likely past the branch drain and requires a professional with a powered auger or hydro-jetting equipment.
For a deeper look at non-chemical drain clearing techniques, Ez-plumbing’s guide covers the full range of mechanical methods with safety notes for different pipe materials.
Why chemical drain cleaners often make the problem worse
The appeal of a caustic drain cleaner is understandable: pour it in, wait, done. The reality is more complicated, and most licensed plumbers advise against them for hair-based bathroom clogs specifically.
Why they often fail
Chemical cleaners work by dissolving organic material through a caustic reaction. The problem is that they require direct contact with the clog, and in a slow-draining sink with standing water, the chemical dilutes before it reaches the blockage. Dense hair mats are also physically resistant — the chemical may dissolve the outer layer while leaving the core intact, giving the impression of a fix that reverses within days.
The damage they cause
Licensed plumbers report that the heat generated by caustic reactions erodes rubber gaskets, damages chrome finishes, and can soften PVC joints over repeated use. When a plumber arrives after chemical use, they often have to neutralize and flush residue before any mechanical work can begin — which adds time and cost to the service call. The risk of chemical burns during that process is real.
| Method | Effectiveness on hair clogs | Pipe compatibility | Safety |
|---|---|---|---|
| Caustic (lye/sulfuric) | Low to moderate | Damages rubber, chrome, PVC over time | High risk — burns, fumes |
| Enzymatic cleaner | Low for dense mats; good for maintenance | Safe for all pipe types | Safe for household use |
| Mechanical (snake, auger, stopper removal) | High | Safe for all pipe types when used correctly | Low risk with proper technique |
Enzymatic cleaners (products like Bio-Clean) work by introducing bacteria that digest organic material over time. They are safe for all pipe types and septic systems, and they work well as a monthly maintenance treatment. They are not fast enough to clear an active clog, but used consistently they slow the rate of buildup significantly. For more detail on risks of caustic chemical cleaners, Ez-plumbing’s breakdown covers what happens inside your pipes after repeated chemical use.
Pro Tip: If you have already poured a chemical cleaner into the drain, wait at least 30 minutes and flush thoroughly with cold water before attempting any mechanical work. Never plunge or snake a drain with active chemical product in it — splashback causes serious burns.
The professional standard: mechanical removal first, enzymatic maintenance after. Caustic chemicals are a last resort for specific clogs (grease in metal pipes, for example) and rarely the right call for a bathroom sink.
Signs your slow drain is a bigger plumbing problem
Most bathroom drain problems are local — stopper, tailpiece, P-trap, or the first few feet of branch drain. But certain symptoms point to something deeper in the system that DIY methods cannot reach.
Stop DIY and call a licensed plumber when you notice:
- Multiple fixtures draining slowly at the same time (two sinks, a tub, or a toilet)
- The toilet gurgles or bubbles when you run the bathroom sink
- Sewage odor coming from any drain, even after cleaning
- Water backing up into the tub or shower when you flush the toilet
- The sink remains slow after completing all steps above (stopper, P-trap, hand auger)
- Recurring clogs that return within a few weeks of clearing
When multiple fixtures are affected simultaneously, the restriction is almost certainly past the branch line, in the main drain or sewer line. That is not a hand-auger situation.
Gurgling deserves special attention. Gurgling sounds accompanying a slow drain typically indicate restricted airflow in the vent stack, not a simple trap clog. Clearing the P-trap will not fix a venting problem — the gurgle will return. A professional diagnostic, which may include a camera inspection of the vent stack or main line, is the appropriate next step. For guidance on gurgling drain causes and what they signal about your plumbing system, that resource provides a useful technical overview.
What to expect from a professional service call:
A licensed plumber’s diagnostic visit typically includes a visual inspection of accessible drain components, a drain test on multiple fixtures, and, when warranted, a camera inspection of the main line. Common repairs at the professional level include powered auger clearing, hydro-jetting for mineral or grease buildup, and sewer line repair for root intrusion or pipe collapse. For mainline issues, sewer line repair is a separate scope from drain cleaning and carries a different cost range.
How to prevent slow drains from coming back
Prevention costs almost nothing and takes minutes per month. The habits and products below keep bathroom drains flowing freely without repeated DIY sessions.
Maintenance schedule:
| Task | Frequency | Time estimate |
|---|---|---|
| Clear and rinse the pop-up stopper | Every few months | 5 minutes |
| Hot-water flush (tap temperature) | Weekly | 2 minutes |
| Enzymatic drain treatment | Monthly | 2 minutes |
| Inspect and clean the P-trap | Annually or after recurring slowdowns | 15 minutes |
| Check hair catcher / drain strainer | Weekly | 1 minute |
Products and habits that make a real difference:
- Hair catchers and drain strainers: A mesh drain strainer that sits over or just inside the drain opening catches the majority of hair before it enters the pipe. They cost $5–$15 and are the single most effective prevention tool available.
- Enzymatic treatments: Monthly use of an enzymatic drain cleaner digests the organic film that accumulates inside pipes and prevents soap-scum buildup from thickening into a clog. Safe for PVC, metal, and septic systems.
- Rinse after grooming: Run the tap for 20–30 seconds after shaving or brushing your teeth. The water flow carries loose debris past the trap rather than letting it settle.
- Avoid flushing excess hair: After brushing hair over the sink, collect loose strands and dispose of them in the trash rather than rinsing them down.
For a full list of drain clog prevention tips that apply to bathroom and kitchen fixtures alike, that resource covers product recommendations and seasonal maintenance considerations in detail.
Ez-plumbing’s guide on preventing drain clogs also covers 10 specific habits and product categories that LA homeowners find practical given the region’s hard water conditions.
What licensed plumbers know that most guides don’t mention
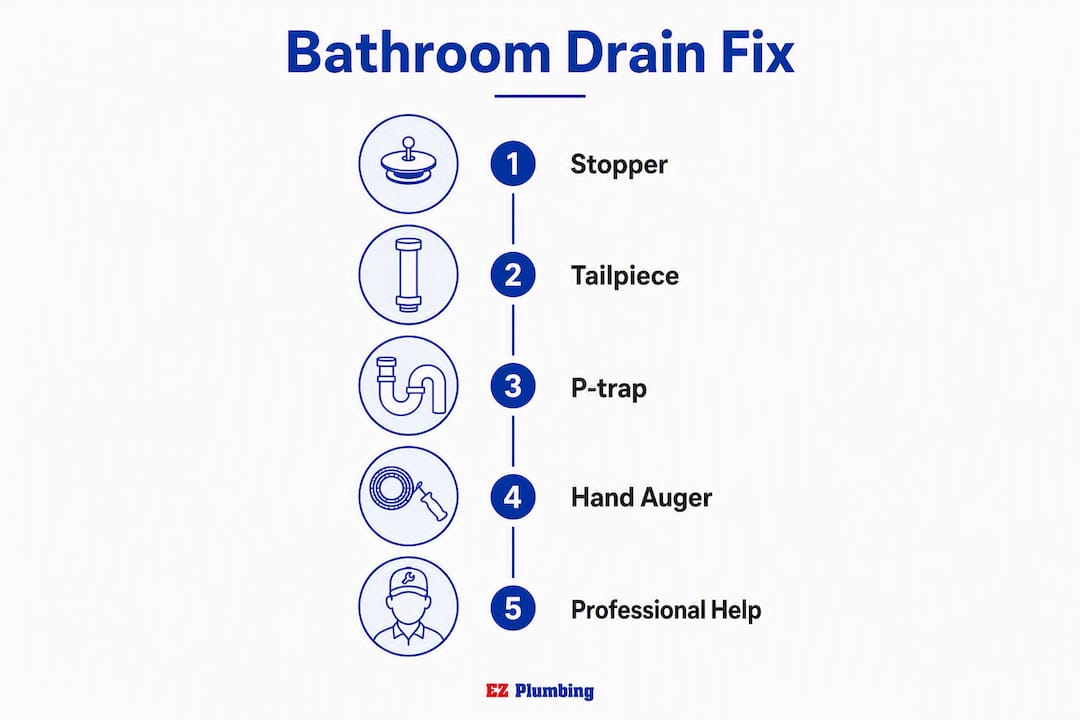
The step order in this guide — stopper, tailpiece, P-trap, hand auger — reflects how professional plumbers actually approach a bathroom sink call. They start at the fixture and move progressively deeper only when each upstream location is confirmed clear. Skipping steps wastes time and, more importantly, increases the risk of pipe damage when tools are used deeper in the system than necessary.
On vent stack diagnostics:
A vent stack runs from your drain system up through the roof and allows air into the pipes so water flows freely. When a vent is partially blocked by debris, a bird nest, or seasonal leaf accumulation, the resulting negative pressure slows every fixture on that branch. A diagnostic test a homeowner can safely run is to observe whether multiple fixtures are slow, listen for gurgling when water drains, and check whether the slowdown is consistent regardless of how recently you cleaned the stopper. If all three are true, the vent stack is a strong candidate. Clearing a vent stack requires roof access and is a job for a licensed plumber.
Questions worth asking a plumber before they start:
- Is this a drain cleaning call or does it require a camera inspection?
- What is the pipe material in this section of the drain line?
- Will hydro-jetting be necessary, or will a powered auger clear it?
- Is there any sign of root intrusion or pipe deformation?
Reassembly best practice from licensed plumbers: “Hand-tighten plastic slip nuts first. If a minor drip remains after the water test, one gentle quarter-turn with pliers is sufficient. Going further risks cracking the fitting — and a cracked slip nut means a parts run and starting over.”
On material-specific handling:
Plastic slip joints (PVC and ABS) need only hand pressure plus a quarter-turn. Metal slip joints (chrome or brass, common in older Los Angeles homes with galvanized or copper drain lines) can take a half-turn with pliers, but check for corrosion at the threads first — a corroded metal slip nut that is overtightened will strip rather than seal.
- Never use pipe dope or thread tape on slip-joint connections — they use rubber gaskets, not threaded seals.
- If a plastic slip nut cracks during tightening, replace the entire trap arm section rather than attempting to patch it.
- For homes with older galvanized drain lines, recurring slow drains despite clear stoppers and traps often indicate internal galvanized corrosion narrowing the pipe interior — a condition that requires repiping, not cleaning.
Key Takeaways
Mechanical removal — starting at the pop-up stopper and moving progressively to the P-trap and hand auger — clears the majority of slow bathroom sink drains without chemicals or a service call.
| Point | Details |
|---|---|
| Start at the stopper | Hair and soap scum at the pop-up stopper or tailpiece cause most slow bathroom sink drains; clean it first. |
| Seal the overflow before plunging | Without sealing the overflow hole, plunging loses pressure and rarely clears the clog. |
| Avoid caustic chemicals | Chemical cleaners damage rubber gaskets and chrome finishes and often fail on dense hair mats; use enzymatic treatments for maintenance instead. |
| Know the red flags | Multiple slow fixtures, gurgling, sewage smell, or recurring clogs after DIY steps signal a mainline or vent issue requiring a licensed plumber. |
| Ez-plumbing for LA homeowners | When DIY steps don’t resolve the problem, Ez-plumbing provides licensed drain cleaning, hydro-jetting, and diagnostic inspections across the greater Los Angeles area. |
Ez-plumbing’s perspective on bathroom drain problems
The steps in this guide represent what our technicians actually do on a service call before reaching for powered equipment. The stopper and P-trap resolve the problem the overwhelming majority of the time, and we would rather a homeowner clear it themselves in 10 minutes than wait for a service appointment they don’t need.
That said, there is a pattern we see regularly in Los Angeles homes: a homeowner clears the stopper, the drain improves for two or three weeks, and then slows again. That cycle usually means one of two things. Either there is no hair catcher installed and the stopper is refilling with hair faster than it is being cleared, or the restriction is deeper in the drain line and the stopper cleaning is only partially relieving pressure. The second scenario is where professional diagnostics earn their cost. A camera inspection of the drain line takes 20 minutes and tells you definitively whether the pipe interior is narrowed by mineral scale, galvanized corrosion, or a partial root intrusion — none of which a hand auger will permanently fix.
Ez-plumbing holds C-36 License #583868 and serves the greater Los Angeles area, including residential and commercial properties. We are fully licensed, insured, and code-compliant with LA municipal requirements. When the DIY steps above don’t hold, we are the next call.
Ez-plumbing drain cleaning services for Los Angeles homeowners
When the stopper is clean, the P-trap is clear, and the drain is still slow, the problem is past what a hand auger can safely reach.

Ez-plumbing’s drain cleaning services cover the full range of bathroom plumbing issues: manual snaking, powered auger clearing, hydro-jetting for mineral and soap-scum buildup, and camera diagnostic inspections for mainline and vent-stack problems. We serve residential and commercial properties throughout the greater Los Angeles area, with 24/7 emergency availability for backups and sewage situations that cannot wait.
If your sink is draining slowly despite completing the steps above, or if you are seeing any of the red-flag symptoms (multiple fixtures, gurgling, sewage odor), contact Ez-plumbing to schedule a diagnostic visit. You can reach us through our drain cleaning service page or by phone for same-day appointments when availability allows.
Useful sources for further reading
- What Plumbers Wish You Knew Before Unclogging Your Sink — Wirecutter: Professional plumber interviews covering mechanical removal techniques, tool recommendations, and why caustic chemicals are a poor first choice for hair clogs.
- Why Is My Bathroom Sink Not Draining — HomeFixer101: Practical homeowner guide with step-by-step stopper and P-trap procedures and clear guidance on the priority order of fixes.
- How to Unclog a Drain: Diagnosis, Tools, and Safe Fixes — WonderHowTo: Covers enzymatic treatments, hot-water flushing limits, and the multi-fixture red flag for mainline problems.
- Slow-Draining Bathroom Sink — JohnSewer: Detailed explanation of overflow sealing for effective plunging and multi-fixture diagnostic guidance.
- Boiling Water and Clogged Drains — YouTube: Short video covering when hot water helps and when it risks deforming PVC joints.
- Bathroom Sink Draining Slowly: Causes and Diagnosis — Drainigo: Thorough breakdown of partial blockage causes, symptom patterns, and when to escalate to a professional inspection.
- How to Unclog a Bathroom Sink — Architectural Digest: Plumber-sourced guidance on plunging technique, zip-tie hair removal, and honest assessment of baking soda and vinegar’s limitations.
- How to Unclog a Blocked Drain Step by Step — InspectAPedia: Comprehensive technical reference covering plunger technique, plumbing snake use, and kinetic water ram methods for stubborn blockages.
- Ez-plumbing: How to Fix Slow Drains: Ez-plumbing’s overview of expert-recommended DIY approaches with safety notes for different pipe materials.
- Gurgling Drains: Causes, Solutions and Expert Tips — AG-Plumbing: Technical explanation of vent-stack behavior and what gurgling sounds indicate about airflow restrictions in your drain system.
For issues that go beyond the sink drain — including mainline backups, sewer odor, or recurring clogs across multiple fixtures — contact a licensed plumber for a proper diagnostic. DIY methods are effective for local, near-surface blockages; anything deeper in the system carries real risk of pipe damage without the right equipment and training.