
Diagnose a Shower Leak Through the Ceiling in 5 Minutes for Homeowners
If water is coming through the ceiling below your shower, the cause is almost always a failed pan liner or worn-out grout and caulk, not a broken pipe. When the leak only shows up during or right after a shower, that’s a strong sign. If it never stops, even hours after the water’s off, you’re likely dealing with a pressurized supply line, and that calls for a licensed plumber right away.
TL;DR:
- Most ceiling leaks during or after a shower indicate faulty pan liners or worn grout and caulk, not a broken pipe, especially if the leak stops when water is off.
- Conducting timing, fill, and drain tests within the first few minutes helps identify whether the leak stems from the pan, drain seal, or supply line, and reveals urgency.
- Leaks that persist long after the shower is off usually involve pressurized plumbing, requiring immediate attention from a licensed plumber rather than DIY repairs.
- Repair costs vary widely, with simple caulking or grout fixes costing $20 to $50, drain reseals around $150 to $350, and full pan replacements reaching up to $5,000.
- Drying and inspecting the ceiling before repairs prevent repeated work and mold growth, and documentation benefits insurance claims when leaks are promptly reported.
Table of Contents
- What To Do Right Now if You Have a Shower Leak Through the Ceiling
- How Do You Find Where a Shower Leak Is Coming From?
- What Usually Causes a Shower Leak That Reaches the Ceiling?
- Should You Fix a Shower Leak Yourself or Call a Plumber?
- How Long Does It Take To Fix a Shower Leak and Repair the Ceiling?
- What Order Should You Dry and Repair a Leaking Ceiling?
- EZ Plumbing: What We Look For When Diagnosing a Shower Leak
- The One Question Most Guides Skip
- Get a Licensed Diagnosis Before the Damage Spreads
- Sources
What To Do Right Now if You Have a Shower Leak Through the Ceiling
The first few minutes matter more than most homeowners realize. Move fast, but move carefully.
- Shut off the shower. If your shower has its own shutoff valve, use it. If not, shut off the water supply to the bathroom, or the main shutoff for the house if you can’t isolate it.
- Kill the power near the leak. If water is dripping anywhere close to light fixtures, outlets, or a fan, cut the breaker for that circuit at the panel. Never touch a wet switch or fixture.
- Contain the drip. Set a bucket or a folded tarp under the leak to catch runoff and protect flooring or furniture below.
- Check for a dangerous ceiling bulge. A sagging, water-filled ceiling can collapse without warning. If it’s visibly ballooning, puncture the center with a screwdriver and let it drain into a bucket rather than waiting for it to give way on its own.
- Photograph everything. Wide shots of the room, close-ups of the stain, and a note of the date and time all matter if you end up filing an insurance claim.
Pro Tip: Save every receipt for buckets, tarps, or emergency repairs you buy in the first 24 hours. Insurers ask for this documentation more often than people expect, and it’s much easier to grab it now than to reconstruct it later.
Once the area is stabilized, resist the urge to start cutting into drywall. Getting the right trade on the phone before you start demolition preserves evidence of exactly how the water traveled, which matters both for diagnosis and for a claim.
How Do You Find Where a Shower Leak Is Coming From?
Before you call anyone, three low-risk tests will tell you most of what a plumber needs to know.
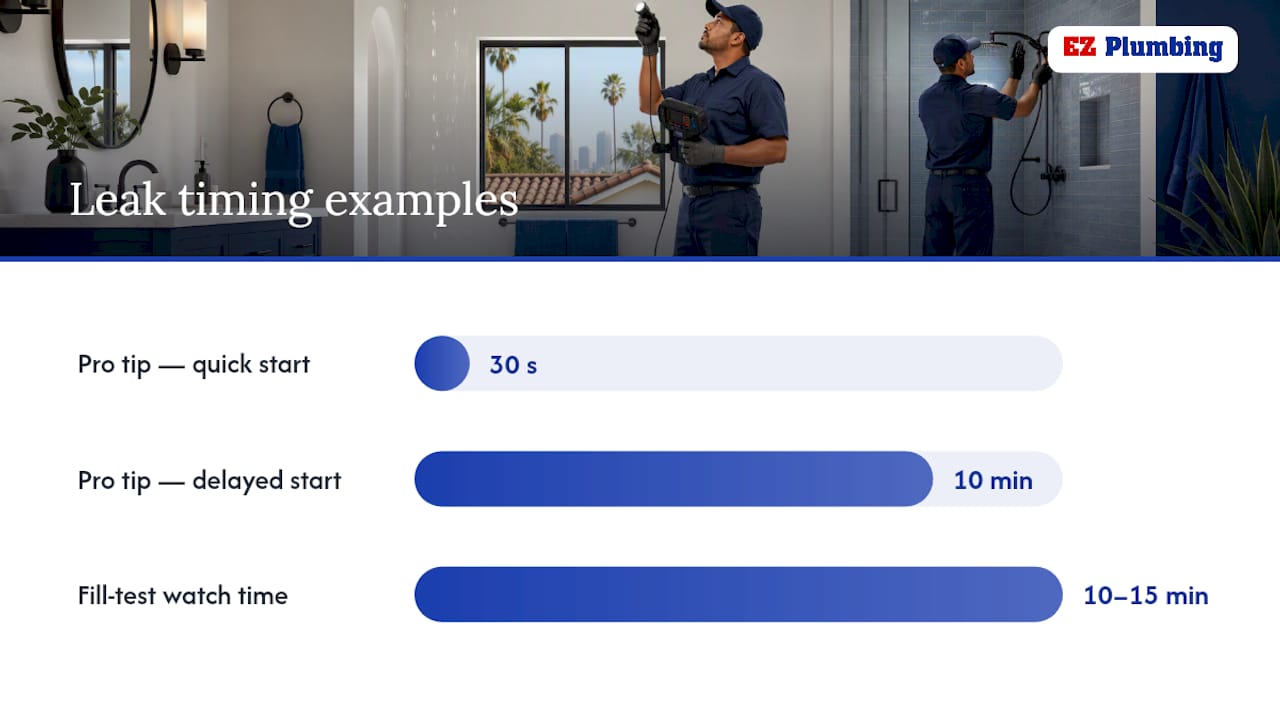
- Run the timing test. Turn on the shower and time how long it takes for the ceiling drip to start. Then shut the water off and watch. A leak that appears only during use and stops within a few minutes usually points to the shower pan or drain seal. A leak that keeps dripping long after the water is off means pressurized plumbing, which is a different problem and a more urgent one.
- Run the fill test. Block the drain with a stopper or a rag, add about an inch of standing water to the shower floor, and watch the ceiling below for ten to fifteen minutes. If it leaks, the pan liner or drain seal is the likely culprit. If nothing shows up, open the drain and let the water run out while you watch closely, which helps separate a pan problem from a drain problem.
- Watch the drain itself. Loosen or remove the strainer and look for water tracking around the outside of the drain body as it empties rather than going straight down through it. Water sneaking around the drain flange, instead of through it, points to a failed drain seal rather than a pan-wide membrane failure.
- Map the stain. Note exactly where the ceiling stain sits relative to the shower drain, the valve, and the front edge of the enclosure. A stain centered under the shower floor suggests the pan or membrane. A stain near the valve suggests a supply-line leak. A stain near the front edge suggests door or curtain overflow rather than a plumbing failure at all.
A moisture meter or a thermal camera can speed this up considerably, since they show wet framing and insulation before a stain ever reaches the ceiling surface. That’s the same equipment professionals reach for on a diagnostic visit. If any test reveals a leak that keeps flowing after the shower is off, or you notice exposed wiring anywhere near the wet area, stop testing and call a plumber. Continued testing at that point risks a shock hazard or worse water intrusion for no additional information.
Pro Tip: Do the fill test with someone else in the house so one person can watch the ceiling while the other manages the water. A leak that starts thirty seconds after filling looks very different from one that takes ten minutes, and it helps to have two sets of eyes on the timing.
What Usually Causes a Shower Leak That Reaches the Ceiling?
Each of these has a distinct pattern once you’ve run the tests above.
- Failed shower pan liner or membrane. The leak shows up during use, the stain centers under the shower floor, and it tends to get worse the longer the water runs. This one requires replacing the membrane, not just patching the surface.
- Deteriorated grout or caulk at the wall-floor joint. You’ll usually see cracked or missing caulk right where the wall meets the shower floor, and the leak tracks to that seam. If the membrane underneath is still intact, regrouting and applying fresh 100% silicone caulk solves it.
- Leaking drain assembly. The stain sits directly under the drain, and the leak coincides with draining rather than showering. This is often a loose or degraded seal around the drain body, and it’s a much narrower fix than a full pan replacement.
- Mixing valve or supply line leak. The leak continues no matter whether the shower is running, and the stain appears near the faucet or valve rather than centered under the floor. This is a plumbing repair inside the wall, not a waterproofing issue, and it needs a licensed plumber.
- Door, curtain, or threshold overflow. Water pools on the bathroom floor at the threshold before it ever reaches the ceiling, and the stain lands near the front edge of the shower. A worn door sweep or a curtain that doesn’t fully contain splash is often the whole story here.
Two of these five causes account for most calls Ez-plumbing gets on this topic: a worn pan liner and a compromised drain seal. Both share a telltale trait: the leak follows water use, then tapers off once the shower has been off for a while. A leak that ignores that pattern and just keeps dripping is the one worth treating as urgent.
Should You Fix a Shower Leak Yourself or Call a Plumber?
Some of these repairs are genuinely within reach for a reasonably handy homeowner. Others are not, and getting that distinction wrong wastes money and sometimes makes the damage worse.
- Recaulk the wall-floor joint. Strip out the old, cracked caulk completely, let the surface dry, and apply a fresh bead of 100% silicone. Give it a full 24 hours to cure before running water again.
- Regrout small cracks. If the grout lines show hairline cracking but the tile itself is sound, regrouting those joints can resolve a minor leak without touching the membrane.
- Reseal an accessible drain clamp ring. If the drain assembly is a two-piece clamping style and you can access it from below, tightening or resealing the clamp ring sometimes stops a drain leak outright.
Beyond that, hand it off. Red flags that mean call a plumber immediately: a leak that continues after the water is off, a ceiling that’s visibly sagging, moisture anywhere near wiring, a persistent mold smell, or a stain pattern suggesting long-term seepage rather than a fresh event.
When you do call someone, ask directly about their license, whether they carry a moisture meter or thermal imaging equipment, whether their visit includes invasive access if the noninvasive tests are inconclusive, and what warranty they offer on a pan replacement or waterproofing membrane. A vague answer to any of those is worth noting.
What repairs typically cost: A DIY reseal or regrout runs $20 to $50 in materials. A professional drain reseal typically lands between $150 and $350. Full pan replacement, which involves demo and retiling, runs $1,500 to $5,000. Valve or pipe repairs vary widely depending on how much wall access the plumber needs.
If a temporary patch is all you can manage before a professional arrives, that’s fine as a stopgap. Just don’t treat it as the fix.
How Long Does It Take To Fix a Shower Leak and Repair the Ceiling?
The repair path you’re on determines both the timeline and what parts of your bathroom get touched.
- Minor fixes like recaulking, regrouting, or a drain reseal are usually a one to two day job once you count cure time, and a handy homeowner can tackle the caulk and grout portions without hiring anyone.
- Full pan or membrane replacement is a bigger project: demo the old pan, install a modern waterproofing system such as Kerdi or RedGard, then retile. Expect 3 to 5 days plus drying time before the shower is usable again. The cost jumps here mainly because of the tile demo and reinstallation labor, not the membrane material itself.
- Supply or mixing valve repairs usually mean opening the wall behind the shower to reach the valve, pressure-testing the line once it’s repaired, then patching and refinishing the wall or ceiling. That patch work adds a day or two on top of the plumbing repair itself.
On insurance: sudden, accidental water damage is often covered under a standard homeowner’s policy, but long-term seepage from a slow leak is frequently excluded. That’s exactly why documenting the leak and reporting it promptly, rather than living with a slow drip for months, matters for your claim as much as for your ceiling.
What Order Should You Dry and Repair a Leaking Ceiling?
Fix the source before you touch the ceiling. Repairing drywall over an unresolved leak just means paying for the same repair twice.
- Dry the cavity first. Once the leak source is stopped, run fans and a dehumidifier on the affected area. If you suspect the insulation or subfloor is saturated, open it up and inspect within 48 hours rather than waiting and hoping.
- Watch for mold. A musty smell, discoloration spreading beyond the original stain, or visible fuzzy growth means it’s time to bring in a mold remediation professional rather than handling it yourself.
- Repair the ceiling in order. Remove the damaged drywall, replace any waterlogged insulation, install new drywall, prime with a stain-blocking primer, then paint.
- Expect the cost to scale with damage. A simple drywall patch typically costs a moderate amount, varying by extent of damage. A fuller restoration job costs more depending on how far the water traveled and whether mold remediation is involved.
EZ Plumbing: What We Look For When Diagnosing a Shower Leak
Ez-plumbing is a licensed plumbing contractor (C-36 License #583868) serving homeowners and property managers across the greater Los Angeles area. When we diagnose a shower leak through a ceiling, we start with noninvasive moisture mapping and targeted leak detection to trace the water path before opening anything. We run timed water tests to separate drain and pan issues from pressurized supply problems, then document findings for your insurance file. Expect a clear scope of work after the inspection, not guesswork.
The One Question Most Guides Skip
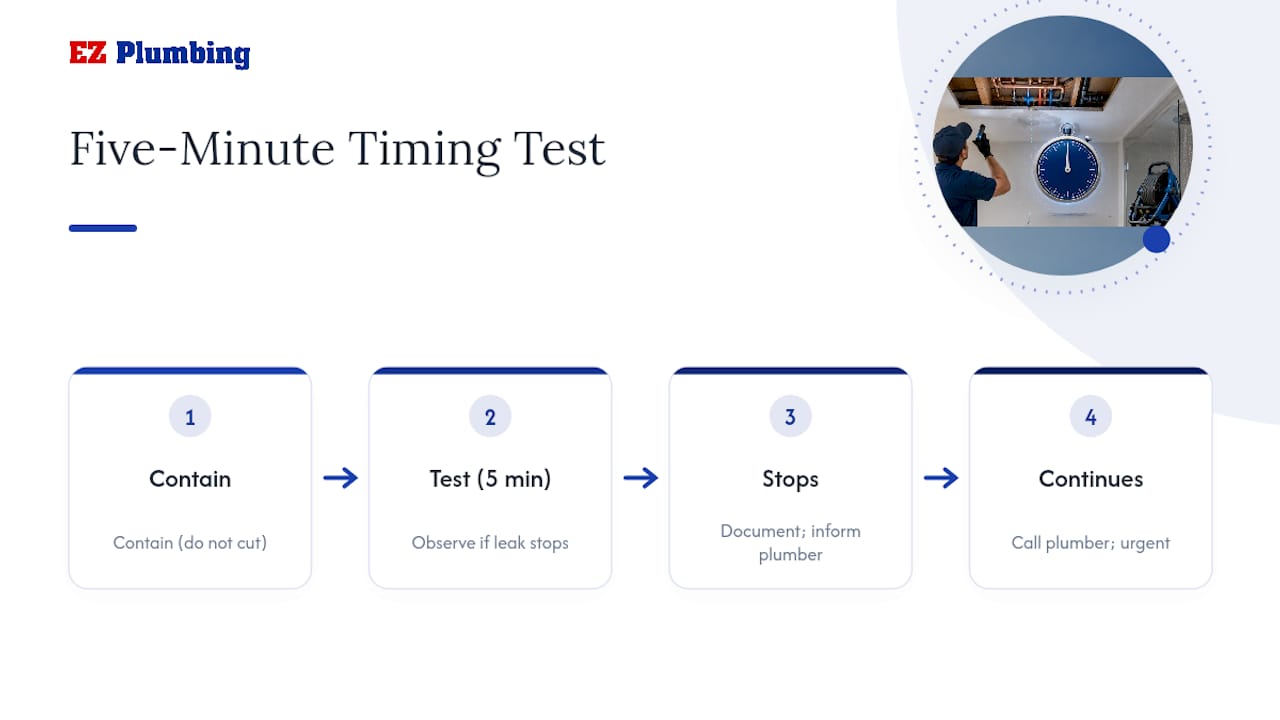
Most articles on this topic walk you through causes and fixes, but they underplay the single question that actually determines urgency: does the leak stop when the water stops? That timing test costs nothing, takes five minutes, and tells you more than a dozen paragraphs about grout chemistry ever will.
The conventional advice to “call a plumber at the first sign of a leak” isn’t wrong, but it skips the step that helps you make that call an informed one instead of a panicked one. A homeowner who runs the timing and fill tests before dialing a number can tell a plumber exactly what they’re walking into, which tends to make the visit faster and the diagnosis sharper.
Where the advice falls short: too many guides frame every ceiling stain as an emergency requiring immediate demolition. That’s often unnecessary and sometimes counterproductive, since cutting into a ceiling before you’ve traced the water path can destroy the evidence you need for both diagnosis and your insurance claim. Contain, test, document, then act. In that order.
— EZ
Get a Licensed Diagnosis Before the Damage Spreads
A pan liner, a drain seal, or a hidden supply line leak all look similar from the ceiling, but they need very different repairs. Plumbing contractors may bring moisture mapping and detection equipment to inspections to provide a real diagnosis instead of a guess before any wall or ceiling gets opened.

When you book an inspection, expect a technician to run the same timing and fill tests covered here, confirm the source with leak detection equipment, and hand you a clear, written quote before any repair work starts. If the cause turns out to be a plumbing issue rather than a waterproofing failure, that diagnosis alone can save you from paying for a pan replacement you never needed. Schedule a leak detection visit with Ez-plumbing and get the leak traced and stopped before it costs you a ceiling.
Sources
- Why Is My Shower Leaking Through Ceiling? (5 Causes, Ranked)
- When shower pans fail: causes, signs, and how to prevent water damage
- My Ceiling Is Leaking, Who Do I Call?
- How to detect a water leak inside a wall — Premier Fire and Water Restoration